
|
Home
| pfodApps/pfodDevices
| WebStringTemplates
| Java/J2EE
| Unix
| Torches
| Superannuation
|
| About
Us
|
|
|
Pulsed Outputs for Arduino using pfodApp V2™
|
by Matthew Ford 5th June 2016 (originally
posted 13th September 2015)
© Forward Computing
and Control Pty. Ltd. NSW Australia
All rights reserved.


This page shows you how to use the free app, pfodDesignerV2, to design a menu on your Android mobile that will pulse an output on your Arduino board without you having to write any code at all. The pfodDesignerV2 generates the Arduino code required to connect to pfodApp and display the button and then pulse the output when the user presses the button. You can choose any pulse duration from 0.1sec to 50days.
Typical uses for this are:-
Remote Garage door
control where you want to simulate someone pressing the garage door
push button by pulsing a relay for a few tenth's of a second.
Fish
Tank Feeder where you want to turn off the aeration in the fish tank
for feeding and have it come back on automatically after three
quarters of an hour.
Irrigation Control where you want to turn on
the watering system for a few hours.
This page will cover the first two examples. The first example, the Garage Door control, only needs a short pulse. Less than 1 sec. A simple button to start the pulse is all that is needed. The second and third examples have longer pulses and when the you connect with pfodApp you would like see if the output is on or off so an On/Off slider is used. Also if you happen to be connected when the pulse times out you would like to see the display updated. To do this a re-request interval is set for the menu so that pfodApp re-request the menu at regular intervals to display the current setting of the output.
This section of the tutorial will design a simple one button menu for your Android moble. When the user presses the button, the associated output on the arduino board will pulse for 0.7sec and the connected relay will short out the garage door push button, as if someone had pressed, so opening or closing the garage door.
The steps are:-
i) Install the
free pfodDesignerV2
app, V2.0.2082+, on your Android
mobile.
ii) Design the menu button and select the Arduino output
to be pulsed and set the duration for 0.7sec
iii) Use
pfodDesignerV2
to generate the Arduino code.
iv)
Copy the code to your computer and program your Arduino.
v)
Connect a relay to the Arduino output and wire the relay contacts
across the garage door push button. Add a communication shield to
your Arduino, either Bluetooth, WiFi or SMS
vi) Purchase and
install pfodApp
on your mobile. When you connect your designed menu will be display
exactly as you designed it.
vii) Connect and press the button to
open or close your garage door.
Download and install the free (and advertising free) pfodDesignerV2 app, V2.0.2082+, to your Android mobile.
Open the pfodDesignerV2 and select “Start new Menu”
Click
“Add Menu Item”

Choose
“Output On/Off or Pulse” option

Now
this button will only pulse the output for 0.7sec so there is not
need to display the current state of the output Low/High.
First remove the slider by clicking on the “Display Text and Slider” button until is shows just “Display Text only”

Then
if you click on the “Output is Low” button it toggles
between “Output is Low” and “Output is High”
For the Garage Door Push Button, edit the Leading Text to “Garage Door Push Button” (Insert a return between Door and Push) and delete the Low and High texts.

Complete
the formatting by setting the font bold and font to Blue and font
background to Silver and font size to +4, what ever format suits
you.
Connect this button to an Arduino I/O pin, say D3

Then
click on “Output is not pulsed” button to set the pulse
type and duration.

From
this screen you can set the output to pulse high or low or not at
all. If your relay is low triggered, then move the slider half way to
Pulsed Low, otherwise if your relay is high triggered, then you to
move the slider to Pulsed High. In this example we will assume a high
triggered relay is being used. So sliding the slider to Pulsed High
displays the duration settings.

On
this screen you can slide the “Set the Seconds” slider
along to choose to set the seconds, minutes, hrs and days you want.
In this example we only want a short 0.7sec pulse so slide the 1/10's
slider to 0.7

Go
back to the previous screen to see the completed settings

Go
back and select “Preview Menu” to see the whole completed
menu exactly as it will display in pfodApp.

To
get rid of the default prompt text <prompt not set> go back and
choose Edit Prompt and then Edit prompt text and delete the default
text and leave it empty. No need for a prompt as the button will says
it all

Then
go back and preview the menu again.

That
is it. Menu design finished. If you want to move the button further
down on your screen you can add a space above it. See this
pfodDesignerV2
Spacer tutorial. Once you have added a spacer you can move it
above the button.
Go back from the preview screen and select Generate Code.

The
default settings for code generation are for a communication shield
the connects the the Arduino via Serial (D0, D1) at 9600 baud. You
can click on the “Change Target” to get a selection of
other Arduino boards and shields to generate code for.
Clicking “Write Code to file” writes the Arduino Sketch to /pfodAppRawData/pfodDesignerV2.txt file in your mobile.
There are various ways of transferring the generated code to your PC. You can use the free Wi-Fi File Transfer app by SmarterDriod (I actually purchased the Pro version). It lets you open a web page to browse your mobile's file system. You can navigate to /pfodAppRawData/pfodDesignerV2.txt from the “Internal Storage” tab and them open the pfodDesignerV2.txt file in a web page and copy and paste it into the Arduino IDE.
The compile and download the code
to your Arduino. Remember to remove the communication shield first so
that it does not interfere with the programming of your Arduino
board.
GarageDoorPulseExample.ino
contains the code generated by pfodDesignerV2 for this example.
Connect a relay to the Arduino output you chose when designing the menu. See How to Add Relays to Arduino for details on adding a relay to your arduino. Wire up the relay contacts across your existing garage door push button. See Android controlled Garage Door Remote.
Plug your communication shield back into your arduino board. A bluetooth or WiFi shield are most common. See Single Click Control of on/off device from your Android mobile or Cheap/Simple Wifi Shield for Arduino and other micros.

You
can also use an SMS shield see Reliable,
Secure, Customizable SMS remote control, but you need to go back
and select this shield on the pfodDesignerV2 and re-generate the
code.
In order to display the menu you have designed you need to have pfodApp installed on your mobile. After you downloaded pfodApp, setup a connection to your Arduino communication shield. See the pfodAppForAndroidGettingStarted.pdf for details on how to set up the connection. Name the connection Garage Door.

When you connect, the arduino sketch code will send the message to display the menu you designed and let you click the button to pulse the relay to open the garage door.
The second example has a longer pulse, about 45mins. For short pulses, a second or so, like the garage door above, a simple button is suitable as the pulse finished quickly and you don't need to know what state the output is in. However for longer pulses you want to know what state the output is in, has the pulse finished. In these cases an On/Off Slider showing both the text and slider is more suitable. In order to have the slider show the current state of the output, the pfodApp also needs to regularly re-request the menu to get the current state of the output.
The steps for this design are very
similar to the previous on.
i) Install the free pfodDesignerV2
app, V2.0.2082+, on your Android
mobile.
ii) Design the menu button and select the Arduino output
to be pulsed and set the duration for 45mins. Add a menu re-request
time.
iii) Use pfodDesignerV2
to generate the Arduino code.
iv)
Copy the code to your computer and program your Arduino.
v)
Connect a relay to the Arduino output and wire one of the fish tank's
low voltage cables to the relay contacts so that the relay turns the
aeration on and off. Add a communication shield to your Arduino,
either Bluetooth, WiFi or SMS
vi) Purchase and install pfodApp
on your mobile. When you connect your designed menu will be display
exactly as you designed it.
vii) Connect and press the slider
button to turn off the aeration for 45mins. You can override the off
period by pressing the button again. If you happen to be connected
when the pulse completes, the slider will update to show the aeration
has turned on again.
Read through the previous example and then follow modifications below.
Start pfodDesignerV2 and “Start new Menu”
Click “Add Menu Item”
This
time choose “Output On/Off or Pulse”

Try
pressing the “Output is Low” button a few times to see
how it changes from Low to High. Clicking anywhere in the button will
toggle it.
Click the “Edit Leading Text” and change
it to “Aeration is “. Note the space at the end of the
text.
Click the “Edit Low Text” and change the text to
Off. Click the “Edit High Text” and change the text to
On.
Click the “Not connected to an I/O pin” and select
D3, or some other suitable output pin.
Set the font bold and font
to Blue and font background to Silver and font size to +4, what ever
format suits you.

Try
click the Aeration is On button again and watch how is changes
between On and Off.
Scroll down and click on “Output is not pulsed” to set the pulse type and duration. If you are using a high trigger relay then you want the aeration to be on most of the time and a low pulse to turn it off for 45mins. So move the slider to “Pulsed Low”. If your relay is low triggered select Pulsed High instead.

Now
to set 45mins duration, slide the “Set the Seconds”
slider until it reads “Set the Minutes”. When you release
the slider the screen will update with the sliders for setting the
minutes and tens of minutes. Set 45 mins.

The
go back and if you scroll down you can see that the pulse direction
and duration has been set. For testing you might like to set a
shorter time, say 1 min or 30 secs and then set the longer time, and
re-generate the code, once you are sure everything is working.

Then
go back and preview the menu

Then
go back and clear out the prompt text by clicking on the Edit Prompt
and then clicking on Edit Prompt Text and deleting the default text.
Preview the menu again.

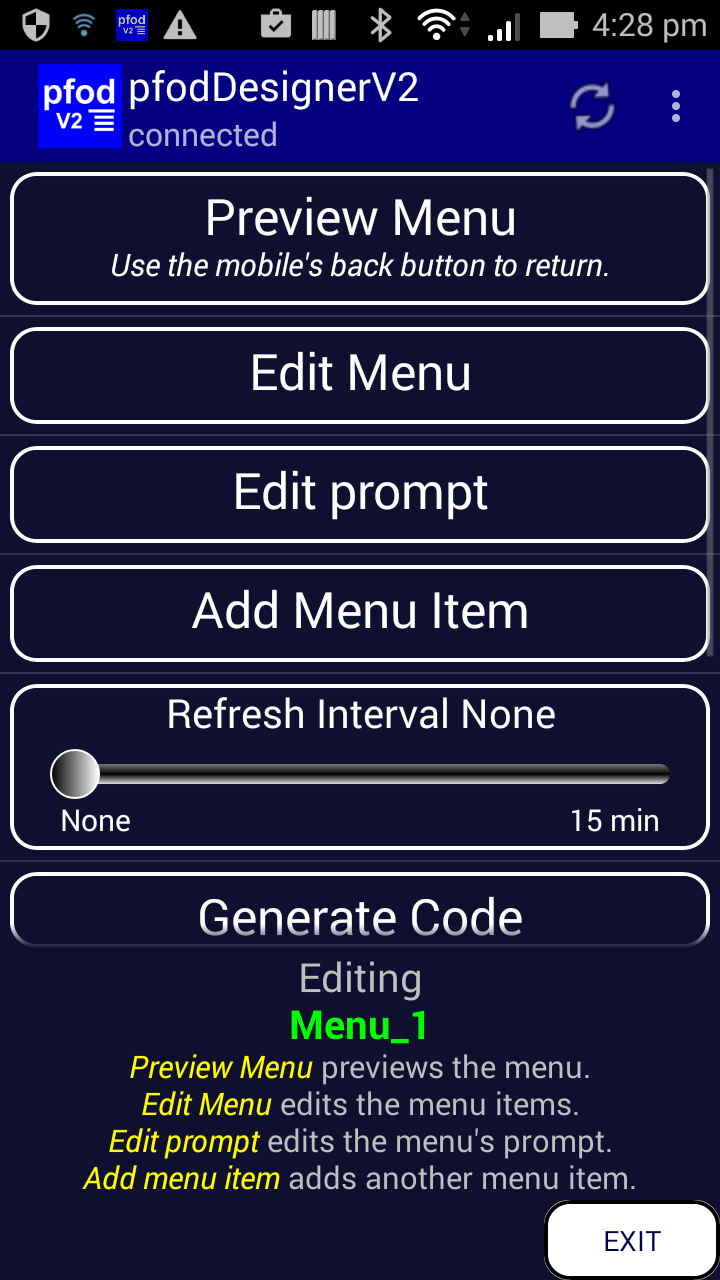
Finally on the Editing Menu_1 slide the Menu Refresh Interval until is reads 1 sec. This will add a re-request time to the menu sent to from the arduino to the pfodApp, so that the pfodApp will re-request the menu once a second. That way the Aeration display will be updated to the current state of the fish tank when the pulse times out.

That's
it. Design finished.
Then complete steps iii) through vi) as in the previous, Garage Door, example, to generate the code, transfer it to the pc and compile and download it to your Arduino. Plug the communication shield back in. FishTankExample.ino contains the generated code.
Set up a connection in pfodApp to connect to the communication shield of your Fish Tank control. See the pfodAppForAndroidGettingStarted.pdf for details on how to set up the connection. Name the connection Fish Tank.

Click
on the Fish Tank connection to connect. The menu you designed is
displayed and you can turn off the aeration and it will turn on again
after 45 mins. or you can manually turn it on again using this menu.
You don't need to keep the pfodApp connected to keep the pulse running. Once the aeration is turned off, the pulse will start and you can close pfodApp. When you connect again, pfodApp will request the menu and will display the current state of the aeration. pfodApp will then continue to re-request the menu once a second while it is connected to keep the display up to date with the state of the fish tank relay.
The tutorial showed how to use pfodDesignerV2 to make a menu that would pulse an Arduino output. Two types of menus buttons were shown. For short pulsed, a second or so, a simple toggle button is sufficient as the output returns to the initial state quickly. For longer pulses, an on/off slider was used to display the current state of the output. As a re-request interval was added to the menu so that the pfodApp would to re-request the menu at regular interval to display the current state of the output.
None of this required any programming. The pfodApp handles all the Android code and the pfodDesignerV2 generates all the necessary Arduino code.
pfodDesignerV2TM
is a trademark of Forward Computing and Control Pty. Ltd.
AndroidTM
is a trademark of Google Inc. For use of the Arduino name see
http://arduino.cc/en/Main/FAQ
The General Purpose Android/Arduino Control App.
pfodDevice™ and pfodApp™ are trade marks of Forward Computing and Control Pty. Ltd.

Contact Forward Computing and Control by
©Copyright 1996-2020 Forward Computing and Control Pty. Ltd.
ACN 003 669 994