
|
Home
| pfodApps/pfodDevices
| WebStringTemplates
| Java/J2EE
| Unix
| Torches
| Superannuation
| CRPS Treatment
|
| About
Us
|
|
|
Non Blocking Modbus Master Library
|
by Matthew Ford 17th Feb 2026 (original 24th February
2025)
© Forward Computing and Control Pty. Ltd. NSW
Australia
All rights reserved.
Update 17th Feb 2026 – V1.0.3 added pre/postTransmission hooks to allow control of hardware send/receive direction pins. See Uno_modbus_halfDuplex example.
Why this project? Version 2 of the Solar Hot Water Battery, uses two modbus devices to measure the 3 phase power and hot water kWhrs. It takes six (6) modbus commands to collect the complete system state. These six commands take between a half to three quarters of a second (0.5s to 0.75s) to complete, assuming there are not timeouts. This library allows those six commands to be executed as a single block while still letting the loop() continue run at high speed to handle push button inputs and Serial commands. If one of the block's commands times out, this library also allows that command to be retried before continuing with the other commands.
The NonBlockingModbusMaster library has the
following features:-
– With suitably sized serial TX and
RX buffers, it is completely non-blocking.
– No callback
methods are necessary for single command non-blocking use.
–
Uses RTU modbus and works with any Arduino Stream object
–
Supports multiple device IDs.
– Has a simple command
chaining facility to group commands together in a single executable
non-blocking block.
– Has a retry()
method for use when the command times out (or
other some other error occurs)
– Has oneTimeDelay()
method to insert an extra pre-command delay. e.g.
when switching between device ID's
– Supports optional
results processing functions that are called when the command
completes.
– Runs on UNO with software serial while
maintaining responsive Serial and other loop() processing.
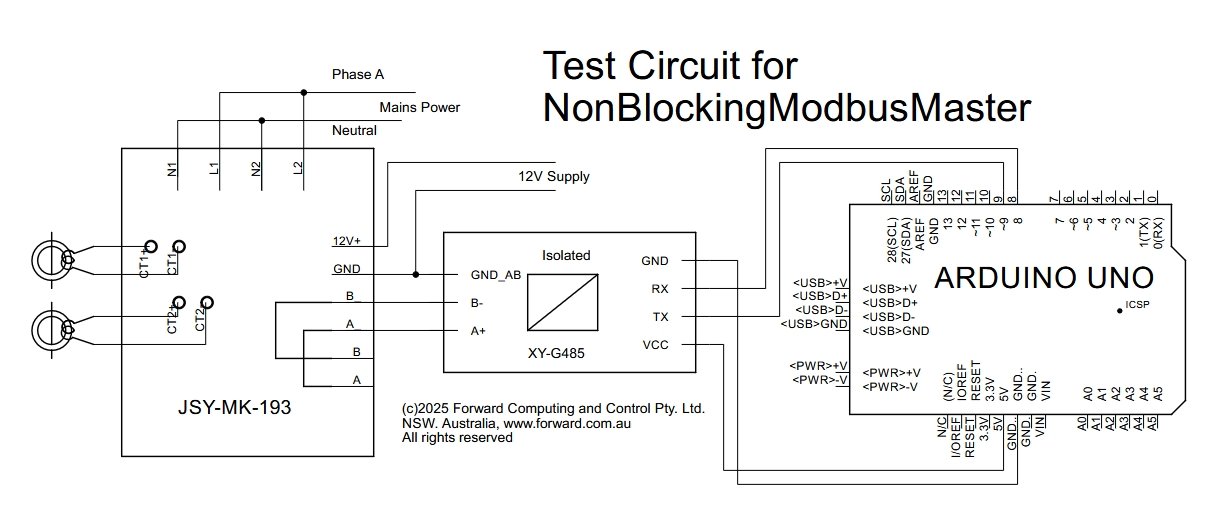
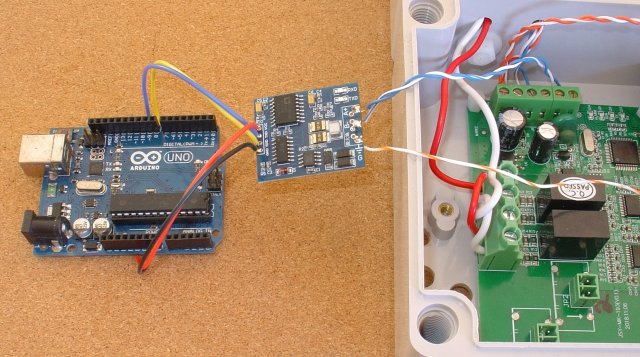
This tutorial uses an UNO and Paul Stoffregen's AltSoftSerial library. For an ESP32 example using Serial1, see the Solar Hot Water Battery Ver 2 project. To access Modbus devices with this library an RS232 to RS485 converter is necessary.
This library is a modification of the Doc
Walker's ModbusMaster library.
Disclaimer:
The readHoldingRegisters method
is the only modbus command that has been extensively tested, due to
lack if other modbus hardware. All other commands are expected to
work as their code has been inherited from the original ModbusMaster
library. Code
corrections and/or test results welcome.
Hardware
Arduino
UNO ~US$27.60 or any other board supported by the Arduino
IDE. All the code developed here can be tested with just an
Arduino UNO.
RS232 to RS485 converter e.g.
Recommended (Isolated)
TTL to RS485 Converter 3.3V/5.0V Hardware Automatic Control Converter
Module For Arduino ~US1.00 aliexpress OR
(Non-Isolated) MAX485 TTL to Turn RS485 Module Level Conversion 485
To Serial UART MAX485CSA RS-485 For Arduino DC 3.3V 5V ~US$0.30
Some
modbus device to test with. Here a JSY-MK-193 (~US35.70 aliexpress)
power meter was used.
Software
Install
the Arduino
IDE V1.8.9+
Install the NonBlockingModbusMaster library from
the Arduino Library Manager or from this NonBlockingModbusMaster.zip
file
Install
the Paul
Stoffregen's AltSoftSerial library from
the Arduino Library Manager
Install
the SafeString
library (V3+) from the Arduino Library Manager, it includes the
millisDelay class and the loopTimer classes used here.
This library.zip file contains all the libraries needed for this tutorial. Rename your existing library directory and unzip this one to your Arduino Sketch directory OR use the Arduino library manager to download and install the libraries listed above.
The first example sketch, UNO_modbus.ino, initializes AltSoftSerial and the NonBlockingModbus Master object and then calls readHoldingRegisters on slave ID 1, Address 0 for 4 registers every 3 seconds. The loopTimer records how fast the loop() method runs while the time to execute the modbus command is also output.
A sample output is
18:22:30.425 -> NonBlockingModbusMaster on UNO using AltSoftSerial
18:22:30.425 ->  reading Slave ID: 1, Holding Register 0, Qty 4 at 9600 every 3 seconds.
. . .
18:22:36.441 ->  readHoldingRegisters took 43 ms.   response Len 4  0x93  0x03  0xFA  0xF4
18:22:39.453 ->  readHoldingRegisters took 43 ms.   response Len 4  0x93  0x03  0xFA  0xF4
18:22:40.402 -> loop us Latency
18:22:40.402 ->  5sec max:1212 avg:8
18:22:40.402 ->  sofar max:5484 avg:8 max - prt:1060
18:22:42.461 ->  readHoldingRegisters took 43 ms.   response Len 4  0x93  0x03  0xFA  0xF4
18:22:45.433 -> loop us Latency
18:22:45.433 ->  5sec max:1216 avg:7
18:22:45.433 ->  sofar max:5484 avg:8 max – prt:1060
This shows that the readHoldingRegisters command takes about 43ms to execute, while the loop() method runs at least every 1.2ms (1216us i.e. 40times faster) and on average runs every 8us. The max sofar of 5.4ms is due to running setup() initially. NonBlockingModbusMaster keep the loop running as fast as it can.
The sketch uses a millisDelay non-blocking delay timer, samplingDelay, to start a modbus read every 3 seconds (and restart the delay for the next read).
  if (samplingDelay.justFinished()) {
    samplingDelay.restart();
    // readHoldingRegisters will return false and be ignored if nbModbusMaster is still processing the last cmd
    // i.e. if nbModbusMaster.isProcessing() returns true
    if (nbModbusMaster.readHoldingRegisters(slaveId, address, qty)) {
      // cmd started
      start_ms = millis();
    } // else still waiting for last cmd to finish, skip this sample
  }
Each of the main modbus commands first checks that a command is not still being processed. If the modbus system is idle (isIdle() returns true) then the next command is started and the readHoldingRegisters returns true. If not then the command is not started and readHoldingRegisters returns false.
Once a modbus command has been started, then at some time in the future nbModbusMaster.justFinished() will return true, just once. This is similar to how the millisDelay class works. When nbModbusMaster.justFinished() returns true then the command has completed OR an error has occurred, so first check the getError() method.
  if (nbModbusMaster.justFinished()) {
    // check for errors
    int err = nbModbusMaster.getError(); // 0 for OK
    if (err) {
      // … handle error
    } else {
      // process result
      for (size_t i = 0; i < nbModbusMaster.getResponseBufferLength(); i++) {
        nbModbusMaster.printHex(nbModbusMaster.getResponseBuffer(i), Serial); Serial.print(" ");
      }
      Serial.println();
    }
  }
Apart from delay's, which you should replace with non-blocking millisDelay calls, Serial output can also slow down your loop(). The print statements block if there is not enough space in the Tx buffer to output all the chars. See Arduino Serial I/O for the Real World for how to avoid these problems. The NonBlockingModbusMaster also writes its commands to a serial connection connected to the RS232 to RS485 converter. So to avoid blocking in the NonBlockingModbusMaster library code, make sure the TX buffer size of the serial connection you are using is large enough to take the entire modbus command. For the modbus responses, the RX buffer size should also be made large enough to take the entire response. This is to ensure you will not lose any response data if the loop() code is slow in calling nbModbusMaster.justFinished()
The AltSoftSerial buffers are 68 bytes for TX and 80 bytes for RX. Increase these in AltSoftSerial.cpp if you need to. The ESP32 has 128 byte buffers by default.
When you process the results, you have the option to retry() the command if it fails, typically due to a timeout. The UNO_modbus_retry.ino sketch illustrates this.
  if (nbModbusMaster.justFinished()) {
    static int retryCount = 0;  // the value of this count is kept from call to call
    // check for errors
    int err = nbModbusMaster.getError(); // 0 for OK
    if (err) {
      if ((err == nbModbusMaster.ku8MBResponseTimedOut) && (retryCount < MAX_RETRIES)) {
        retryCount++;
        nbModbusMaster.retry(); // send same cmd again
      }
    } else {
      retryCount = 0; // success
    }
    if (!err) { // print results
      for (size_t i = 0; i < nbModbusMaster.getResponseBufferLength(); i++) {
        nbModbusMaster.printHex(nbModbusMaster.getResponseBuffer(i), Serial); Serial.print(" ");
      }
      Serial.println();
    }
  }
Calling retry(), starts the command again and suppresses justFinished() from returning true. That is, justFinish() continues to return false as long as retries are executing and only returns true after the last retry has completed or timed out.
Removing the 12V supply to the modbus slave device gives this output
18:58:00.452 ->  cmd took 42 ms.   response Len 4  0x93  0x03  0xFA  0xF4
18:58:05.412 ->  cmd took 2010 ms.   Error: 0xE2
18:58:05.412 ->  Retry
18:58:06.415 ->  readHoldingRegisters skipped because modbus still busy with last cmd.
18:58:07.417 ->  cmd took 4018 ms.   Error: 0xE2
The previous command completed at 00:453. The next
readHoldingRegisters command was started 3sec later at 03:412 and
timed out after 2secs at 05:412 and was retried.
The 3sec timer
timed out again at 06:415 and tried to start the next
readHoldingRegisters command but the system was still process the
retry, so the readHoldingRegisters was not started and returned
false, so printing the “skipped” message and the command
start time was not reset. When the retry timed, at 07:417 out 2sec
after the second attempt at the command started, the cumulative time
for that command was 4sec (two timeouts) and it was not retried
again.
At the top of the NonBlockingModbusMaster.cpp file you can uncomment the DEBUG_SERIAL define to send debug output to Serial.
#define DEBUG_SERIAL
The NonBlockingModbusMaster library provides a oneTimeDelay() method which adds the specified ms delay to the preDelay time for the next command only. This can be necessary when switching between different devices. For example when switching between reading a JSY-MK-193 on ID:1 and reading a JSY-MK-345 on ID:2, a 50ms delay needs to be added between the last ID:1 command completing and starting the first ID:2 command. Otherwise the ID:2 command times out. Simply add a call to oneTimeDelay() before calling readHoldingRegisters.
 nbModbusMaster.oneTimeDelay(50); // 50ms extra preDelay, only for next cmd
 nbModbusMaster.readHoldingRegisters(2, 0, 4);  // ID:2, Address:0, Qty:4
This extra delay is cleared when the next command's preDelay has completed.
As has been shown above you can process the results in the justFinished() block. However you can also specify a processing method to be call after the command completes, but before justFinished() returns true. The UNO_modbus_processing.ino sketch illustrates this.
void processData(NonBlockingModbusMaster &mb) {
  Serial.println(" in processData()");
  static int retryCount = 0;
  // check for errors
  int err = mb.getError(); // 0 for OK
  if (err) {
    if ((err == nbModbusMaster.ku8MBResponseTimedOut) && (retryCount < MAX_RETRIES)) {
      retryCount++;
      mb.retry(); // send same cmd again
    }
  } else {
    retryCount = 0; // success
  }
  if (!err) {
    for (size_t i = 0; i < mb.getResponseBufferLength(); i++) {
      mb.printHex(mb.getResponseBuffer(i), Serial); Serial.print(" ");
    }
    Serial.println();
  }
}

void loop() {
  if (samplingDelay.justFinished()) {
    samplingDelay.restart();
    nbModbusMaster.readHoldingRegisters(slaveId, address, qty, processData); // add processing fn
  }
  if (nbModbusMaster.justFinished()) {
    Serial.println(" Finished.");
  }
}
Basically the processing code from the justFinished() block is moved to its own method and that method name passed when calling readHoldingRegisters. NOTE: The result data and modbus errors are still available to the justFinished() block as well.
You can use processing methods to easily chain commands together in to a single execution block. The justFinished() method only returns when the block completes. If, in the processing method of the previous command, you start a new command, the internal state of the NonBlockingModbusMaster object changes to MB_START, in this state justFinished() returns false. justFinished() does not return true state is either MB_ERROR or MB_END. Sstarting a new command overwrites the current MB_ERROR or MB_END state with MB_START.
NOTE: An error in the one command does NOT automatically stop the rest of the commands in the chain from executing. You have the choice in the processing method's code whether to continue after an error and call the next command or to not call the next command if there is an error and so terminate the chain there. If you choose to continue processing the block after a command error, then you will most likely want to record somewhere else that an error has occurred. Successful retry()'s are not normally counted as errors.
The first example of chaining is a simple example of reading a series of registers and storing the results on an array for later processing. UNO_modbus_simple_chaining.ino illustrates this. This example also checks nbModbusMaster.isProcessing() to see if the previous chain of reads has finished. If not, then the next set of reads is delayed.
// list of addresses to read and array to place readings in
#define NUM_REGISTERS 16
int registerAddresses[] = {0, 2, 7, 19, 25, 30, 31, 40, 41, 50, 51, 60, 61, 97, 98, 99};
uint16_t data[NUM_REGISTERS];
size_t addressIdx = 0; // keep track of which address to read
. . .

void processAddr(NonBlockingModbusMaster &mb) {
  static int retryCount = 0;
  int err = mb.getError(); // check for errors // 0 for OK
  if (err) {
    if ((err == nbModbusMaster.ku8MBResponseTimedOut) && (retryCount < MAX_RETRIES)) {
      retryCount++;
      mb.retry(); // send same cmd again
    }
  } else {
    retryCount = 0; // success
  }
  if (!err) {
    data[addressIdx] = mb.getResponseBuffer(0); // save result for this register
  }
  // else err continue or not?? can stop here by not calling readAddr_2()
  addressIdx++; // go on to next one
  if (addressIdx < NUM_REGISTERS) { // read next address
    readAddr();
  } // else finish here
}

bool readAddr() {
  return nbModbusMaster.readHoldingRegisters(1, registerAddresses[addressIdx], 1, processAddr); // add processing fn to save results and continue
}

void loop() {
  if (samplingDelay.justFinished()) {
    samplingDelay.restart();
    if (!nbModbusMaster.isProcessing()) {  // Not still running last set start again
      addressIdx = 0;
      readAddr();
    } else {
      Serial.println(" Still processing skip this restart");
    }
  }

  // this will return false and be ignored if nbModbusMaster is still processing the last cmd
  // i.e. if nbModbusMaster.isProcessing() returns true
  if (nbModbusMaster.justFinished()) {
    // all reads finished  Do some processing here of the data results array
    Serial.println(" -- Finished all reads.");
  }
}
The UNO_modbus_chaining.ino sketch illustrates having separate processing methods for each link of the chain. There are two readHoldingRegister commands and the first one, after processing it results, calls the second readHoldingRegister command. justFinished() returns when the second command completes and its processing method has been called.
void processAddr_0(NonBlockingModbusMaster &mb) {
  static int retryCount = 0;
  Serial.println(" in processAddr_0()");
  int err = mb.getError();   // check for errors // 0 for OK
  if (err) {
    if ((err == nbModbusMaster.ku8MBResponseTimedOut) && (retryCount < MAX_RETRIES)) {
      retryCount++;
      mb.retry(); // send same cmd again
    }
  } else {
    retryCount = 0; // success
  }
  if (!err) {
    for (int i = 0; i < mb.getResponseBufferLength(); i++) {
      mb.printHex(mb.getResponseBuffer(i), Serial); Serial.print(" ");
    }
    Serial.println();
  }
  // else err continue or not?? can stop here by not calling readAddr_2()
  readAddr_2(); // chain to read from addr 2 qty 2, this call will not fail as last cmd has finished
}

void processAddr_2(NonBlockingModbusMaster &mb) {
  static int retryCount = 0;
  Serial.println(" in processAddr_2()");
  // check for errors
  int err = mb.getError(); // 0 for OK
  if (err) {
    if ((err == nbModbusMaster.ku8MBResponseTimedOut) && (retryCount < MAX_RETRIES)) {
      retryCount++;
      mb.retry(); // send same cmd again
    }
  } else {
    retryCount = 0; // success
  }
  if (!err) {
    for (int i = 0; i < mb.getResponseBufferLength(); i++) {
      mb.printHex(mb.getResponseBuffer(i), Serial); Serial.print(" ");
    }
    Serial.println();
  }
  // finish here
}

bool readAddr_0() {
  return nbModbusMaster.readHoldingRegisters(1, 0, 2, processAddr_0); // add processing fn
}

bool readAddr_2() {
  return nbModbusMaster.readHoldingRegisters(1, 2, 2, processAddr_2); // add processing fn
}

void loop() {
  if (samplingDelay.justFinished()) {
    samplingDelay.restart();
    Serial.println(" ++ start block reads ");
    readAddr_0();
  }
  if (nbModbusMaster.justFinished()) {
    Serial.println(" -- Finished all reads.");
  }
}
For convenience the readHoldingRegisters where put in their own
methods but they could just as easily been called directly at the end
of the processing method.
A sample output is:-
19:58:36.563 ->  ++ start block reads
19:58:36.598 ->  in processAddr_0()
19:58:36.598 -> response Len 2  0x93  0x03
19:58:36.644 ->  in processAddr_2()
19:58:36.644 -> response Len 2  0xFA  0xF4
19:58:36.644 ->  -- Finished all reads.
This tutorial describes the use of the NonBlockingModbusMaster library on an UNO using software serial. Use of the retry() method to recover from timeouts and and how to chain commands together into a single executable block was also covered.
For use of the Arduino name see http://arduino.cc/en/Main/FAQ
The General Purpose Android/Arduino Control App.
pfodDevice™ and pfodApp™ are trade marks of Forward Computing and Control Pty. Ltd.

Contact Forward Computing and Control by
©Copyright 1996-2024 Forward Computing and Control Pty. Ltd.
ACN 003 669 994