
|
Home
| pfodApps/pfodDevices
| WebStringTemplates
| Java/J2EE
| Unix
| Torches
| Superannuation
|
| About
Us
|
|
|
How to Write Your Own Arduino Libraries
|
by Matthew Ford 29th Oct 2023 (original
29th April 2020)
© Forward Computing and Control
Pty. Ltd. NSW Australia
All rights reserved.
Update: 29th Oct 2023:
Added note on initialization of class variables. Added DebugIO files
to FlashingLedClass.zip
Update:
5th Dec 2021: Updated
comments on the use of Arduino Strings and char[]/char*
This library tutorial is for Arduino Beginners who can write straight forward Arduino sketches and either have a project that has grown too large for a single sketch (.ino file) or who are starting a new project and want to re-use some code from a another sketch in the new project. This tutorial will show you how to break your sketches up into re-usable parts and make your own 'private' libraries.
This process has been used in a commercial project that built a 750 Kb 'private' library comprising over 90 files and 21,000 lines of code and comments.
Although Arduino uses a C++ compiler, this tutorial is for beginners, so it will avoid using C++ constructs and stick to basic Arduino (C style) code plus the few extras needed to do the job. Most 'private' library code implements a single function that there is only one instance of in each project. However, if you have written code that you want to reuse multiple instances of in the same project, like flashing leds on multiple output pins, then a simple C++ class is the correct solution. Turning your 'private' C library into a simple C++ class, will be covered at the end of the tutorial.
If you want to learn C++ programming OR if you want to create general purpose third-party / public Arduino libraries, you will need to look further after finishing this tutorial. If you want to know why, in general, C++ should not be used for Arduino programming (unless you are an expert programmer), see Why Not C++ for Arduino Programming? at the end of this tutorial. If you think you are a capable C++ programmer, check out some its intricacies in The Safe Bool Idiom (local copy here)
The tutorial will cover the following:-
A
Simple Flashing Led Sketch
Breaking the
code into callable Methods
Your first set
of 'private' library files
How to add
debugging to your libraries
Installing
Your 'private' Library in Arduino
Turning
your library into a C++ Class
Also see Arduino For
Beginners – Next Steps
Taming
Arduino Strings
How
to write Timers and Delays in Arduino
SafeString
Processing for Beginners
Simple Arduino
Libraries for Beginners (this one)
Simple
Multi-tasking in Arduino
Arduino
Serial I/O for the Real World
To illustrate the process of turning your code into a re-usable 'private' library, the code to flash a single led will be used. BasicFlashingLed.ino

Put the BasicFlashingLed.ino in a subdirectory of you Arduino Sketches directory, called BasicFlashingLed. In the Arduino IDE, the File → Preference menu item shows your Sketch book location, that is where you need to create the BasicFlashingLed directory and in that BasicFlashingLed directory place the BasicFlashingLed.ino file. You can now open that sketch and program your Uno or other Arduino board. Most boards have an led attached to pin 13. Check the specs for the board you are using.
The first step to creating you own library is
to break out the actions into their own methods that your sketch can
call.
FlashingLedMethods.ino
defines four (4) methods:- togglePinInit(), stopTogglingPin(),
startTogglingPin() and handleTogglingPin(). The variable name have to
been change to more general ones such as pin
instead of ledPin
togglePinInit(13) set which pin will be used for the led and initializes it as an output pin and turns the led off
void togglePinInit(int pinNo) {
  pin = pinNo;
  pinMode(pin, OUTPUT); // set output
  stopTogglingPin();
}
stopTogglingPin() stops the recurring delay, turns the led off, output LOW on the UNO board and sets the ledOn boolean to false.
void stopTogglingPin() {
  pinToggleDelay.stop(); // stop the led flash delay
  digitalWrite(pin, LOW); // turn led off
  pinHigh = false; // off
}
startTogglingPin() starts the repeating delay, turns the led on, and set the ledOn boolean to true
void startTogglingPin() {
  pinToggleDelay.start(PIN_TOGGLE_DELAY_MS); // start led flash delay
  digitalWrite(pin, HIGH); // turn led on
  pinHigh = true; // on
}
handleTogglingPin() is called in the loop() method.
void handleTogglingPin() {
  if (pinToggleDelay.justFinished()) {
    pinToggleDelay.restart(); // restart it
    pinHigh = !pinHigh; // toggle pinHigh
    if (pinHigh) {
      digitalWrite(pin, HIGH); // turn on
    } else {
      digitalWrite(pin, LOW); // turn off
    }
  }
}
After the board has started and the call to setup() has returned, loop() is just continually called over and over again. Each time handleTogglingPin() is called it checks if the delay has finished and if so restarts the delay and toggles the led On or Off.
Here is the setup() and loop() code
millisDelay stopTogglingDelay;
unsigned long STOP_TOGGLING_DELAY_MS = 8000; // stop flashing in 8sec
…
void setup() {
  togglePinInit(13); // built in led
  startTogglingPin();
  stopTogglingDelay.start(STOP_TOGGLING_DELAY_MS);
}

void loop() {
  handleTogglingPin();  // check if led should be toggled
  if (stopTogglingDelay.justFinished()) {
    stopTogglingPin();
  }
}
An extra delay has been added to stop the led flashing after 8 seconds. FlashingLedMethods.ino has all the code.
Now that you have separated the flashing actions into their own methods, you can move those methods to their own .cpp/h files and just add these to each sketch directory that needs them. The FlashingLedFile.zip file contains the sketch, FlashingLedFile.ino file and a TogglePin.cpp and TogglePin.h file. Having your library files in the same directory as the sketch is convenient for development and debugging as the Arduino IDE displays all the files in tabs allowing easy editing and formatting. Once you are happy with the files they can be moved to their own library directory under Arduino libraries This is covered later in the tutorial.

The TogglePin.cpp file contains the methods' code (definitions), including an added setTogglingSpeed() method. Checking has also been added to the methods to ensure the pin number has been initialized. The variables in TogglePin.cpp have been defined with the static keyword. The static keyword is a C keyword that tells the compiler this variable is local to this file and is not visible from any other file. This both allows you to reuse the variable name in other files AND prevents you from accidentally accessing/changing the variable from other files. The keyword static in C/C++ has multiple different uses depending on where it appears in the code. In relation to C style libraries being built here, static hides the variable or function from the rest of the code files. In C++ classes it means something different.
The TogglePin.h file contains the declarations, the names and types of arguments and return type. You #include the .h file at the top of your sketch so the compiler knows how to generate the code to call the methods. The compiler only works on one file at a time so each code file (.ino / .cpp / .c ) must contain all the information the complier needs. The sketch is pre-processed to FlashingLedFile.ino.cpp before passing to the compiler.
Important: You must also #include “TogglePin.h” at the top of the TogglePin.cpp file as well as at the top of the FlashingLedFile.ino
To create the TogglePin.h copy the header line of each method, drop the { and terminate with a ; For example for
void togglePinInit(int pinNo) {
  pin = pinNo;
  if (pin >= 0) {
    pinMode(pin, OUTPUT); // set output
    stopTogglingPin();
  }
}
in the TogglePin.cpp place void togglePinInit(int pinNo); in the TogglePin.h This tells the compiler the method name togglePinInit and type of argument int and the type of return void (i.e. nothing returned)
Do the same for all the methods in the TogglePin.cpp
void togglePinInit(int pinNo);
void setTogglingSpeed(unsigned long msDelay);
void startTogglingPin();
void stopTogglingPin();
void handleTogglingPin();
Finally add a little bit of C/C++
pre-processor magic. Before the compiler compiles the file, the build
process runs the file through the pre-processor to process the text
directives. You have already use one of these, the #include
which is replaced with the contents
of the file referenced. So
#include
“TogglePin.h”
line
in the FlashingLedFile.ino file will be replaced with
void togglePinInit(int pinNo);
void setTogglingSpeed(unsigned long msDelay);
void startTogglingPin();
void stopTogglingPin();
void handleTogglingPin();
before the file is passed to the compiler. Now the magic you are going to add is an #ifndef #define #endif block.
#ifndef TOGGLE_PIN_H
#define TOGGLE_PIN_H
void togglePinInit(int pinNo);
void setTogglingSpeed(unsigned long msDelay);
void startTogglingPin();
void stopTogglingPin();
void handleTogglingPin();
#endif // TOGGLE_PIN_H
This tells the pre-processor, if macro named TOGGLE_PIN_H has already been defined then skip to the #endif line. If it has not been defined then the next line defines it (as nothing) for the rest of the file being processed.
The purpose of this is so you can avoid having to worry if that header file has already been included by some #include in some other file the has already been included. Yes a header, .h, file can have includes which will be included when ever that header file is included. This get messy very quickly and the #ifndef #define #endif block avoids double includes of the same file. By convention the name being tested and defined is a capitalized version of the file name appended with _H , but you can use any unique name.
There are number of pre-processor macro directives and operators which let you do some very fancy pre-processing (search for “C pre-processor”), but the most common ones are #define, #ifdef, #ifndef, #else and #endif
At the top of
FlashingLedFile.ino add
#include
"TogglePin.h"
so
your sketch knows what methods are available and how to call
them.
You
must also
#include
"TogglePin.h"
at
the top of the TogglePin.cpp
file
as well as.
The FlashingLedFile.zip file contains the sketch, FlashingLedFile.ino file and a TogglePin.cpp and TogglePin.h file.
There are two versions of the #include directive, #include “...” and #include <...>. Use the #include “...” version because it will look in the sketch directory first before looking in the Arduino libraries. The #include <...> version skips looking in the sketch directory and so will not find the FlashingLed.h file. For the technical details of “ “ versus < > see https://gcc.gnu.org/onlinedocs/cpp/Search-Path.html
We use a .cpp file for the methods' code file because the C++ compiler uses name mangling for .cpp files. The sketch file, ino, is transformed by the IDE into a .cpp file before compiling and so will mangle the method names in header, .h, files by default. Putting the toggle led methods in .cpp file ensures those method names are mangled in the same way and so when all the compiled files are linked together at the end to create the final program, all the names will match. You can put code in a .c file, but then you have to let the compiler know not to mangle the names by wrapping declarations in the .h file in an extern “C” block
In this tutorial we will always just use .cpp files even if they don't contain classes. This is the simplest approach and avoids extern “C” blocks.
Because we are going to finally move our 'private' library to the Arduino libraries directory, we need to put the code in .cpp/.h files. However you can just put excess code in extra .ino files in the sketch directory. The Arduino build process will concatenate all the .ino files together, starting with the file that matches the folder name followed by the others in alphabetical order into one big .ino file and the compile that. For the Arduino build process see https://github.com/arduino/Arduino/wiki/Build-Process
You will want a simple way to turn debugging
on/off in your library code. The simplistic approach is to use
Serial.print(..) statements, however you should avoid this approach
since
a) the main sketch may not have called Serial.begin() and
b) on some boards Serial1 is the serial OR
c) you may want
buffer the debug output so it does not block your code while waiting
for the serial port to send the previous message. See Buffering
Print Output in Simple
Multitasking Arduino without using an RTOS
To handle these option you can use the DebugIO.cpp and DebugIO.h 'private' library files.
The FlashingLedDebug.zip file contains the sketch and the 'private' library files.
The DebugIO.cpp file is very simple. It is just a place to hold a pointer to Stream to send debug messages to. Again the static keyword is used for this variable, debugPtr, so that it is local to this file and is not visible from any other file. The only way for the rest of the code to to access this variable is via the set.. and get.. methods.
#include "DebugIO.h"

static Stream* debugPtr = NULL;

/* must call this first to get any debug output
    @param ioPtr -- pointer to the Stream to use for debugging
*/
void setDebugPtr(Stream *ioPtr) {
  debugPtr = ioPtr;
}

// must call this in the file you want to debug
Stream* getDebugPtr() {
  return debugPtr;
}
Then in the main sketch, FlashingLedDebug.ino, in setup(). initialize the Stream you are going to use for debugging, e.g. Serial.begin(9600) and then call setDebugPtr() with its address. The C operator & returns the address of a variable.
#include "DebugIO.h"
…
void setup() {
  Serial.begin(9600);
  for (int i = 10; i > 0; i--) { // wait 5 sec to give you time to open the serial Monitor
    Serial.print(i); Serial.print(' ');
    delay(500);
  }
  Serial.println();
  setDebugPtr(&Serial); // initialize debug with the adddress of Serial, do this first before calling  togglePinInit
  togglePinInit(13); // built in led
  startTogglingPin();
  increaseTogglingDelay.start(INCREASE_TOGGLING_DELAY_MS);
}
This sets the DebugIO variable debugPtr to the address of Stream. Then in your library file you add a static Stream* debugPtr = NULL; and in the init() method add the code
#ifdef DEBUG
  debugPtr = getDebugPtr(); // will return null if setDebugPtr() has not been called
#endif
Then you can turn debug on and off by un-commenting or commenting out
#define DEBUG
at
the top of the .cpp file.
Finally to output messages to debug you use code like
  if (debugPtr) { // will skip debugPtr if either i) debugPtr is not defined  OR setdebugPtr() has not been called
    debugPtr->print(F("Initializing Toggling for pin : ")); debugPtr->println(pinNo);
  }
The if (debugPtr) tests if the debugPtr is not NULL and if so debugPtr->print(.. can be called to print to the debug Stream. The -> C operator lets you access methods via a pointer.
The code in TogglePin.cpp now looks like:-
#include "DebugIO.h"
…
// uncomment the #define DEBUG and call setDebugPtr() in DebugIO, if you want to debug this file
#define DEBUG
static Stream* debugPtr = NULL;  // static hides this from all other files so you can use the same code in each file to debugPtr
…
…
// call this first to initialize led pin
void togglePinInit(int pinNo) {
#ifdef DEBUG
  debugPtr = getDebugPtr(); // will return null if setDebugPtr() has not been called
#endif
  if (debugPtr) { // will skip debugPtr if either i) debugPtr is not defined  OR setdebugPtr() has not been called
    debugPtr->print(F("Initializing Toggling for pin : ")); debugPtr->println(pinNo);
  }
  pin = pinNo;
  if (pin >= 0) {
    pinMode(pin, OUTPUT); // set output
    stopTogglingPin();
  }
}
So to enable debugging in your 'private' library file you need to do
two things:-
1) call setDebugPtr() from the main sketch and
2)
#define DEBUG in the library file.

An advantage of this approach is that you can disable all debugging for the whole project by just not calling setDebugPtr() in the main sketch.
Note: The the debug message printed as the pin toggles is a short message. This helps prevent the Serial buffer filling up and blocking the program waiting to send the bytes to the monitor. Buffering Print Output in Simple Multitasking Arduino without using an RTOS offers a better solution which lets you increase the debug message buffer size and choose whether or not to block when if becomes full.
Once you are happy with your library files in the sketch directory, you can move them to your own library under the Arduino libraries directory. This gives all your projects access to the library code.
In the Arduino sketch directory open the libraries sub-directory (create it if it does not exist), then in the libraries sub-directory create a new directory MyLibraries (or whatever you want to call it). Then copy the TogglePin.cpp , TogglePin.h , DebugIO.cpp and DebugIO.h files to the MyLibraries directory.
Alternatively you can download the MyLibraries.zip file to a convenient directory e.g. Desktop, and then use the Arduino IDE menu Sketch → Include Library → Add Zip Library... to install the files
The final sketch, FlashingLedMyLib.ino , is just one file

When you compile this sketch, it should automatically find your 'private' libraries. If you get compile errors check out Common Library Problems (local archive here) in Adafruit's tutorial on Arduino libraries .
Most of the time your libraries perform just one function per board and the above procedure is all you need. However sometimes you want to use multiple instances of your library code in the sketch, such as flashing multiple output pins. In those cases you need to wrap your library code in a simple C++ class. If you are wanting to learn C++ then you will need to lookup one of the many online tutorials. If you just want to get something working that you can use your code multiple times then continue here. FlashingLedClass.zip contains the sketch and supporting class files.
The steps to
convert TogglePin.cpp and .h to new C++ class files Toggle.cpp
and Toggle.h
are :-
1) Copy/rename TogglePin.cpp / .h to Toggle.cpp / .h
Toggle will
be then name of then class.
2) In Toggle.cpp, prepend Toggle::
to each method
name. Note the ::
3)
Cut the variables from the top of Toggle.cpp and past them below the
method names in Toggle.h. Remove the static
keyword from
each
4) In Toggle.h, wrap all the code in class
Toggle { public: … }; Then
add private: above
the variables you copied in step 3.
As mentioned above, in C style libraries the static keyword hides variables and functions from the other code files. When you wrap your library in a simple C++ class. The class wrapper and the private: tag does the job of hiding variables and functions from other code and the static keyword in a C++ class means something else.
Toggle.h now looks like

Note: Each of the variable in the Toggle class are set to an initial value. e.g. bool pinHgh = false; C++ sometimes initializes class variables to default values (0 or false) if you don't assign one yourself and sometimes it does not. The explanation is beyond the scope of this tutorial. To avoid problems ALWAYS set initial values for all the class variables.
and the top of Toggle.cpp looks like
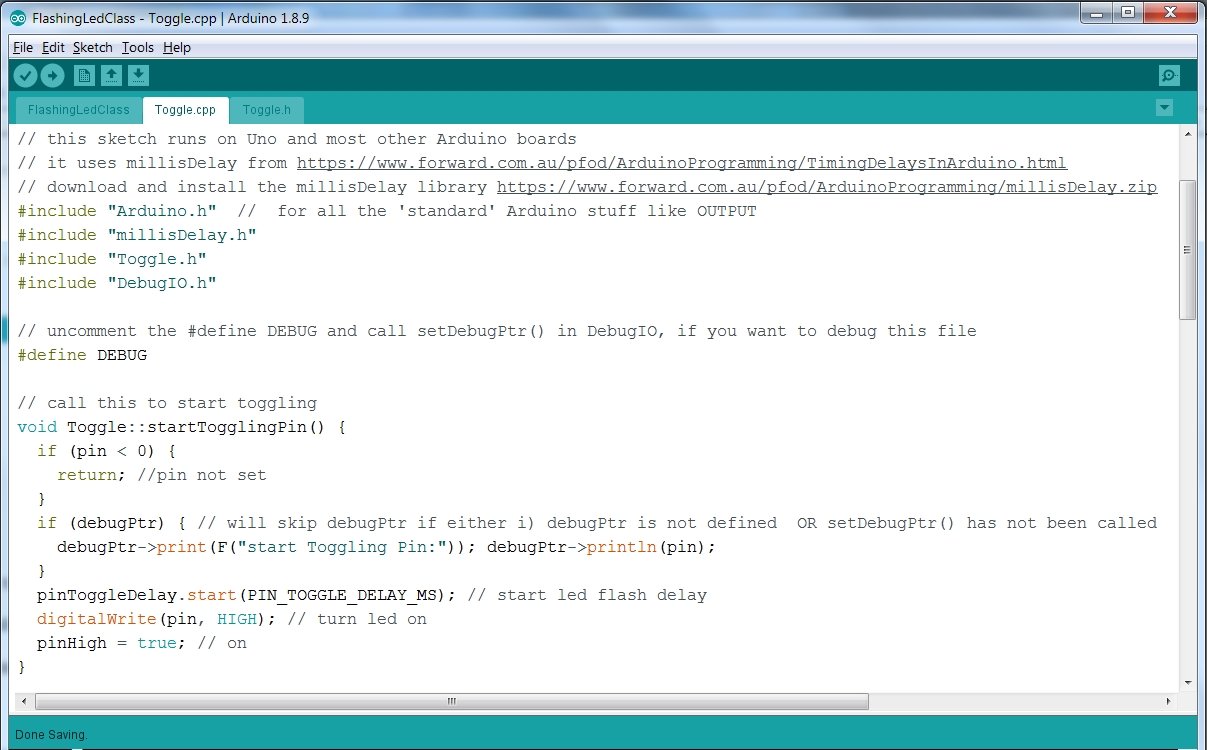
That's all you need to do to turn your 'private' library code into a C++ class. Each instance of you C++ class has its own set of variables that keep track if that instance's state.
Now you can use the Toggle class multiple times in your main sketch, FlashingLedClass.ino

Declare two instances of your Toggle class
Toggle togglePin_A;  // declare two toggle instances one for each pin
Toggle togglePin_B;  // do not use togglePin_B();  or you will get some odd error msgs. This is a C++ oddity.
Behind your back, the C++ compiler created a default no argument
constructor, Toggle::Toggle() that sets up the class instance
and allocates and initializes the variables as specified in your
class Toggle { .. block.
The Toggle togglePin_A;
statement calls that default no argument constructor to initialize
the togglePin_A instance of Toggle. It is one of the oddities of C++,
that unlike all other no argument methods, the C++ compiler will
generate errors if you try to add the () to togglePin_A.
Then in the setup() you can set the pin numbers and start them running.
  togglePin_A.togglePinInit(13); // built in led
  togglePin_A.startTogglingPin();

  togglePin_B.togglePinInit(12); // another external led
  togglePin_B.startTogglingPin();
In the loop() code add a call to handleTogglingPin() for each
instance.
void loop() {
  togglePin_A.handleTogglingPin();  // check if led should be toggled
  togglePin_B.handleTogglingPin();  // check if pin should be toggled
The debug output is
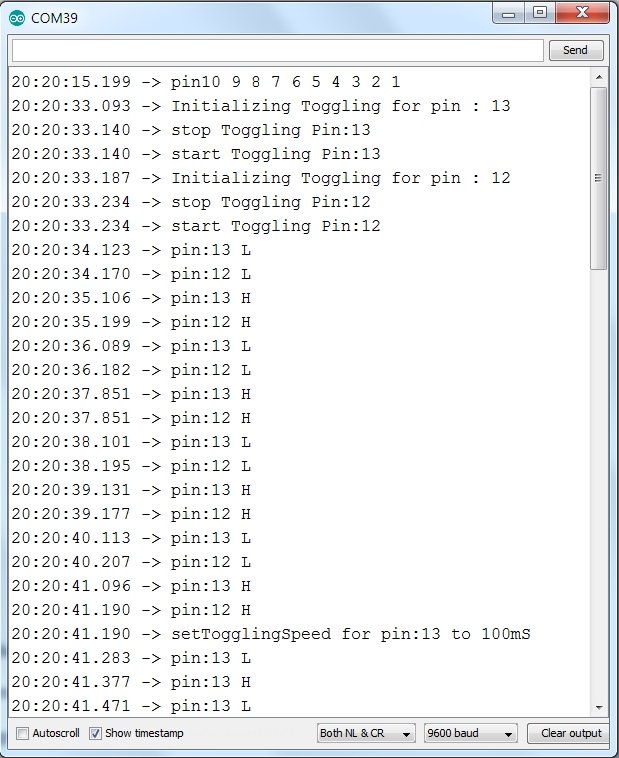
This tutorial showed how to simple and straight forward is is make you own 'private' libraries so you can reuse your code in other projects. It also showed you how to create a simple C++ class if you need to use multiple instances of the same library code in a sketch.
In general pass simple variables, int, long, etc, by value. That is void fn(int x); and the arguments will be copied and any changes made in the function will not effect the passed variable.
If you want the value to be updated on return, then use a pointer, e.g.
void fn(int *x){
  *x = 5;
}
For non-simple variables such as class instances and structures, pass them a pointers. e.g.
void setDebugPtr(Stream *ioPtr) {
  debugPtr = ioPtr;
}
to avoid un-necessary copying and memory allocations. Always check for the pointer being not NULL before use.
Avoid
using C++ std::strings, or the Arduino String
class, which do behind the scenes memory allocations, use char*
instead.
Avoid char[] and char* if at all possible as they are the
cause of many errors.
Update: 5th
Dec 2021 :
Arduino
Strings
provide a simple and safe way to do text processing. For small AVR
boards, like UNO, they will not crash your sketch even when it runs
out of memory. See Taming
Arduino Strings
char[] and char* are still a cause of many
errors. The SafeString library provides String type methods that work
on char[] and char* safely. See SafeString
Processing for Beginners
C++ allows passing by reference, another different (confusing) use if the & operator . This is actually just passing a pointer by another syntax e.g.
void fn(int &x) {
 x = 5;
}
But in this case x = 5; will change the variable in the calling program which is not obvious from just looking at the x = 5; statement.
For structures and classes (provided by other libraries), to avoid copying all the values, use either a pointer if you intend to update the variable in the caller or if you do not intend it to be updated use const & (passing by reference)
Also see Arduino
Library style guide and the Arduino
code style guide.
To be clear, Arduino programming uses C++ by default, but the core libraries use a very limited subset of C++'s capabilities and hide almost all of it under the hood. You, as a beginner, can mostly ignore C++ and stick to programming in C which is much simpler and has far fewer pitfalls. C++ inherits almost all C's syntax.
As of May, 2020, the C
language is the most popular language and more than two and a half
times as popular as C++ and rising
"Why is the
programming language C still hot? The major drivers behind this trend
are the Internet of Things (IoT) and the vast amount of small
intelligent devices that are released nowadays. C excels when it is
applied to small devices that are performance-critical. It is easy to
learn and there is a C compiler available for every processor."
The Arduino Uno is one such small device.
Linus
Torvald's (the of creator Linux) assessment of C++ is
"C++
is a horrible language. It's made more horrible by the fact that a
lot of substandard programmers use it, to the point where it's much
much easier to generate total and utter crap with it. Quite frankly,
even if the choice of C were to do *nothing* but keep the C++
programmers out, that in itself would be a huge reason to use C."
For other reasons to avoid C++ see https://en.wikipedia.org/wiki/C++#Criticism, http://locklessinc.com/articles/10_problems_with_cpp/ and https://blog.codinghorror.com/the-problem-with-c/
In Bjarne
Stroustrup's interview (C++'s creator) he said “C++ has
indeed become too "expert friendly" … There has to
be languages for those experts to use-- and C++ is one of those
languages." and
“The idea of programming as a
semiskilled task, practiced by people with a few months’
training, is dangerous.” (For an example of the complexities of
writing 'correct' C++ code see The
Safe Bool Idiom)
Both of these statements are at odds with the aims of Arduino programming and point to why you, as a beginner, should avoid using C++ for Arduino programming. The exception is very simple C++ classes which provide a very convenient means of re-using the same code multiple times in a project, for example, for the individual control of multiple flashing LEDs.
The General Purpose Android/Arduino Control App.
pfodDevice™ and pfodApp™ are trade marks of Forward Computing and Control Pty. Ltd.

Contact Forward Computing and Control by
©Copyright 1996-2020 Forward Computing and Control Pty. Ltd.
ACN 003 669 994