
|
Home
| pfodApps/pfodDevices
| WebStringTemplates
| Java/J2EE
| Unix
| Torches
| Superannuation
| CRPS Treatment
|
| About
Us
|
|
|
Android control of Non-Arduino micros using pfodApp™
|
by Matthew Ford 2nd August 2016
(originally posted 28th January 2016)
© Forward
Computing and Control Pty. Ltd. NSW Australia
All rights reserved.

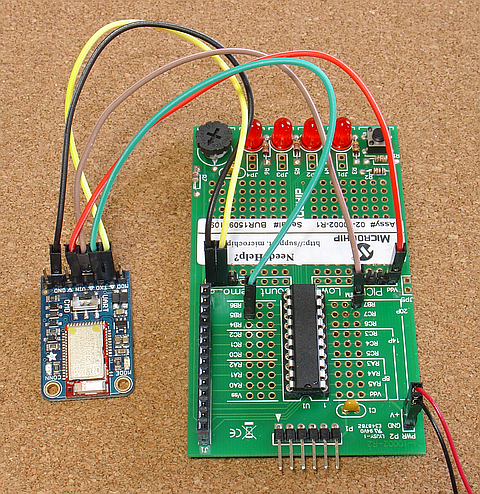

This is a detailed example of how code a PIC18F14K22 talk to an Adafruit BLE communication module and use pfodApp on your Android mobile to log and plot data sent from the PIC. No Android programming required.
This example follows on from PIC Led Control example. That example needs to be completed first as it sets up the pfodParserC library for your microprocessor. The complete MPLAB project for this example is DataLogging.X.zip
pfodDesignerV2 lets you add a chart with up to three (3) plots to your menu. The tutorial How to Display/Plot Arduino Data on Android covers how to design a chart menu item. In this example you will use the C code target to generate the pfodMenu.h and pfodMenu.c files needed for non-Arduino based processors.
Start with your previous “PIC Led Control” menu design in pfodDesignerV2. Following the example of How to Display/Plot Arduino Data on Android, add a chart button called “Plot of Random Data” containing a chart labelled “PIC Data” with two plots (i.e. hide Plot 3). Plot 1 labelled “Random Data” and Plot 2 labelled “Led setting” with Y axis “LED (On=1)”, Fixed Scale and a Plot Data Variable Range of (-1 to 2)
Generate the C code and replace the existing pfodMenu.h and pfodMenu.c files with the new generated code. Here are the generated pfodMenu.h and pfodMenu.c files.
Do a clean rebuild and re-program your PIC. (Note: disconnect the Adafruit's TX/RX lines when reprogramming so it does not get confused.) Then when you connect with pfodApp you will see your new menu.
Clicking
on the “Plot of Random Data” button open the chart with
two empty plot. Your PIC is not sending any data yet.
Looking at the new pfodMenu.h header file you can see the added plot variables
// plotting data variables
  extern volatile uint8_t pfodParser_sendDataFlag; // set this to true (1) to send data, it is reset to false (0) by pfodParser_sendData()
  extern volatile unsigned long plot_X_var; // X axis defaults to an incrementing counter unless your code assigns a value to plot_X_var before each pfodParser_sendData() call.
  extern volatile int plot_1_var;
  extern volatile int plot_2_var;
  // plot 3 is hidden
void pfodParser_sendData(void) {
  if (!pfodParser_sendDataFlag) {
      return;
  }
  pfodParser_sendDataFlag = 0;
  // send plot data in CSV format
  pfodParser_printLong(plot_X_var);
  pfodParser_printCh(','); pfodParser_printLong(plot_1_var);
  pfodParser_printCh(','); pfodParser_printLong(plot_2_var);
  pfodParser_printCh(','); // Plot 3 is hidden in pfodDesignerV2. No data sent.
  pfodParser_println(); // end of CSV data record
  plot_X_var++;
}
To send data you only need to assign values to the variables
plot_X_var, plot_1_var and plot_2_var and then
set the pfodParser_sendDataFlag true (non-zero). If you don't
assign a value to plot_X_var then pfodParser_sendData() will
just send an incrementing counter for the X axis.
Open the Code Configurator again (Tools → Embedded → Code Configurator Open/Close) and from Device Resources (left hand side) open the Timer section and double click on TMR0. Configure it as shown below. This set the time to call the interrupt method once a second.

Click
the Generate tab to re-generate the MPLAB config files. There are now
two new files tmr0.h
and
tmr0.c
under
mcc_generated_files.
The SYSTEM_Initialize() method now automatically initializes and
starts timer TMR0.
Open the tmr0.c file and cut the void TMR0_CallBack(void) method and paste at the bottom on your main.c file.
Edit the TMR0_CallBack method to assign values to the plot variables and to set pfodParser_sendDataFlag to non-zero. This example overrides plot_X_var with a sec. counter and just assigns a random value for plot_1_var and assigns the current value of cmd_A_var to plot_2_var.
unsigned long timeSec = 0;
void TMR0_CallBack(void)
{
    timeSec++;
    plot_X_var = timeSec;
    plot_1_var = 450+600+(rand()%100);
    plot_2_var = cmd_A_var;
    pfodParser_sendDataFlag = 1; // send data once per sec
}
The complete
edited main.c is here. You
need to add stdlib.h to the includes for rand().
Since the TMRO_CallBack() is an interrupt callback method, it should be kept short with little or no calculation in it. Just assign the variables and return.
Now when you connect with pfodApp and turn the led on and off a few times the plot looks like this.
The CSV plot data is also logged to a file on your Android for later downloading and further analysis. The raw data filename is displayed as you exit pfodApp. See pfodAppForAndroidGettingStarted.pdf for more details.
The complete MPLAB project for a PIC18F14K22 is in DataLogging.X.zip
This second MPLAB PIC18F14K22 example builds on the first one to add data logging and plotting. pfodDesignerV2 does most of the coding for you and generates the pfodMenu.h and pfodMenu.c files. You only need to assign values to the plot variables and set the pfodParser_sendDataFlag. pfodApp automatically saves the data to a file on your mobile for later use.
The
pfodDesignerV2 does not cover all the screen or plotting options.
Check out the complete pfodSpecification.pdf
the all the details.
AndroidTM is a trademark of Google Inc, For use of the Arduino name see http://arduino.cc/en/Main/FAQ
The General Purpose Android/Arduino Control App.
pfodDevice™ and pfodApp™ are trade marks of Forward Computing and Control Pty. Ltd.

Contact Forward Computing and Control by
©Copyright 1996-2024 Forward Computing and Control Pty. Ltd.
ACN 003 669 994