
|
Home
| pfodApps/pfodDevices
| WebStringTemplates
| Java/J2EE
| Unix
| Torches
| Superannuation
| CRPS Treatment
|
| About
Us
|
|
|
pfodWeb and pfodWebDesigner
|
by Matthew Ford 12th July 2026 (originally posted 17th July
2025)
© Forward Computing and Control Pty. Ltd. NSW
Australia
All rights reserved.
pfodWeb is an open-source, off-line, web page that is a pfod client and code designer. It can connect via Serial, BLE, Bluetooth, TCP/IP and HTTP
12th July 2026 – Added
600 boards to designer and code generation for BLE, TCP/IP and HTTP
connections
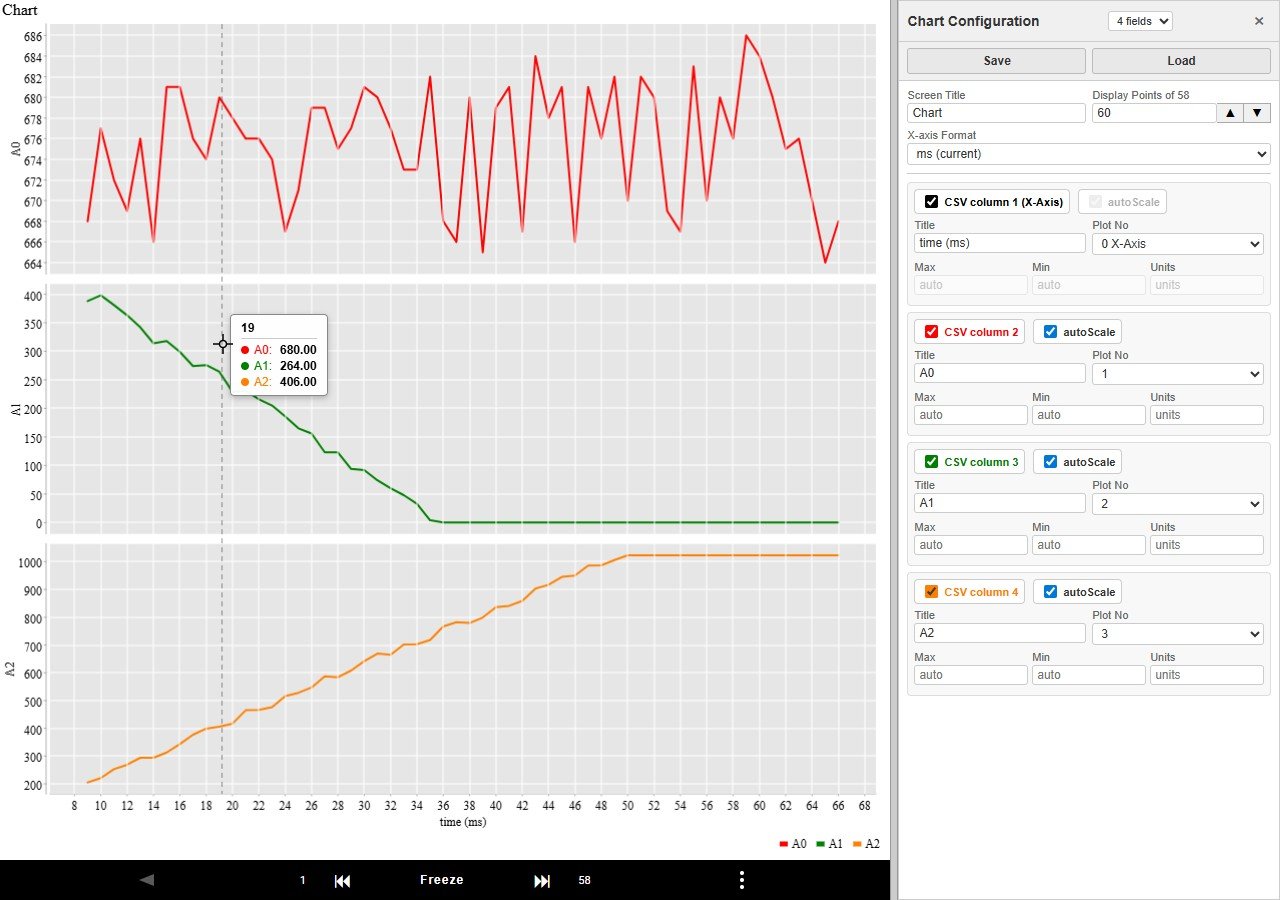
30th June 2026 –
Added Mouse over chart to
display data values
27th June
2026 – Added Minimal C
Code target to Designer and revised pfodProxy connection
26th
June 2026 – Completed
pfodWeb menu support and added Designer connection. pfodWeb not runs
in any brower
18th March 2026 –
Added Charting via Serial, BLE
and WiFi (HTTP)
18th October
2025 – pfodWeb V2 can now connect via Serial, BLE and
WiFi (HTTP)
Install Arduino IDE V2. Install the latest pfodParser library from the library manager OR the pfodParser.zip
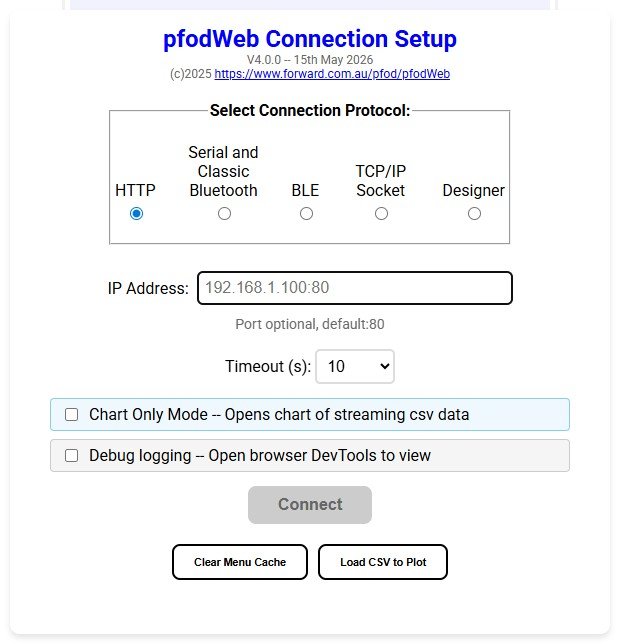
Open …Arduino/libraries/pfodParser/pfodWeb/pfodWeb.html in your browser. Click on the Designer connection, choose your Target board and connect to design your user interface and connect board pins to control, monitor, plot. See the tutorials on building your menu / sub-menus and data logging and charting. Preview the menu and generate the complete Arduino sketch.
Program your board and connect via Serial from pfodWeb.
Follow
the pfodProxy Instructions to install the pfodProxy for your OS
(windows, macOS or linux).
See
pfodWeb_startup.
Make sure the Arduino IDE or other application does not
already have that port open.
pfodWeb will display you
designed control and monitoring menu.
See the docs for more details on pfodWeb and Charting and Data Logging
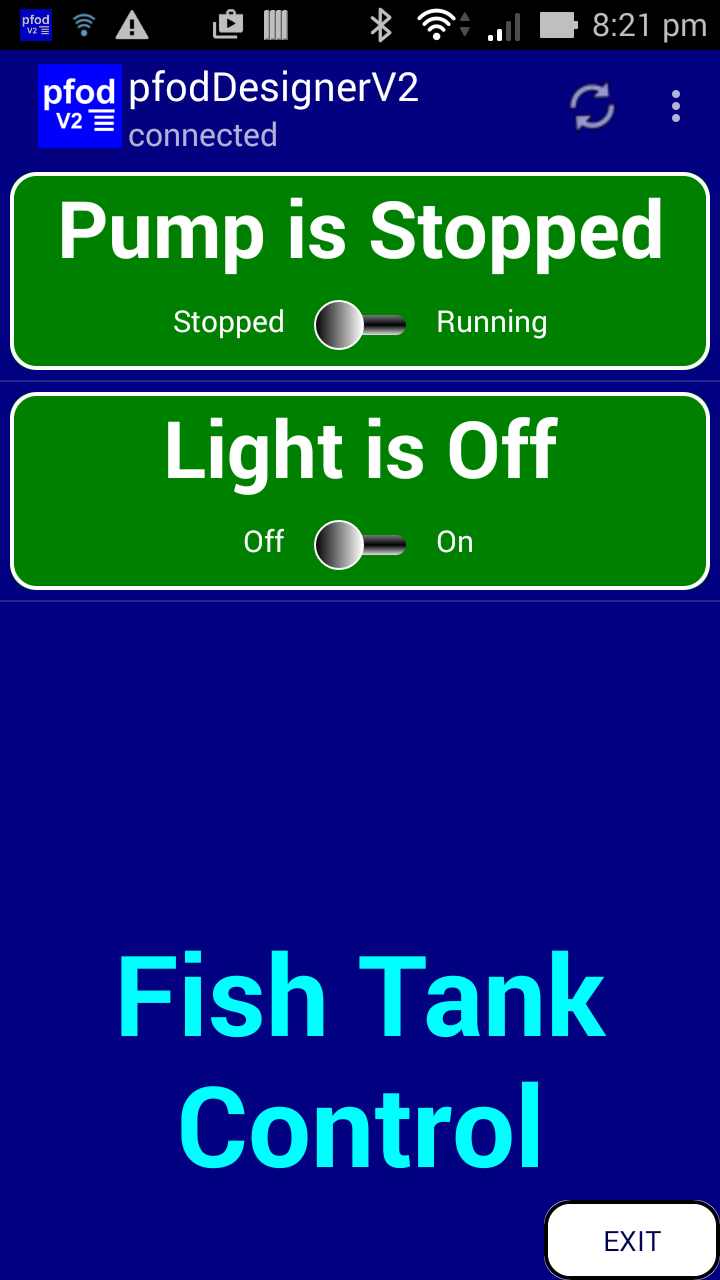
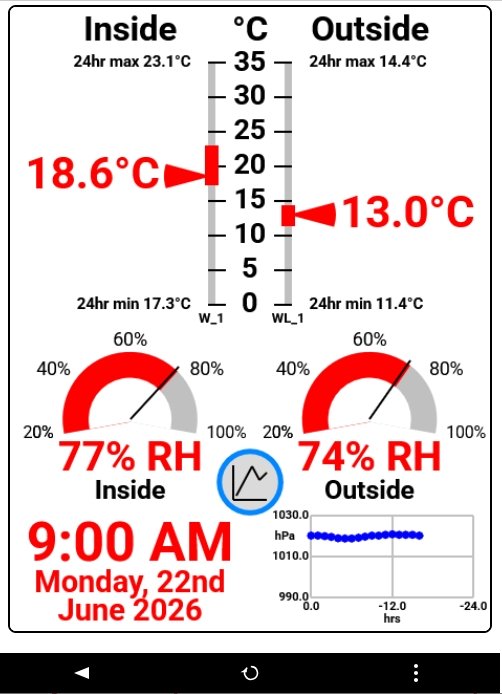
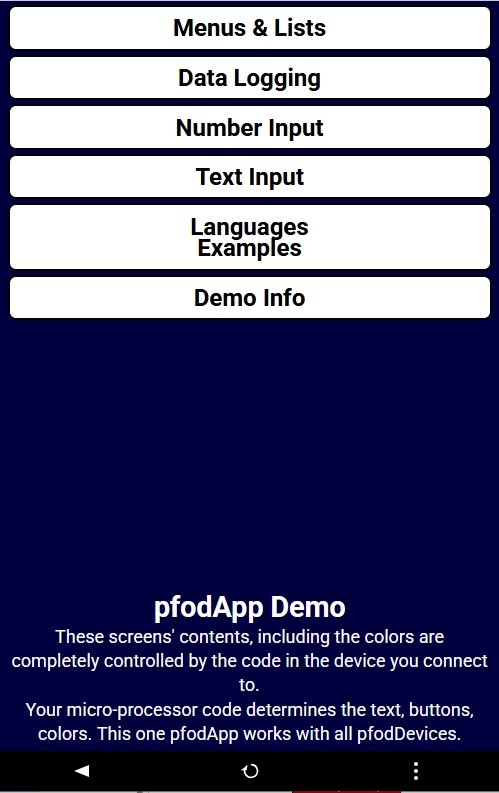
Run the pfodParser library pfodWeb demoScreen examples. The menu items include:- set or pulse an output, display input's level, set PWM / DAC output via a slider, display ADC input in real units (not just counts), buttons, labels, spacers, charts, sub-menus. There is also a drawing menu item to display user designed controls like the Weather Station above.
pfodWeb designer connection lists board
pins for over 600 boards. If you board/connection is not listed,
raise a request on github BUT in the mean time use the
Unlisted Board Serial target to design your menu and attach
pins. The generated code will have place holders like
const
int onoff_Set_Led_Cmd_2_pin = ?; // name the digital output pin for
'Set Led'
for you to fill in
the appropriate pin number for your board.
Use the Chart Only Mode which opens the chart directly and plots and logs streaming CSV data. See Flexible Plotting with pfodWeb
If your board supports HTTP server and has 1MB of file storage, you can server pfodWeb.html directly from your microprocessor for a completely self-contained, off-line, deployment. This allows any browser to display your controls, including iPhones.
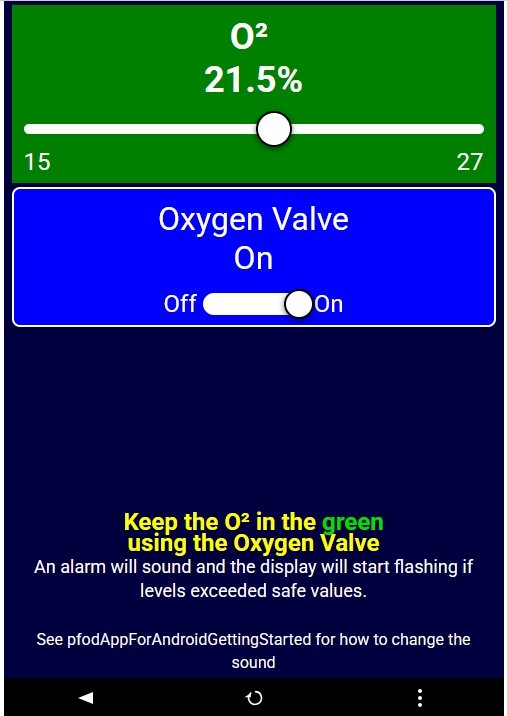
pfod support response controls with immediate user feedback via drawing menu items. See pfodWebDesigner the companion, free web based replacement for the Android app, pfodGUIdesigner. pfodWebDesigner allows you to design interactive and responsive user interfaces for your microprocessor. pfodWebDesigner generates Arduino code that works with all pfodDevices that connect via Serial, Bluetooth, BLE, SMS and WiFi, not just those that have WiFi support. See Design interactive GUI components for pfodApp and pfodWebDesigner
For non-Arduino boards there is a Minimal C Code target that only requires a 'serial' interface. See pfod for Non-Arduino based microprocessors, which has ATTiny and PIC examples.
pfodApp
has been in development for over 25
years. First as a J2ME application and, since 2012, as an paid
Android app.
This javascript web based, pfodWeb.html,
provides a browser based version of pfodApp that can be run on any
modern computer or mobile (including Apple IPhones)
pfodWeb.html is a free web based replacement for the paid Android app, pfodApp. pfodWeb.html runs in any browser and connects to your Arduino board via either Serial, BLE, TCP/IP or HTTP. Using Serial you can connect to any Arduino board and display the menus / interactive controls it serves. pfodWeb.html runs competely off-line. No internet connection is needed. The menus and interactive controls are completely defined by your Arduino using the code generated by the pfodWeb.html Designer connection, or the Android app, pfodDesignerV3. Very compact pfod messages are used to send the controls and receive the user's commands.
Install the Arduino pfodParser library (or download pfodParser.zip). Open …/Arduino/libraries/pfodParser/pfodWeb/pfodWeb.html in your browser. Click on the Serial connection and follow the pfodProxy Instructions to download and run the pfodProxy. The pfodProxy lets you connect via Serial, BLE and TCP/IP. See pfodWeb_startup and Quick Start below
If your Arduino board supports HTTP and has a file system of 1MB, then you can load the all necessary pfodWeb.html files for an HTTP connection onto your microprocessor and serve them directly from there for a completely self contained deployment. See the pfodParser library examples/pfodWeb/demoScreens_http and LedOnOff_http.
pfodWeb includes a Designer connection that lets you design your own menus / charts etc and connect the controls to your board's pins. You can preview the control menus and then generate complete Arduino sketches for your board. This Designer connection is a re-implementation of the pfodDesigner Android app. See the many tutorials on using it to build you own controls and data logging and charting.
pfodWeb can chart and data log csv data streamed from your micro. No menu or GUI is needed. The charting much more flexiable than the default Arduino plotter. You can freeze the chart and zoom in, scale and split the plots or ignore them. For a detailed tutorial on Charting see Flexible Plotting with pfodWeb via Serial BLE, HTTP and also the docs pfodWeb-chart-mode-guide
pfodWeb
and pfodWebDesigner are free and open source. If you want to support
this work, purchase the Android pfodApp
which will work with the same code developed here.
Also see the
free pfodDesigner
Android app for creating menus and charts for pfodApp.
pfodWebDesigner is a companion, free web based replacement for the Android app, pfodGUIdesigner. pfodWebDesigner allows you to design interactive and responsive user interfaces for your microprocessor. pfodWebDesigner generates Arduino code that works with all pfodDevices that connect via Serial, Bluetooth, BLE, SMS and WiFi, not just those that have WiFi support. See how to install pfodWebDesigner and Using pfodWeb Designer to Create GUI's. Individual pfodWebDesigner controls are stored as JSON files which you can duplicate, modify and reuse in other designs. Each reused control can be individually scaled and positioned in the final design.
Install Arduino IDE V2 – For Windows, use the "Windows ZIP" or plain "Windows" executable (EXE) downloaded direct from https://arduino.cc. and allow it to install any device drivers it suggests.
Install the latest pfodParser library from the library manager OR unzip the pfodParser.zip to your Arduino libraries dir
Compile and upload the examples → pfodParser → pfodWeb → demoScreens_Serial example sketch
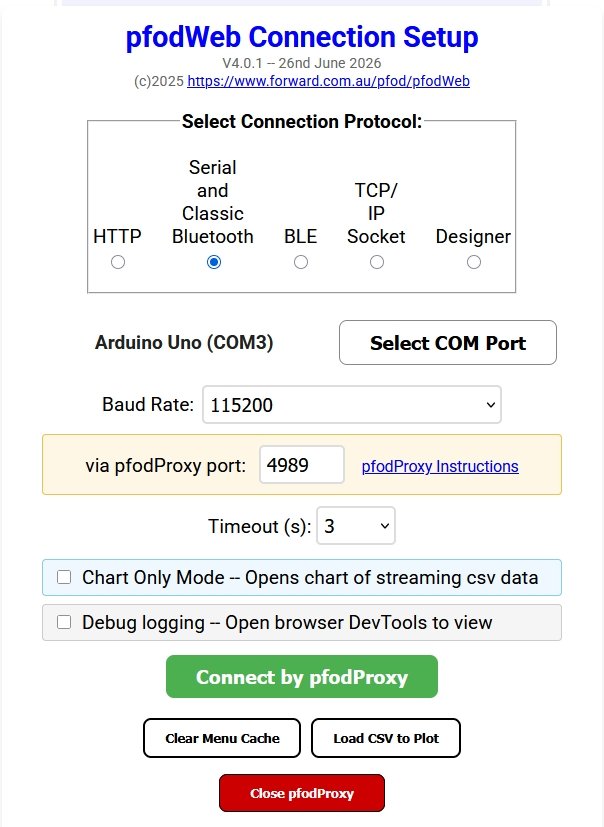
Open …Arduino/libraries/pfodParser/pfodWeb/pfodWeb.html in your browser. Click on Serial connection and follow the pfodProxy Instructions to install the pfodProxy for your OS (windows, macOS or linux). See pfodWeb_startup.
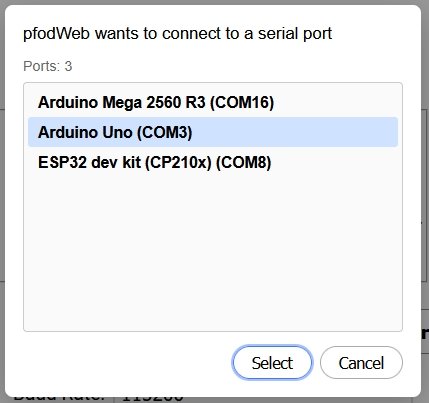
Select Com Port and Connect by pfodProxy
Note:
This will fail if the Arduino IDE or other application already has
that port open. Close the Arduino Serial Monitor.
The pfodWeb Debug logging logs extensive debug messages to the web page console (see How to Open the Developer Console in different Browsers) and displays dotted outlines for the mouse touchZones in drawings.
The
pfodWeb.html page caches the menu data with its version, so that when
requesting updates, only the changes are sent, not the whole menu.
If
the GUI does not seem to displaying your changes, Exit the menu,
using the … button bottom right and Clear Menu Cache and
re-connect.
The companion pfodWebDesigner web app, separate from pfodWeb's
Designer connection, allows you to create your own interactive and
responsive GUI's and then export the Arduino code that will serve
them to pfodApp
or pfodWeb. You have complete control over the size, color, position
and function of the controls you design using pfodWebDesigner.
The
messages that create the GUI are very compact and can be served by
any microprocessor that has a Bluetooth Classic, Bluetooth Low Energy
(BLE) or WiFi connection.
Introductory
pfodWebDesigner Tutorial – Covers setting up
the pfodWeb Designer local server. A simple press button example
illustrates touchZone and touchAction.
Reusing
Controls with InsertDwg – Covers copying dwgs and using
insertDwg to insert multiple copies into the main
drawing.
touchActions
for Instant Feedback – Covers
using touchActions to give instant feedback in a slider
control.
TouchActionInput
for text/number entry – Covers
using touchActionInput to input text / numbers to your micro
Building
Reusable Controls – Covers
building a re-usable popup help button component.
Arduino
IDE V2 (V2.3.6)
Any Arduino board
Libraries
- pfodParser
– Install via Arduino or install the pfodParser.zip
If your Arduino microprocessor supports a web server and has 1MB of available file storage, you can host all the pfodWeb files necessary to connect via HTTP on your pfodDevice (your microprocessor) and serve them from there. Any web browser can be used to display pfod GUI's via HTTP
The pfodParser library has an example sketches LedOnOff_http and demoScreens_http under under File → Examples → pfodParser → pfodWeb. Those sketches compile for ESP8266, ESP32 and Pi PicoW/2W.
1)
Install the Arduino IDE V2 data upload add-on arduino-littlefs-upload
that
will upload the file system data to ESP8266 and ESP32 and Pi Pico
2)
Open the LedOnOff_http or demoScreens_http example sketch and fill in
your network's ssid and password.
3) Edit the
useLittleFSToServe_pfodWeb
to
true to start the microprocessor's LittleFS file system.
bool useLittleFSToServe_pfodWeb = true;
4)
Select a memory setting for the board that has at least 1MB available
for a file system FS/SPIFFS.
5) Upload the sketch.
6) When the
upload is finished, make sure the Arduino Serial Monitor is closed
and press Ctrl+Shift+P to open the tools menu and in the search bar
type Upload
LittleFS to
find the upload too. Select it to load the data
files.
7)
Open the Serial Monitor (within 10sec) to see what IP has been
assigned to your board.
8) In your web browser, any web browser,
enter http://<board_ip>
If
the Serial Monitor shows Connected!
IP address: 10.1.1.10,
then enter http://10.1.1.10 and that
will display your control.
The sketch's /data files are gz compressed and serve up the HTTP connection version of pfodWeb.
Regardless of the setting of useLittleFSToServe_pfodWeb you can always use the pfodWeb.html to access and display the GUI via HTTP by entering the IP address of the board in pfodWeb.html's HTTP connection details.
pfodWeb re-implements pfodApp in js. There are two points of
difference:-
i) pfodSecurity is currently not supported and
ii)
the {@} request for current micro time is not sent. As a fall back
pfodWeb time stamps the first data messages with the local time and
uses that to infer local time from the data's millisecond time
stamps.
The Designer connection in pfodWeb is a re-implemenation of the pfodDesignerV2 Android app. Currently pfodWeb Designer only generates code for Serial connections for AVR and ESP32 boards. More boards and connections will be added later. See the pfodDesignerV3 tutorials for how to generate menus and sub-menus, charts etc.
pfodWeb.html includes a basic set of Android fonts so that the size and spacing of menus and drawings match between pfodApp and pfodWeb. Additional fonts can be added by you without having to re-compile pfodWeb.html. See the extraFonts Guide
pfodWeb now runs in any browser released after 2017. pfodWeb uses pfodProxy to connect to Serial, BLE and TCP/IP connection. pfodProxy runs on Windows, MacOS and linux systems from 2017 onwards.
The pfodWeb Designer connection generates complete Arduino sketches for Serial connections (to be expanded later). pfodWebDesigner generates complete sketches for Serial, BLE and WiFi. The free pfodDesignerV2 Android app generates complete sketches for Serial, BLE and WiFi.
Serial is the simplest sketch, and works with any Arduino board. You can keep printing debug msg which will be sent along with the pfod messages and can be viewed in the Raw Message View. For non-Arduino microprocessors there is a Minimal C Code code generator that will work with any micro with 2KB of flash, e.g. PIC, Attiny84/85 etc. See Control of Non-Arduino based micros for examples.
HTTP is the connection to use for completely self-contained deployments. You server pfodWeb.html from your micro's file system. Nothing else need to access and control your micro.
BLE is the third option, if your Arduino board supports a Nordic UART connection. The pfodWebDesigner and the free Android pfodDesigner app generates complete BLE sketches for the ESP32 and other boards. You can connect using pfodWeb or the Android pfodApp Android.
TCP/IP is the final option. The free Android pfodDesigner app generates complete sketches for a range of boards. You can connect using pfodWeb or the Android pfodApp Android.
pfodWeb.html is pure html / js and does not use any external
packages or downloads. You can run pfodWeb completely off-line with
no internet connection. pfodProxy is written in Rust.
The entire
source code is available on Github
and in pfodWeb_src.zip,
pfodWebDesigner uses nodejs to run a local server on your computer. So you need to install nodejs on your computer, but no other modules need to be downloaded and once the main nodejs is installed you can run completely off-line with no internet connection. pfodWebDesigner.zip contains all the source code and comes with all necessary (un-compromised) nodejs packages it needs. pfodWebDesiger is also hosted on Github.
There have been a number of attacks on NPM packages recently, see Shai-Hulud malware campaign (local copy here) and NPM Supply Chain Attack (local copy here). None of the compromised packages are used by pfodWebDesigner.
This page covered using pfodWeb to display interactive GUI's served by your Arduino board via Serial, BLE or HTTP. The Serial connection allow any Arduino board to serve its own custom GUI to control it operation and display its measurements.
AndroidTM is a trademark of Google Inc. For use of the Arduino name see http://arduino.cc/en/Main/FAQ
The General Purpose Android/Arduino Control App.
pfodDevice™ and pfodApp™ are trade marks of Forward Computing and Control Pty. Ltd.

Contact Forward Computing and Control by
©Copyright 1996-2024 Forward Computing and Control Pty. Ltd.
ACN 003 669 994