
|
Home
| pfodApps/pfodDevices
| WebStringTemplates
| Java/J2EE
| Unix
| Torches
| Superannuation
|
| About
Us
|
|
|
pfodApp controlled IR Temperature Meter with Menus
|
by Matthew Ford 16th August 2016 (original
9th September 2013)
© Forward Computing and
Control Pty. Ltd. NSW Australia
All rights reserved.
Updated: 16th
August 2016 – Revised to use
pfodParser
library v2.37+, correct spelling and clarify saving of
readings
Note: The screens shown here are pfodApp V1 screens. You
should use pfodDesignerV2 to generate your own pfodApp V2 screens.
This project builds on pfodApp
IRTemp Meter (Arduino/Android Bluetooth) by menus that allow you
to select between Fahrenheit and Celsius display. Displays the
averaged reading and lets you select the number of readings to
average over. The reading are automatically saved to a file on your
Android mobile for later transfer to your PC for further
processing/plotting. The complete
parts list is here.
No Android
programming is required.
You
can make this unit stand alone and portable by adding a 9V battery as
described
here.
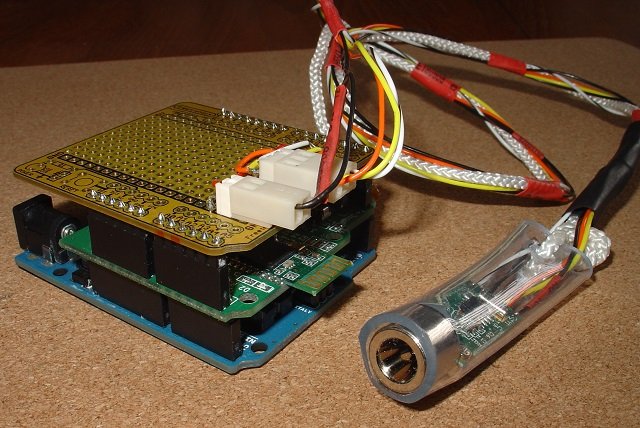
This change will be done in two steps:- First the basic menu will be added to allow you to change between oF and oC and to start logging the reading. Then the averaged reading will be added to the display together with a sub-menu to allow you to select the number of samples to averaged. The complete sketch, pfodUnoIRTempMenus.ino, is here and also included in the examples for the Arduino pfodIRTemp library. Unzip pfodIRTemp.zip to your Arduino library directory.

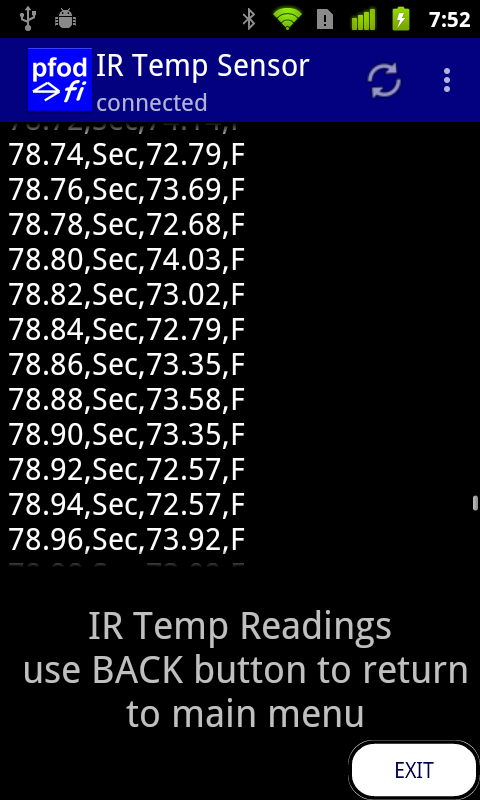
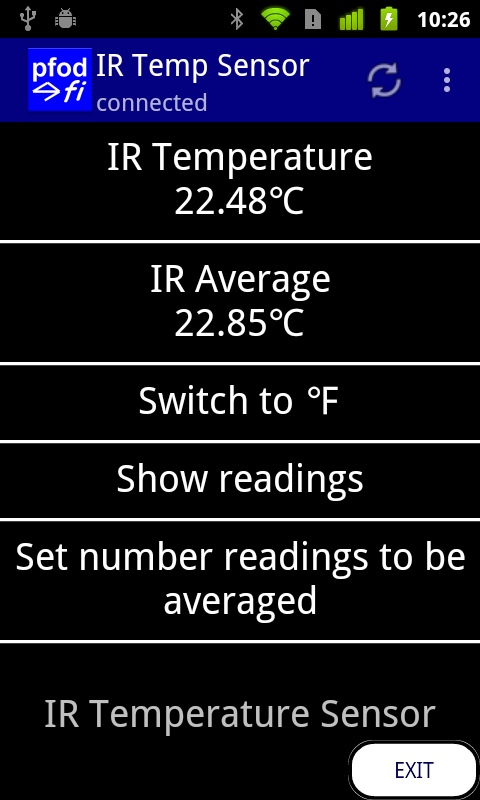
Above screen shots show the basic menus that will be added and the screen that the “Show readings” menu will open. Update, pfodApp V2 automatically saves reading to a file so the previous “Save readings ..” button has been renamed to the more accurate “Show readings”. The first part of the sketch with these basic menu items is here (pfodUnoIRBasicMenus.ino)
The previous sketch, pfodUnoIRTempData.ino, needs to a) handle more commands and b) send a main menu with more items and update the main menu when the reading is changed from Fahrenheit to Celsius.
First handling more commands, the top of the loop() method in the sketch becomes
  void loop() {
  byte  cmd = parser.parse();
  if (cmd != 0) { // got something
    if (cmd == '.') { // main menu request
      sendMainMenu();
    } else if (cmd == 'c') {
      switchScale();
      sendMainMenuUpdate();
    } else if (cmd == 's') {
      // open Streaming Raw Data screen
      Serial.print(F("{=IR Temp Readings\n use BACK button to return\n to main menu}"));
    } else { // we don't handle message
      Serial.print(F("{}")); // BUT always respond or pfodApp will timeout
    }
  }
This code add support for two new commands 'c' and 's' in addition to the existing request for main menu command '.'
When the Android pfodApp sends the message {c} the Arduino pfodDevice pfodParser will parse it and return 'c' in the cmd variable which will call switchScale and send back an update to the main menu with the current temperature reading in the new scale. The swichScale method is just
  void switchScale() {
    fahrenheit = !fahrenheit; // toggle from fahrenheit to Celsius
  }
When the Android pfodApp sends the message {s}, the Arduino pfodDevice will send back the Streaming RawData screen message, {=IR Temp Readings\n use BACK button to return\n to main menu} to ask the Android pfodApp on the Android mobile to open the RawData screen which both displays the readings. pfodAppV2 automatically save all raw data to a file once it receives a response to the main menu request, {.}. Once started, the data is continued to be saved until the connection is closed. Note that the text to be displayed on this screen is broken into a number of lines using the newline char escape sequence, \n
The code for the methods sendMainMenu() and sendMainMenuUpdate() is
void sendMainMenu() {
  Serial.print(F("{" // start message
                 "."));  // tell pfodApp this is a menu screen
  sendMainMenuWithLatestTemp();
}
// send the update to main menu
void sendMainMenuUpdate() {
  Serial.print(F("{" // start message
                 ":"));  // tell pfodApp this is an update to the existing menu screen
  sendMainMenuWithLatestTemp();
}

void sendMainMenuWithLatestTemp() {
  Serial.print(F("IR Temperature Sensor" // display name of menu
                 "`1000" // tell pfodApp to re-request again this menu after 1sec
                 "|t~IR Temperature\n")); // first menu time temp + reading
  if (fahrenheit) {
    Serial.print(irTemp.convertToFahrenheit(lastTemperatureReading));
    Serial.print(F("F"));
  } else {
    Serial.print(irTemp.convertToCelsius(lastTemperatureReading));
    Serial.print(F("C"));
  }
  Serial.print(F("|c~Switch to\n")); // next menu item
  if (fahrenheit) {
    Serial.print(F("Celsius (C)"));
  } else {
    Serial.print(F("Fahrenheit (F)"));
  }
  Serial.print(F("|s~Show readings" // last menu item
                 "}")); // close message
}
As you can see the only difference between the two methods is that {. starts the main menu while {: starts the update. The menu update message, {: , was designed for just this use, where after processing a command you want to just update the existing menu. Updating a menu can change the text displayed to the user and hide / unhide individual menu items by blanking / unblanking their display text. See the pfodSpecification for the details.
An interesting part of this menu (and its update) is the `1000 which tells the Android pfodApp to resend, every 1sec (1000mS), the command that returned this menu. This means every 1sec the Android pfodApp will resend the request for main menu message, {.} , and the Arduino pfodDevice will reply with its main menu containing the latest temperature reading. So the Andriod mobile display is constantly being updated with the current IR temperature.
The revised sketch with these basic menu changes is available here (pfodUnoIRBasicMenus.ino)
The last change for this stage of the project is to average the readings and allow the user to select the number of samples to be used in the average.
Because the IR temperature sensor is so responsive, its reading jumps around. Taking an average of a number of readings provides a more stable display. This step will add an averaging method and a sub-menu to allow the user to select the number of samples to be averages. Because the averaging introduces a delay in the display, this code will also include a command to re-set the average value to the current reading and then continue to average from there.
The complete sketch, pfodUnoIRTempMenus.ino, is here. This sketch also replaces the F and C with the unicode characters for Fahrenheit and Celsius as shown in the screen shot at the top of this page.
When the “Set number of readings to be averaged” menu is selected, the Arduino pfodDevice sends back a single selection list screen message, {? , for the Android pfodApp to display. The message is created by the sendNumberReadingToAverageMenu() method
  void sendNumberReadingToAverageMenu() {
     Serial.print(F("{?m`")); // single selection list returns index of selection 0 to n
     Serial.print(idxNoSamples); // current selection
     Serial.print(F("~Set number of samples to be averaged" // prompt
                    "|Average 2 Readings|Average 4 Readings|Average 8 Readings|Average 16 Readings|Average 32 Readings" // choices
                    "}"));
  }
If the current index selection is
2, this message would be
{?m`2~Set
number of samples to be averaged|Average 2 Readings|Average 4
Readings|Average 8 Readings|Average 16 Readings|Average 32
Readings}
See
the pfodSpecification for the
details of this message's format.
Which the Android pfodApp would display
as
When the user selects another option, say 32 averages, and clicks save, the Android pfodApp sends back the message {m|4} where m is the command associated with this screen and 4 is the index (starting at 0) of the option selected.
In order to parse this message, the Arduino pfodDevice needs to use the pfodParser which handles the full range of pfod messages. So the includes at the top of the sketch are #include "pfodEEPROM.h" and #include "pfodParser.h" and a pfodParser is constructed, pfodParser parser;
The command handling code now needs to handle some more commands, 'a' , 'n', 'm'. The {a} command is returned when the user clicks on the IR Average menu item and it re-sets the average to the current reading. The {n} command is returned when the user selects the “Set number of readings to be averaged” menu time and as shown above the Arduino pfodDevice returns a screen to allow the user to select the number of readings to average. The {m| ... } command is returned when the user has made a selection from the single selection list of samples to average. The number after the | indicates the index, starting at 0 of the users choice. e.g. {m|4} indicates the user selected the 32 readings choice.
For the 'm' command the code need to parse the number following the | and update the number of reading to be averaged. The pfodParser provides simple methods to do this argument parsing as shown below. Remember the call to parser.parse() will return 0 until the closing } of the pfod message is received. Then parser.parse(); will return the first byte of the command. All the commands here are only one byte so that is the complete command. The command handling code now looks like:-
  byte  cmd = parser.parse();
  if (cmd != 0) { // got something
    if (cmd == '.') { // main menu request
      sendMainMenu();
    } else if (cmd == 'c') {
      switchScale();
      sendMainMenuUpdate();
    } else if (cmd == (byte)'a') {
      // clear the average to current temp
      clearAverage(lastTemperatureReading);
      sendMainMenuUpdate(); // send updated menu with new average
    } else if (cmd == 's') {
      // open Streaming Raw Data screen
      Serial.print(F("{=IR Temp Readings\n use BACK button to return\n to main menu}"));
    } else if (cmd == (byte)'n') {
      sendNumberReadingToAverageMenu();
    } else if (cmd == (byte)'m') {
      byte* idxPtr = parser.getFirstArg(); // parse 1 arg as a number
      long longResult;
      parser.parseLong(idxPtr, &longResult); // only one arg
      idxNoSamples = (byte)longResult; // update current selection
      setNoReadingsToAverage((int)idxNoSamples); // set new average
      Serial.print(F("{}")); // always respond or pfodApp will timeout
    } else { // we don't handle message
      Serial.print(F("{}")); // BUT always respond or pfodApp will timeout
    }
}That completes the Uno version of the pfodIRTemp Meter. All these versions only required Arduino code changes. No Android programming was required. The same pfodApp was used throughout and is also used for other diverse functions see www.pfod.com.au for other projects.
Notice that the Arduino pfodDevice code does not keep track of the menu hierarchy. It is the Android pfodApp's job to do that. So that when the user has finished selecting the number of reading to average, the pfodDevice just processes the command and returns {} to the Android pfodApp. The pfodApp has kept track of from which menu the user chose the item that opened the number of averages selection screen. Then when that the pfodDevice returns {} the pfodApp knows to resends the command that will ask the pfodDevice for that menu again, in this case the main menu. This makes the Arduino code very simple even when there are nested menus. The Arduino code just processes each command it receives, ignoring how many menu hierarchies the user traversed to get to it.
The next stage in this project will be to make a battery powered portable version using an FioV3 board.
AndroidTM is a trademark of Google Inc. For use of the Arduino name see http://arduino.cc/en/Main/FAQ
The General Purpose Android/Arduino Control App.
pfodDevice™ and pfodApp™ are trade marks of Forward Computing and Control Pty. Ltd.

Contact Forward Computing and Control by
©Copyright 1996-2020 Forward Computing and Control Pty. Ltd.
ACN 003 669 994