
|
Home
| pfodApps/pfodDevices
| WebStringTemplates
| Java/J2EE
| Unix
| Torches
| Superannuation
| CRPS Treatment
|
| About
Us
|

|
BLE Window/Door Open Detector and Rain Detector
|
by Matthew Ford 16th September 2024 (original 1st May
2024)
© Forward Computing and Control Pty. Ltd. NSW
Australia
All rights reserved.
Update 16th September 2024 –
This project is superceded by the more accurate and sensitive Audio
Rain Sensor and Window Open DetectorUpdate
17th May
2024 – See Using the
RG-9 Rain Detector for a version of this project that uses the
Hydreon RG-9 to detect rain instead of the PCB used here.
Why this project? On a number of occasions we found that the up stairs bedroom windows had been left open during a rain storm. This project installs very simple, long life, BLE window open detectors and a simple receiver and rain detector.
This project has the following features :-
– The
window/door open detector has just 3 components, is wireless (BLE)
and runs for 5 years on a coin cell.
– Human readable BLE
output Open/Closed
– The receiver/rain detector is a small
ESP32 module, push button and a buzzer and indicator led and PCB rain
detector.
– The buzzer can be silenced with the push button
or via the Android pfodApp
– A simple web page is provided
for monitoring and debugging
– pfodApp provides a diagram of
the windows layout and indicates which are open and when it is
raining
– No Android programming is required. All the
display code in your Arduino sketch. You draw your own custome layout
in the free pfodGUIdesigner
and then generate the code to update Arduino sketch so that pfodApp
will display to your custom layout on your Android mobile
The Parts List. (Prices as at 1st May 2024 excluding shipping)
This project used:-
1 x nRF52832 module Holyiot nRF52832 –
YJ-16048 – US$5 (Aliexpress)
1 x TLZWLA micro switch --
US$0.92 for 10 off (Aliexpress)
1 x CR2032 coin cell ~ US$1.00
1
x Aokin CR2032 Battery Holder – US2.51 for 10 off
(Aliexpress)
1 x PCB (see below for the eagleCad/gerber files) ~
US$1.40 (each for 30off White, www.pcbcart.com)
Nylon nuts bolts
2mm and 3mm ~ US$13 (80off) (Autumn Sun Store, Aliexpress)
Code
lp_BLE_micro
switch.ino and pfod_lp_nrf52_2024
Arduino board support and
these libraries
There are many other nRF52832 options e.g. XL52832-D01 and adaptor plate which as 0.1” pin spacing to suit veroboard and other micro switch options when could be mounted separately from the BLE module.
This project used:-
1 x ESP32C3 –
Seeed
Studio XIAO ESP32C3 (SKU 113991054) – US$5.00
1 x
Plastic box – Jaycar
HB6009 ~ US$5.80
1 x RCA plug – Jaycar
PP0240 ~ US$0.65
1 x RCA Panel socket – Jaycar
PS0275 ~ US$1.00
1 x Momentary Switch Panel mount –
Jaycar
SP0656 ~ US$4.20
1 x VeroBoard – Jaycar
HP9540 ~US$4.30
1 x 6m shielded cable – Jaycar
WB1500 ~ US$3.00
1 x Buzzer – Jaycar
AB3456 ~ US$6.80 (dual tone only constant tone input used)
1 x
Rain Detector PCB ~ US$0.44 (ElectronicFans, Aliexpress) (only the
PCB used not the switching module see below)
1 x 5mm Orange Led
80mcd – Jaycar
ZD0169 ~ US$0.25 (not bright enough for use in direct light)
1
x pfodApp
Android app AU$13
Code RD_ESP32C3_BLE_Scanner_Server.zip
and ESP32
V2.0.11
Arduino board support and these libraries
(same as for BLE above)
The BLE Open/Closed Sensor is trivial as the circuit below shows (pdf version). Just a basic nRF52832 module and a coin cell and micro switch.
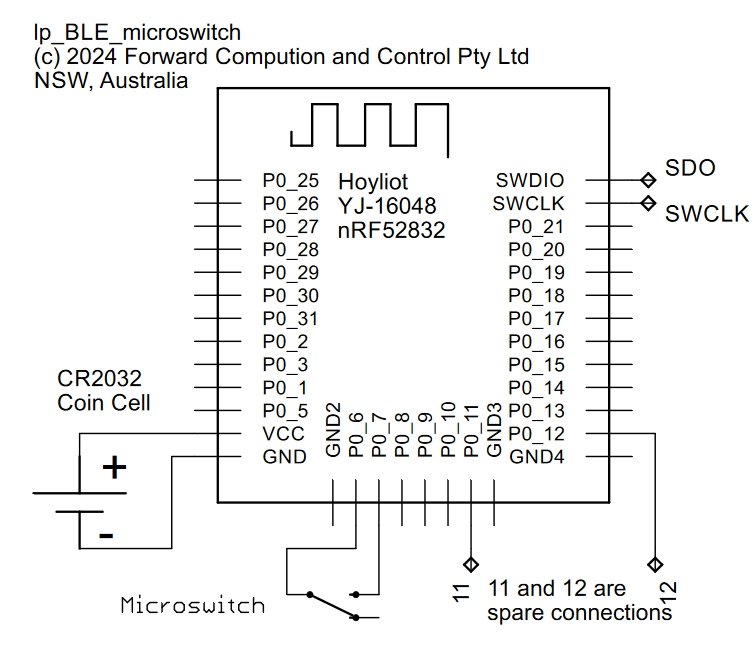
The Eagle Cad files and the pcb gerber files are in the WindowOpenBLE_Eagle.zip file.
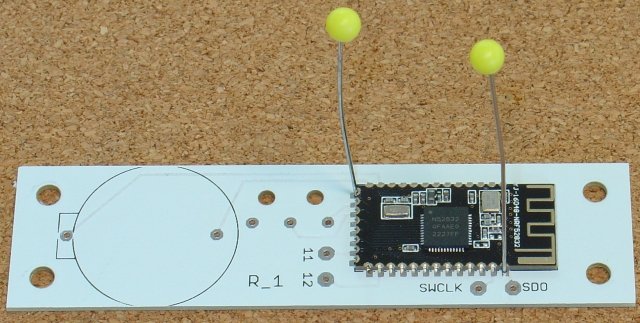
The PCB has a few pin holes that can be used to locate the BLE module while it is being soldered.
Programming
Install the pfod_lp_nrf52_2024 Arduino board support as described in Easy Very Low Power BLE in Arduino
Unzip the WinOpenDetect_libraries.zip, to your Arduino sketch dir (Note: the Arduino .add .ZIP file does not work as the zip contains multiple libraries)
The sketch to program is lp_BLE_micro switch.ino. Each module should be assigned a unique name. Set the LOCAL_NAME at the top of the sketch.
const char LOCAL_NAME[] = "Front_Bedroom_Win_Rhs"; // Bedroom 1 window 1, (max 24char)
When programming the module, it is best to solder the power and SWCLK and SDO cables directly to board and programmer. Jumper cables are convenient but become unreliable after repeated use.
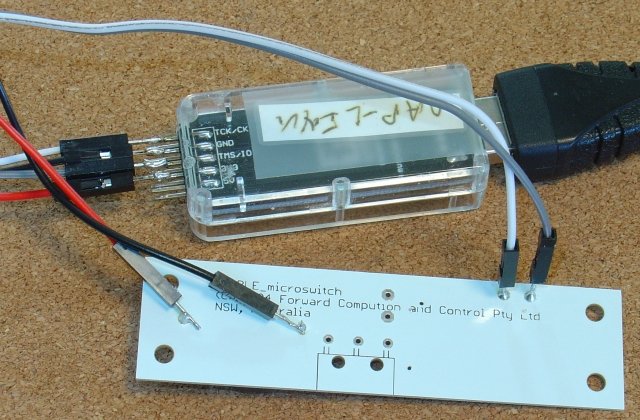
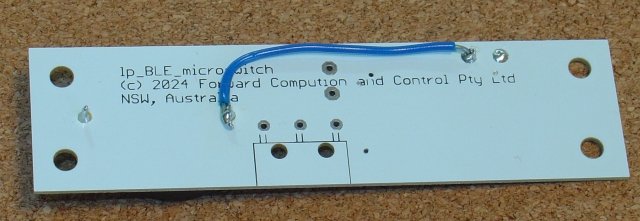
After programming, connect the SWCLK to GND (battery -ve) to prevent noise triggering the module into program mode..
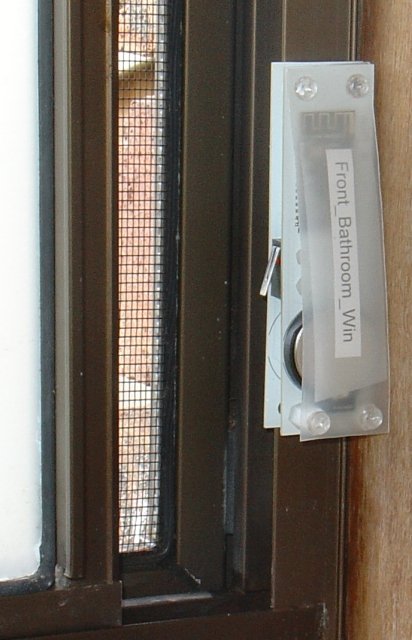
The choice of micro switch depends on your particular situation. These four (pictures below) provide for a range of spacings between the PCB and the window panel.
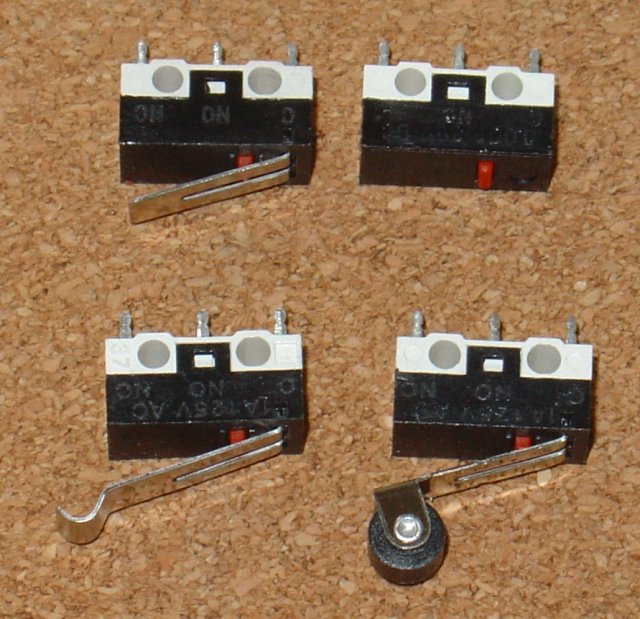
If the window frame is wood, you can just use one PCB with the micro switch mounted on the same side as the BLE module and battery and then use double sided tape to attache the PCB in the correct position.
However if the window frame is metal, use a double decker arrangement shown below to space the BLE module (and its antenna) away from the metal frame. For further flexibility you can mount the PCB remotely and run two wires to the micro switch on the window.

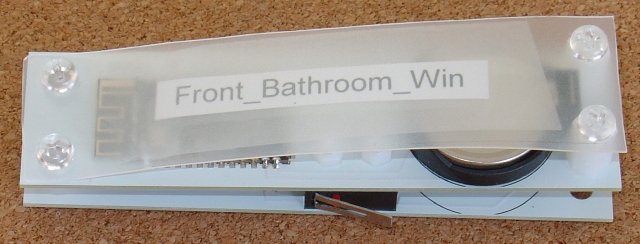

Repeat this for each window giving a different LOCAL_NAME to each module. You can check the operation using Nordic nRF Connect Android app.
Checking BLE Module Operation
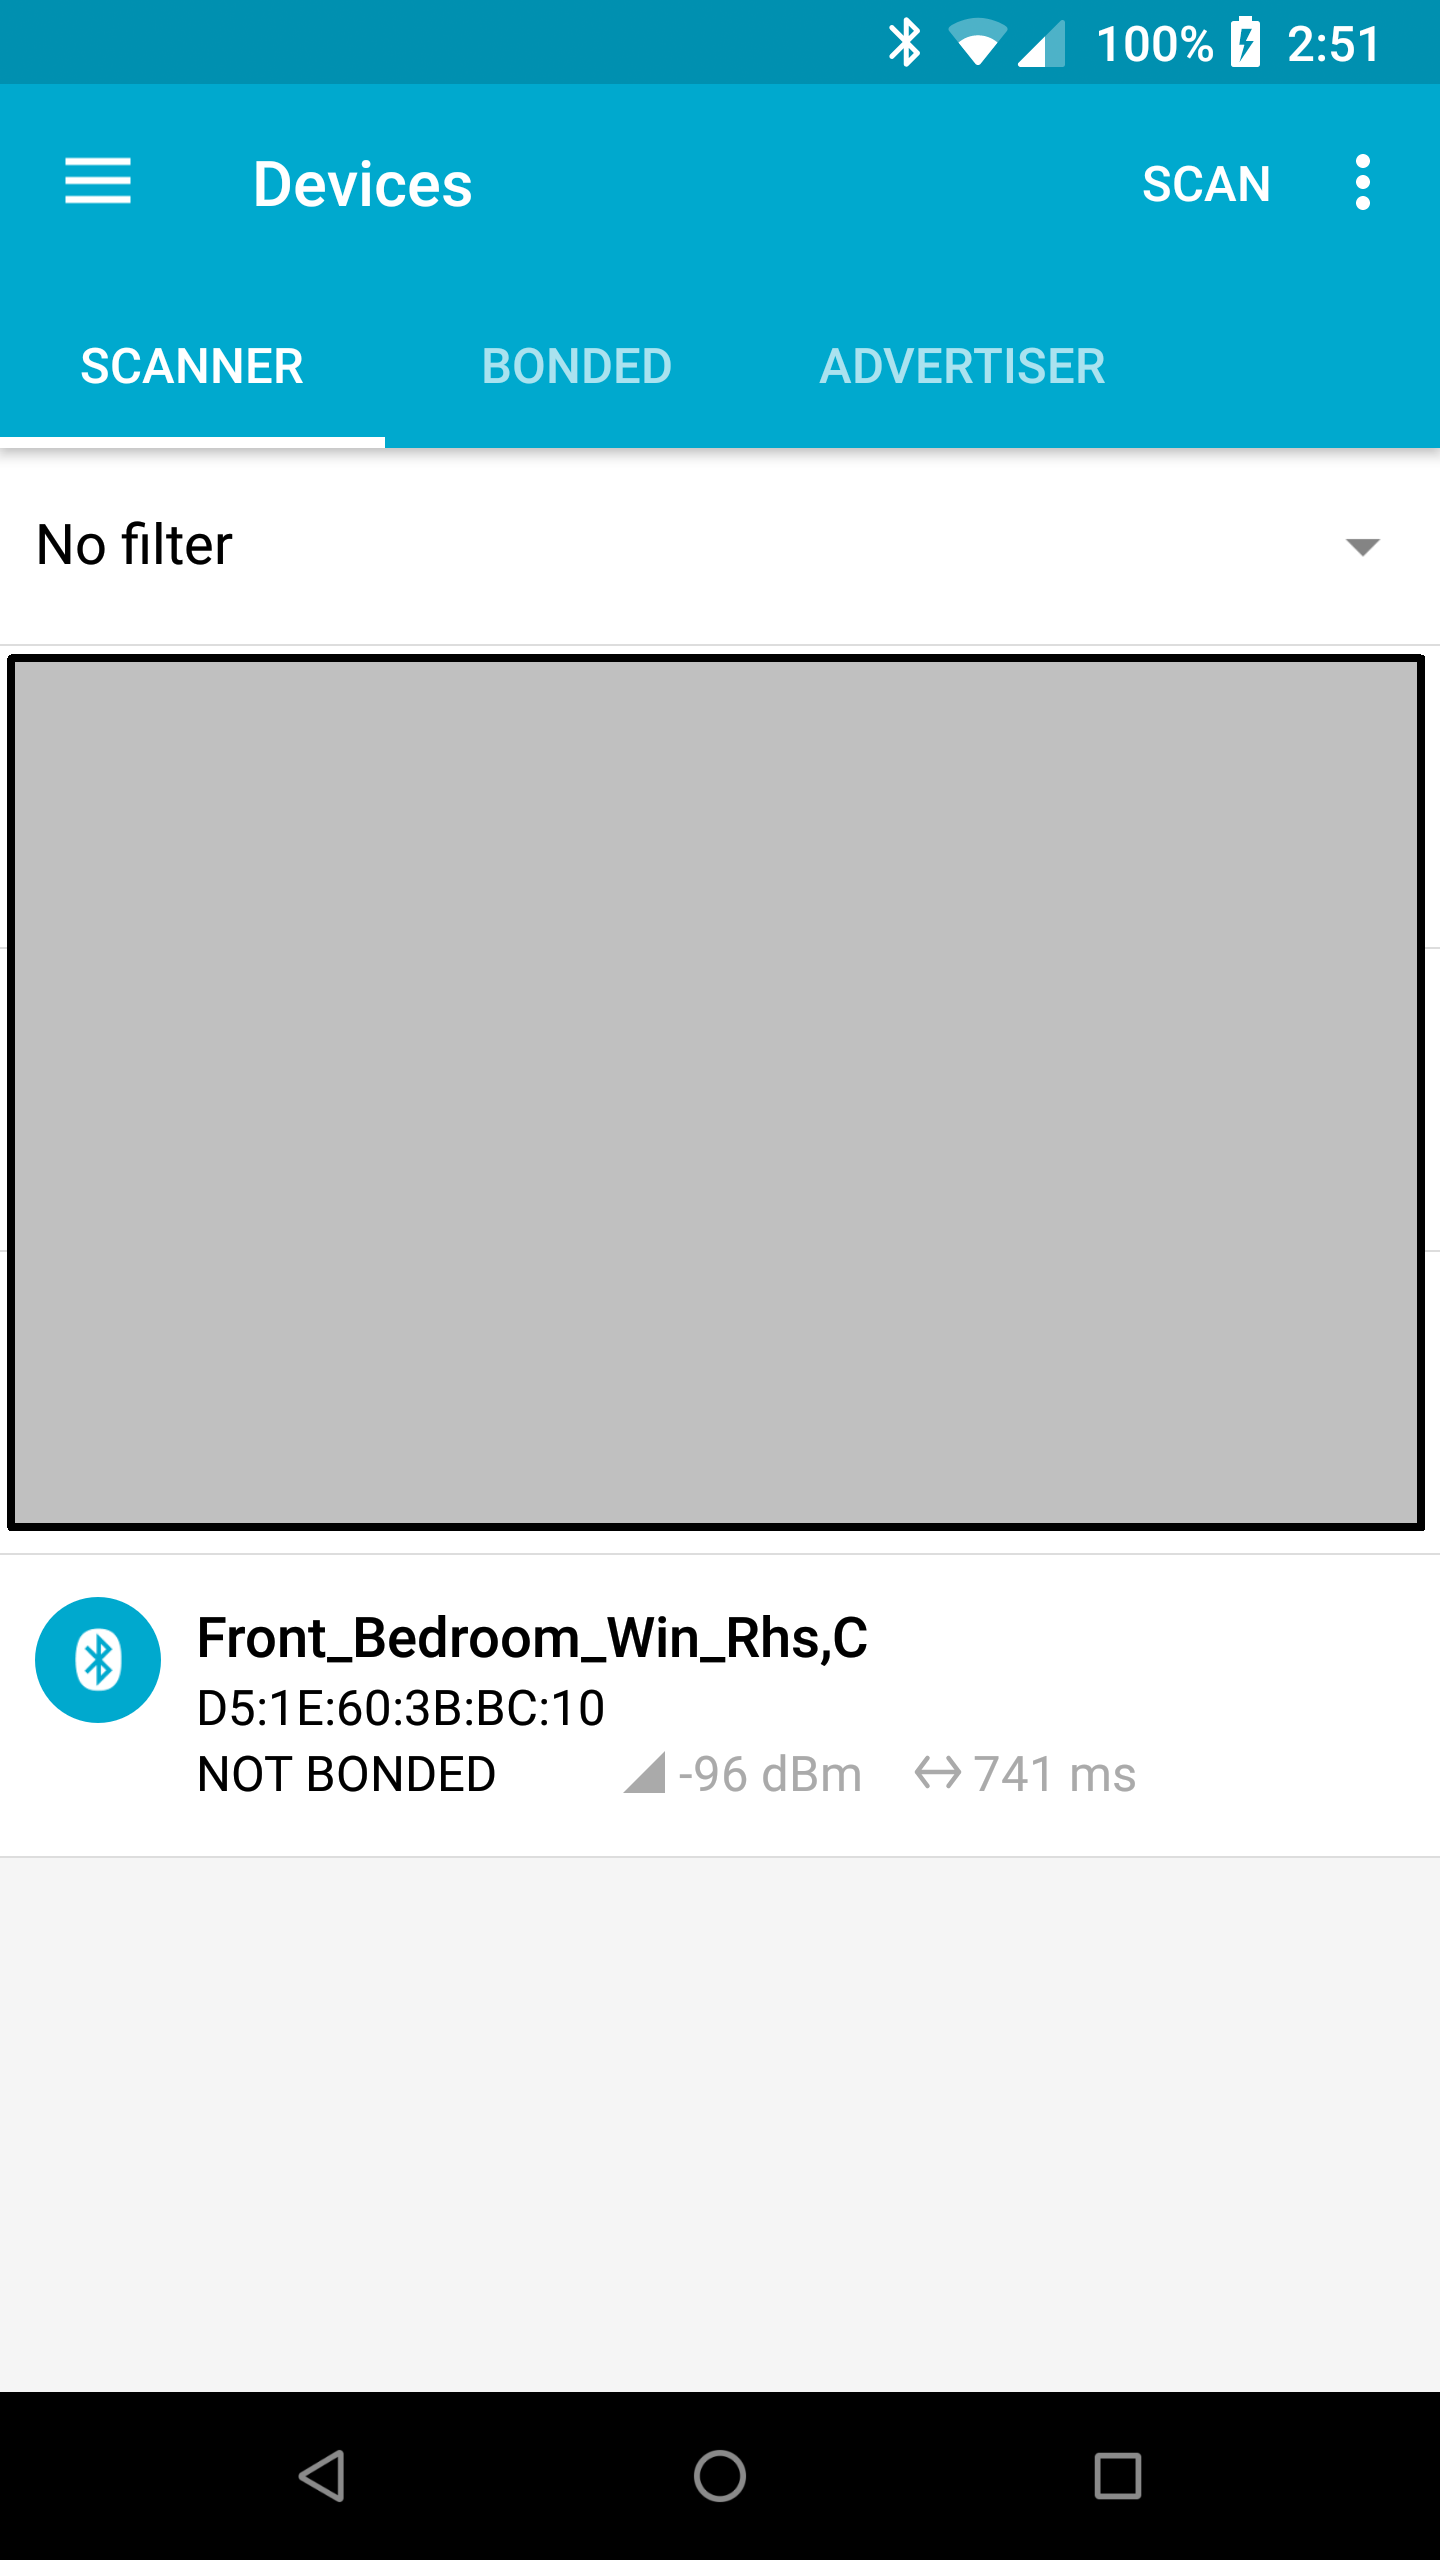
Open the app, it will start scanning for devices. Press the micro switch with your finger to trigger it closed and it will advertise its LOCAL_NAME with ,C (for Closed) appended, for 10sec. i.e. Front_Bedroom_Win_Rhs,C above. Release the micro switch and the advertised name will change to end in ,O for Open. Open and close the window to see that the micro switch is triggered.

Construction
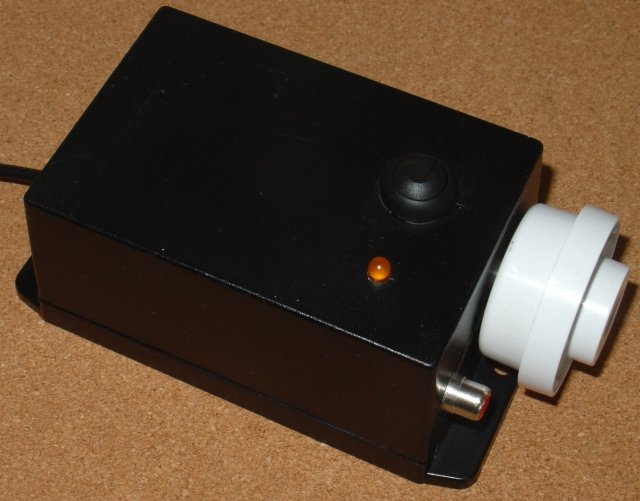
The Receiver/Rain Detector is also very simple. (schematic pdf here)
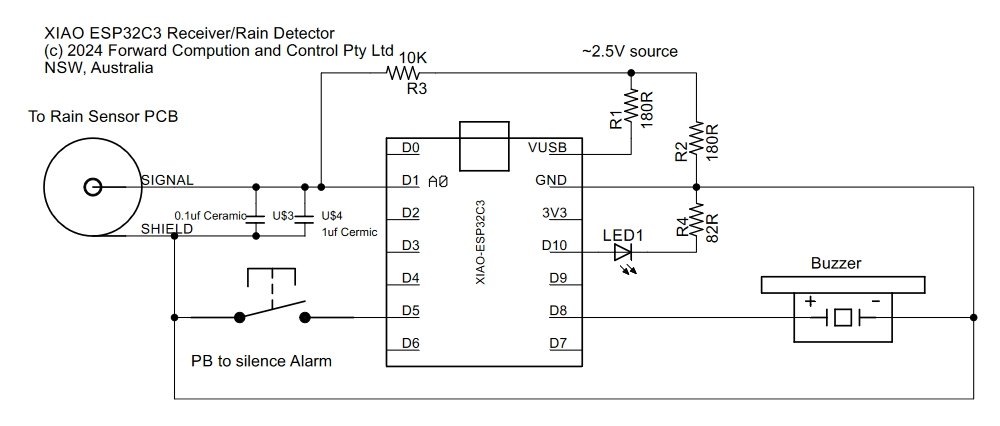
It is constructed on veroboard and mounted in a small plastic box.
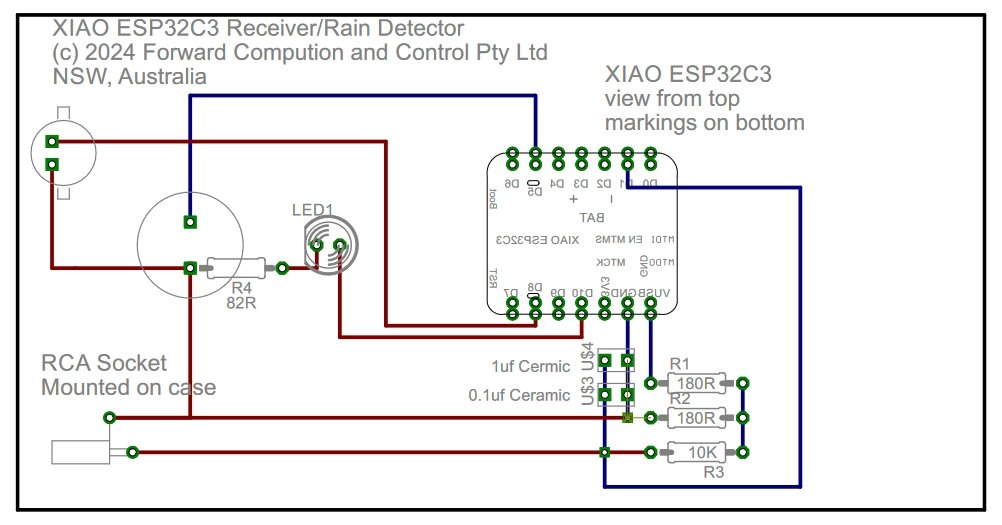

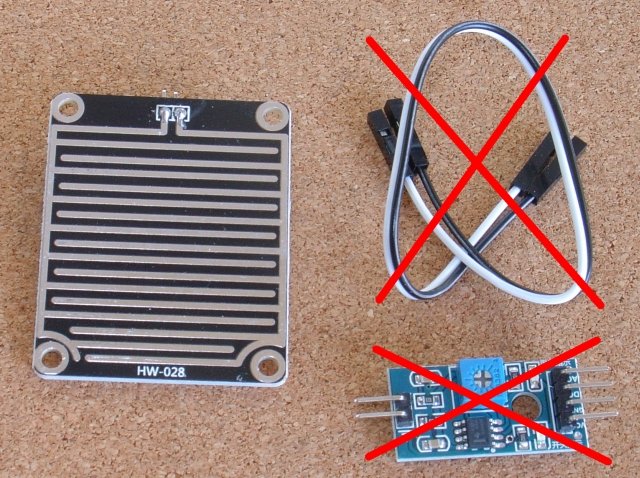
The rain detector is a small PCB from this rain detector kit (Aliexpress – Rain Detection Sensor ~US$1.00 + shipping). Only the PCB was used and wired via shielded cable and an RCA plug to the Receiver/Detector which uses the ESP32C3 ADC to measure the voltage across the PCB. You could also just use some veroboard strips alternately connected to replace the PCB detector.
This rain detector, while inexpensive,
has some drawbacks:-
1) Once it gets wet it takes some time to
dry out
2) The PCB track corrode which increase the wet
resistance and upsets the detection of the wet/dry transition.
A more expensive optical rain detect is being investigated to replace the PCB.
Programming
Install the ESP32 board support V2.0.11 (other later versions may also work) See https://docs.espressif.com/projects/arduino-esp32/en/latest/installing.html for instruction. Choose V2.0.11 from the drop down version.
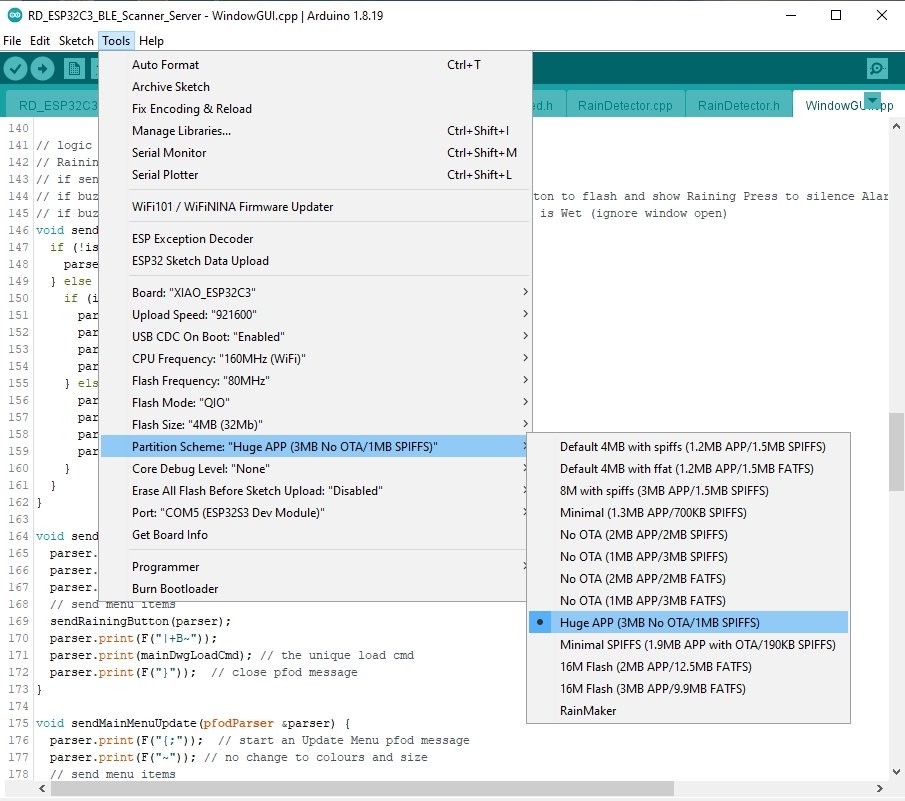
Select Board “XIAO_ESP32C3” and the Partition Scheme “Huge APP (3MB No OTA/1MB SPIFFS)”
Unzip the required libraries, WinOpenDetect_libraries.zip, to your Arduino sketch dir (Note: the Arduino .add .ZIP file does not work as the zip contains multiple libraries)
Unzip RD_ESP32C3_BLE_Scanner_Server.zip to your sketch directory. At the top of the RD_ESP32C3_BLE_Scanner_Server.ino file set the names of the BLE Open/Close monitors to match the ones you programmed your BLE modules with.
char expectedDevices[][MAX_BLE_ADVERTISED_NAME]
  = { "Front_Bedroom_Win_Rhs", "Front_Bedroom_Win_Lhs", "Front_Bathroom_Win", "Back_Bedroom_Win_Lhs", "Back_Bedroom_Win_Rhs" };
Then program the XIAO ESP32C3. See
the FAQ near the end of the page on Getting
Started with Seeed Studio XIAO ESP32C3 if you cannot see the COM
port for the ESP32C3 or if your program download fails.
Operation
The receiver/detector runs a BLE scanner, a web server, a tcp server and an ADC monitoring the rain detector. It also runs ESPAutoWiFiConfig to let you connect to your network and set the device's static IP. See ESPAutoWiFiConfig for the details. Here the config/connected indicator led has been omitted (pinNo is 0) but you can add another connection led to a spare XIAO output if you wish.
BLE scanner
The BLE scanner runs on its own task, bleScannerTask, in RD_ESP32C3_BLE_Scanner_Server.ino. It scans for 2 seconds and updates the LastSeenOpenClosed list with the state of the expectedDevices. The bleScannerTask is the only task that writes to the LastSeenOpenClosed, other tasks and the main loop() only read volatile values from the list. The ESP32 is a 32bit CPU and data types that are <=32bits are read/written atomically. That is in a thread safe manner. Making the variables volatile ensures the latest updates from the bleScannerTask are read.
The LastSeenOpenClosed list items store the Open/Closed/Bad state of each of the expectedDevices and the last time they where seen. The BLE OpenClosed monitors advertise for 10 seconds in every 100 seconds, or if their state changes. If an advertisement from an expectedDevice is not seen for 220 seconds, it is marked as BAD, out-of-range or flat battery.
Rain Detector
The rain detector is the XIAO's ADC converter reading the 10K / rain detector PCB voltage divider supplied with ~2.5V from a 180R/180R divider attached to the 5V supply. When the PCB is dry it resistance is very high (>1Mohm) and ADC measures ~2.5V. When the PCB gets wet it resistance drops to 26K or lower and the ADC reads measures ~1.8V. The exact values in counts read by the ADC depend on the ADC internal reference are are not important. The only important value is the number of counts that indicate the transition from Dry to Wet. This is set in rainDetector.cpp wetcount variable.
To determine this webcount value. Note the counts when the PCB is dry and then add some drops of water and note the new count. Choose a number somewhere in between. Check with real rain. This count value is displayed on the web page output (see below). To suppress noise/hum pickup etc ADC readings are taken every 3ms and accumulated over 3sec (i.e. ~1000 readings) to average out the noise.
An hystersis of +/-20 counts is added to prevent small variations triggering wet/dry transitions.
Alarm and Led Indicator
The indicator led has the following states
|
OFF |
All windows close. None marked as BAD |
|
ON |
Not Raining and at least one window Open and none marked as BAD |
|
Fast Flash |
Raining and at least one window Open |
|
Slow Flash |
Not Raining and at least one window marked as BAD |
The alarm will sound if the it
starts to rain, that is the rain sensor count goes from dry to wet
and there is at least one window open. Closing all the windows will
stop the alarm and leave it enabled. Pressing the push button on the
receiver or on the pfodApp will disable the alarm until the rain
sensor becomes dry again.
Displays
There are two displays in this sketch, a basic web page and a pfodApp display.
web page Display

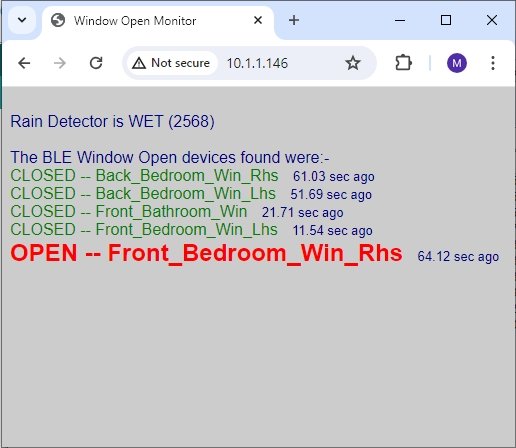
The web page display is access by using your browser to goto the static IP you setup (using ESPAutoWiFiConfig) for the reciever/detector. That is 10.1.1.145 in the screen shot above. This web page shows the current state of the rain detector, wet or dry, and the raw count. Use this to check that you have set an appropriate wetcount value in the code. The page also shows the state of each of the expectedDevices and when they where last seen. On reboot the rain detector is WET (0) until the first average ADC reading is available after 3secs and all the expectedDevices are marked as Closed until they are seen in the scans. If a BLE monitor is not seen for 220sec it is displayed in Black as BAD.
You can use just this web page to see what windows are open when the alarm goes off and use the push button on the receiver to silence the alarm in you need to.
pfodApp Display
There is also a pfodDisplay available which needs some customization to your particular layout. pfodApp is an Android app that displays what your Arduino sketch sends. No Android programming is necessary (or possible). All the code is in your Arduino sketch. In this case in the WindowsGUI.cpp and Windows.cpp files.
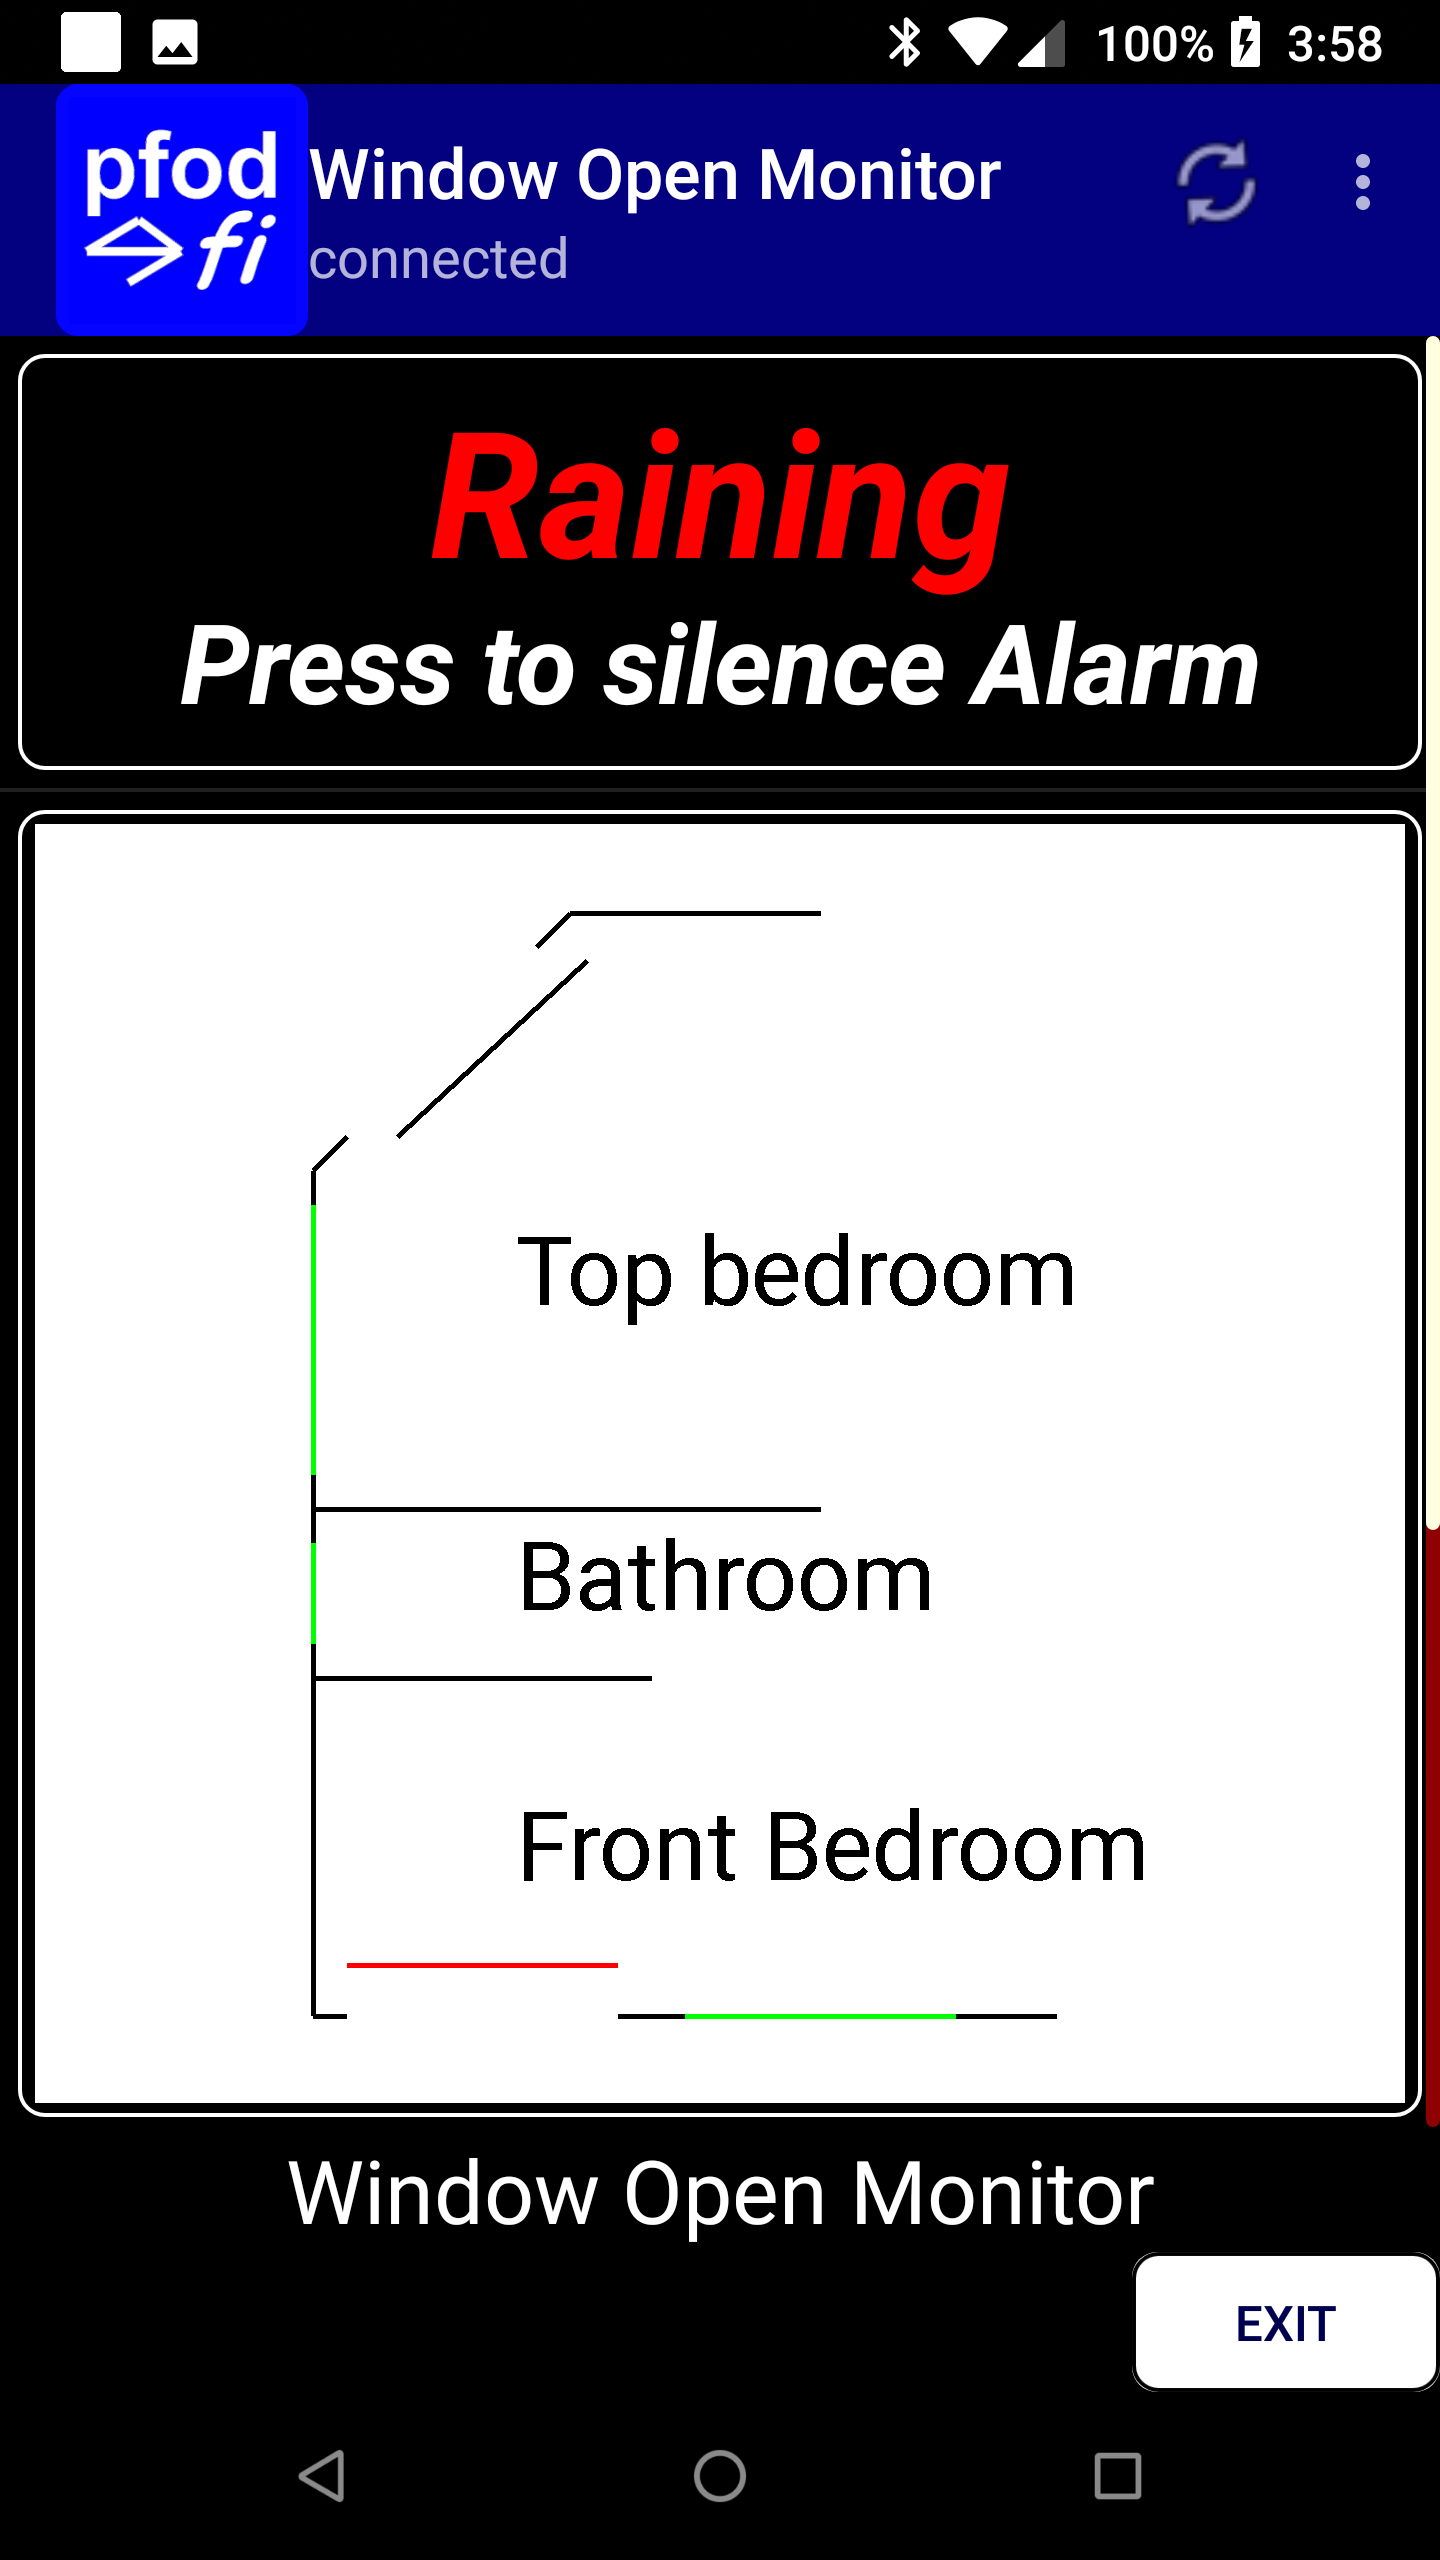
The WindowsGUI.cpp sets up a pfodDevice that pfodApp can connect to. This pfodDevice display a button if it is raining and a diagram of state of the windows. The diagram is coded in Windows.cpp and you can draw your own using the free pfodGUIdesigner Android app. The pfodGUIdesigner tutorial and videos cover how to used pfodGUIdesigner to draw your graphical interface and then generate the Arduino code that will display it in pfodApp.
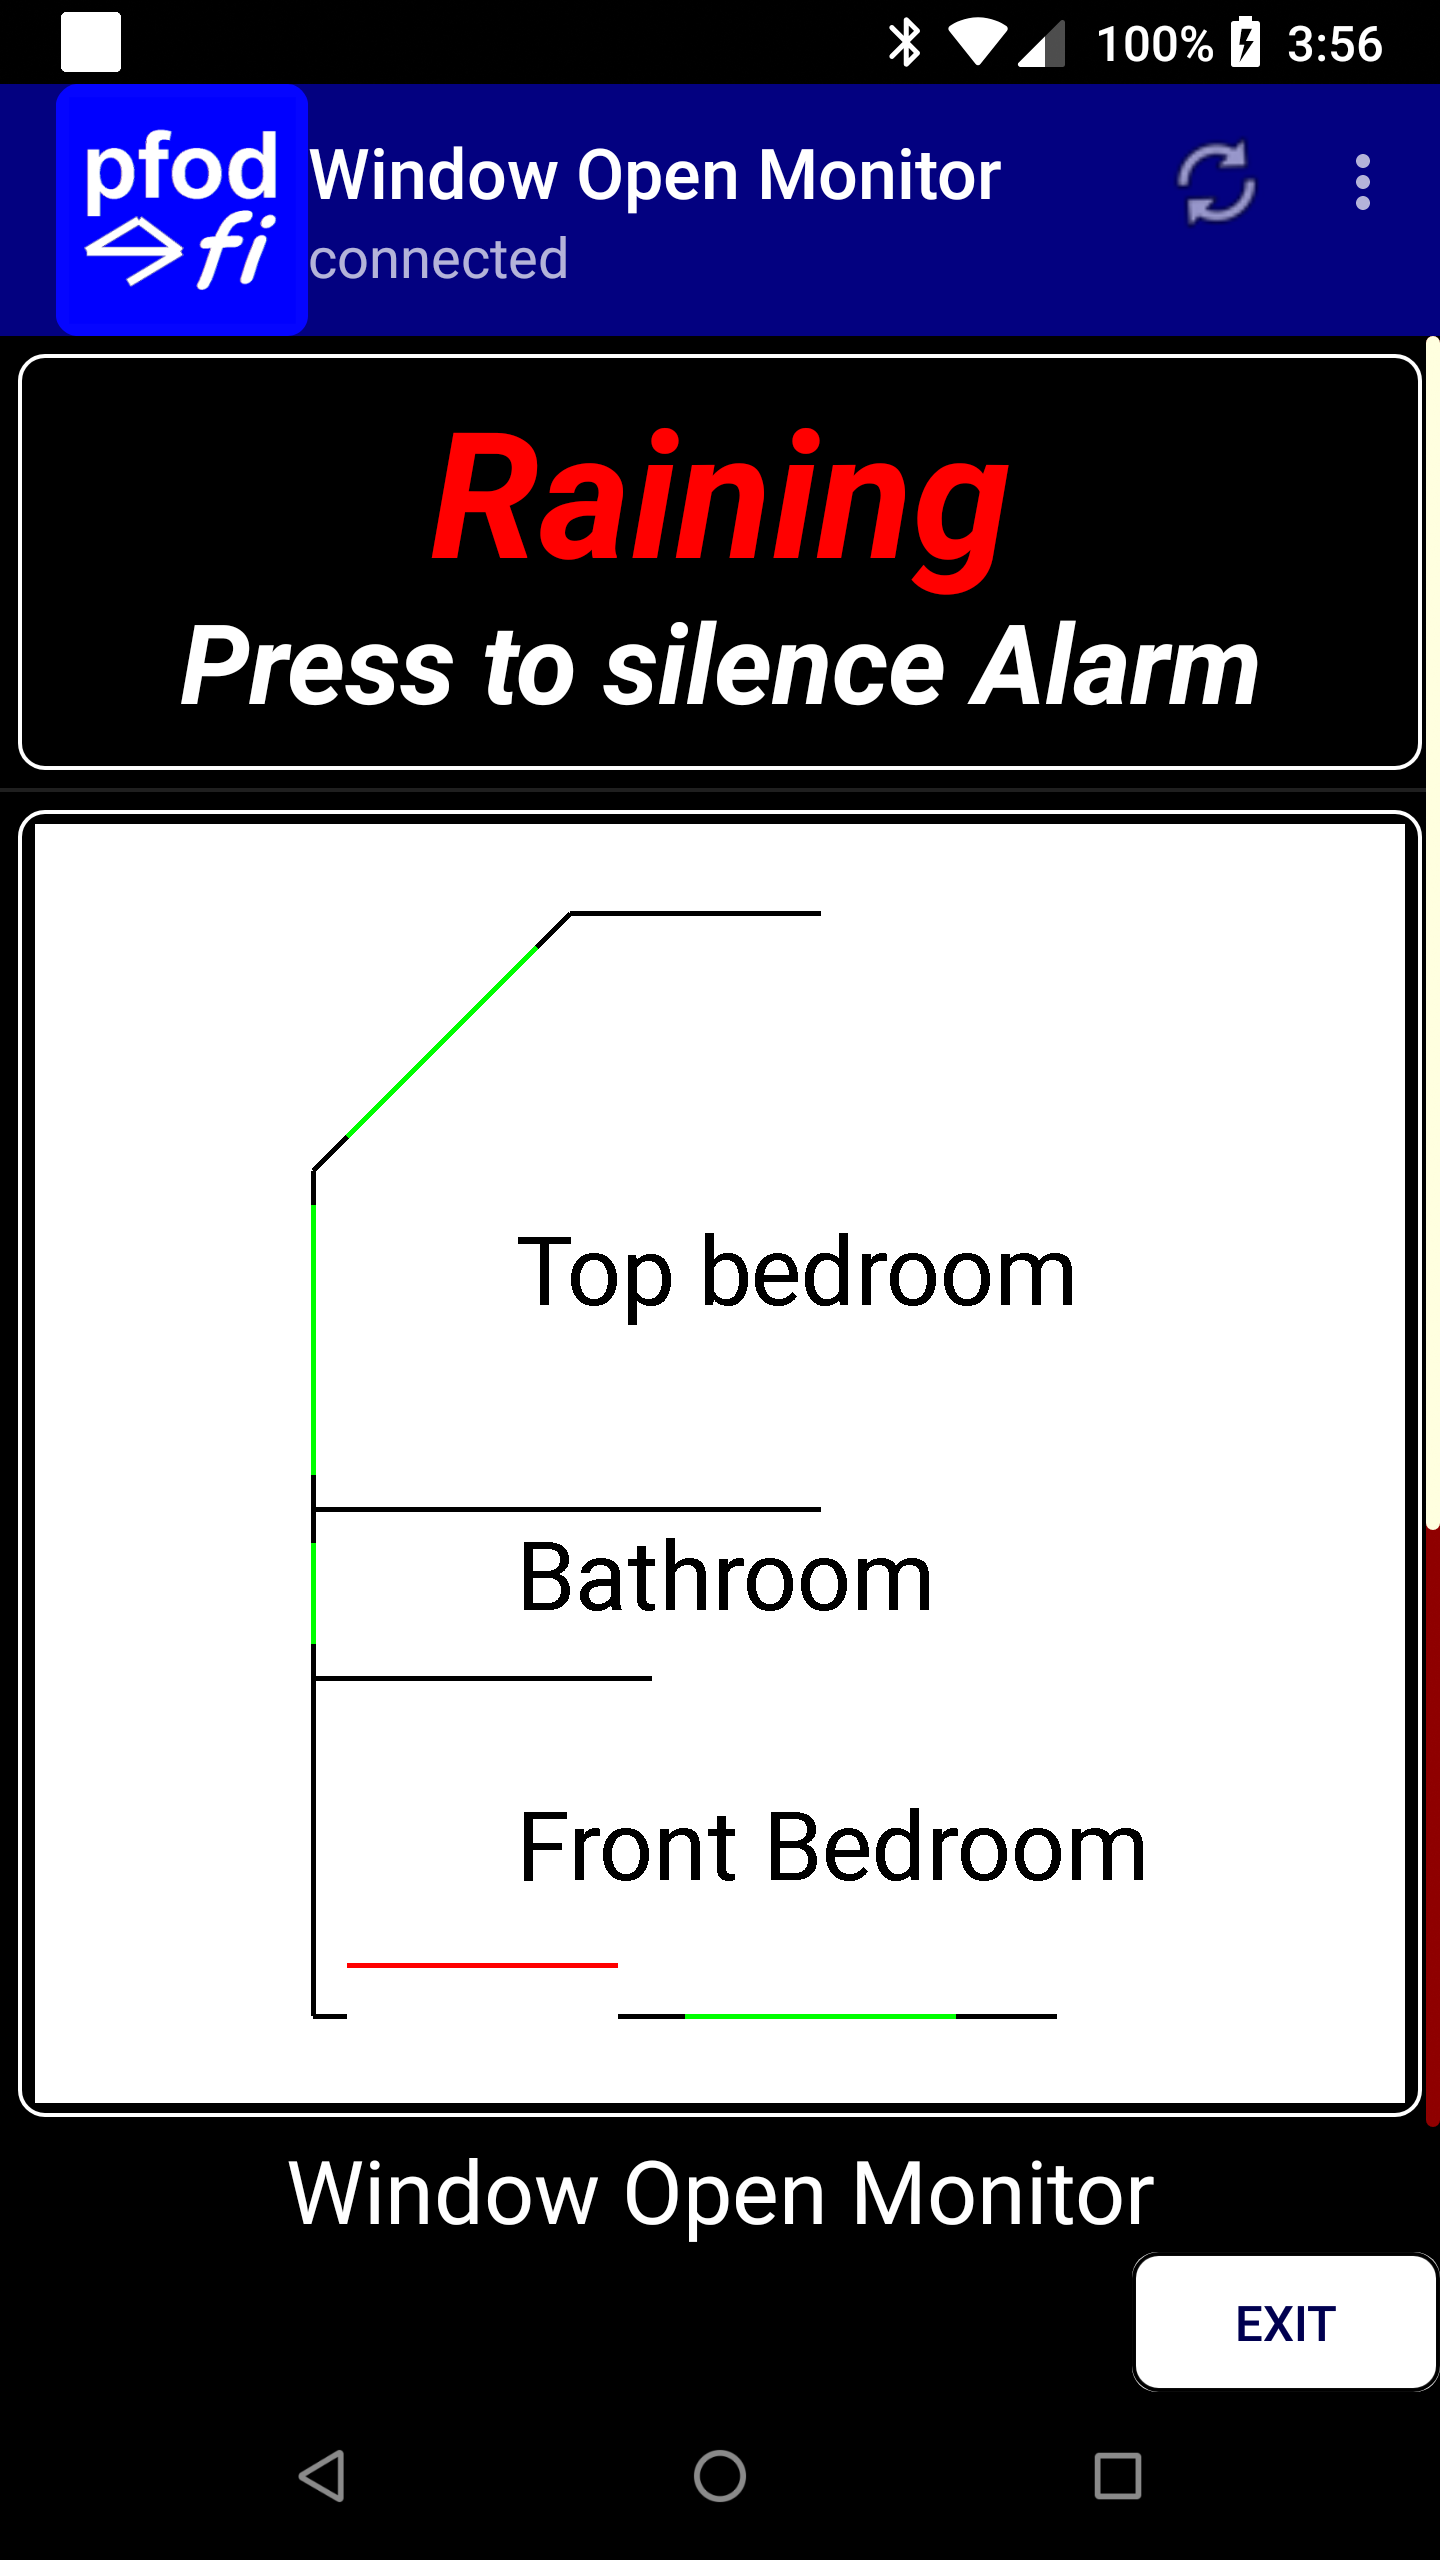
The interface used here is simple
outline showing the rooms and windows and the state of the windows,
closed Green, open Red, bad Black.
Below is the display for when
it starts raining and the the Front Bedroom Right Hand Side window is
Open (RED). Also the Top Bedroom Right Hand Side window is shown as
BAD (Black), low battery or out-of-range. The rest of the windows are
closed (GREEN)
Of course you will want to display your own layout. You can draw this using the free pfodGUIdesigner.
Designing Your Own Layout
Download the free pfodGUIdesigner and look through the tutorial and videos on its use.
Open the pfodGUIdesigner and start a new drawing. Save the drawing a “Windows” so that the generated code will be drop in replacement for the code in this project.
Then draw the outline of your rooms leaving gaps for the windows/door and name the rooms. You change the size and direction of the lines by editing the Width and Height values. The lines are drawn between diagonally opposite corners of a virtual rectangle with that width and height, so horizontal lines have a height of 0 while vertical lines have a width of 0. You don't need to 'save' your work as each edit is automatically saved. You may want to take 'snap shots' at various stages of your design by saving the drawing under another name and then re-opening the “Windows” drawing.
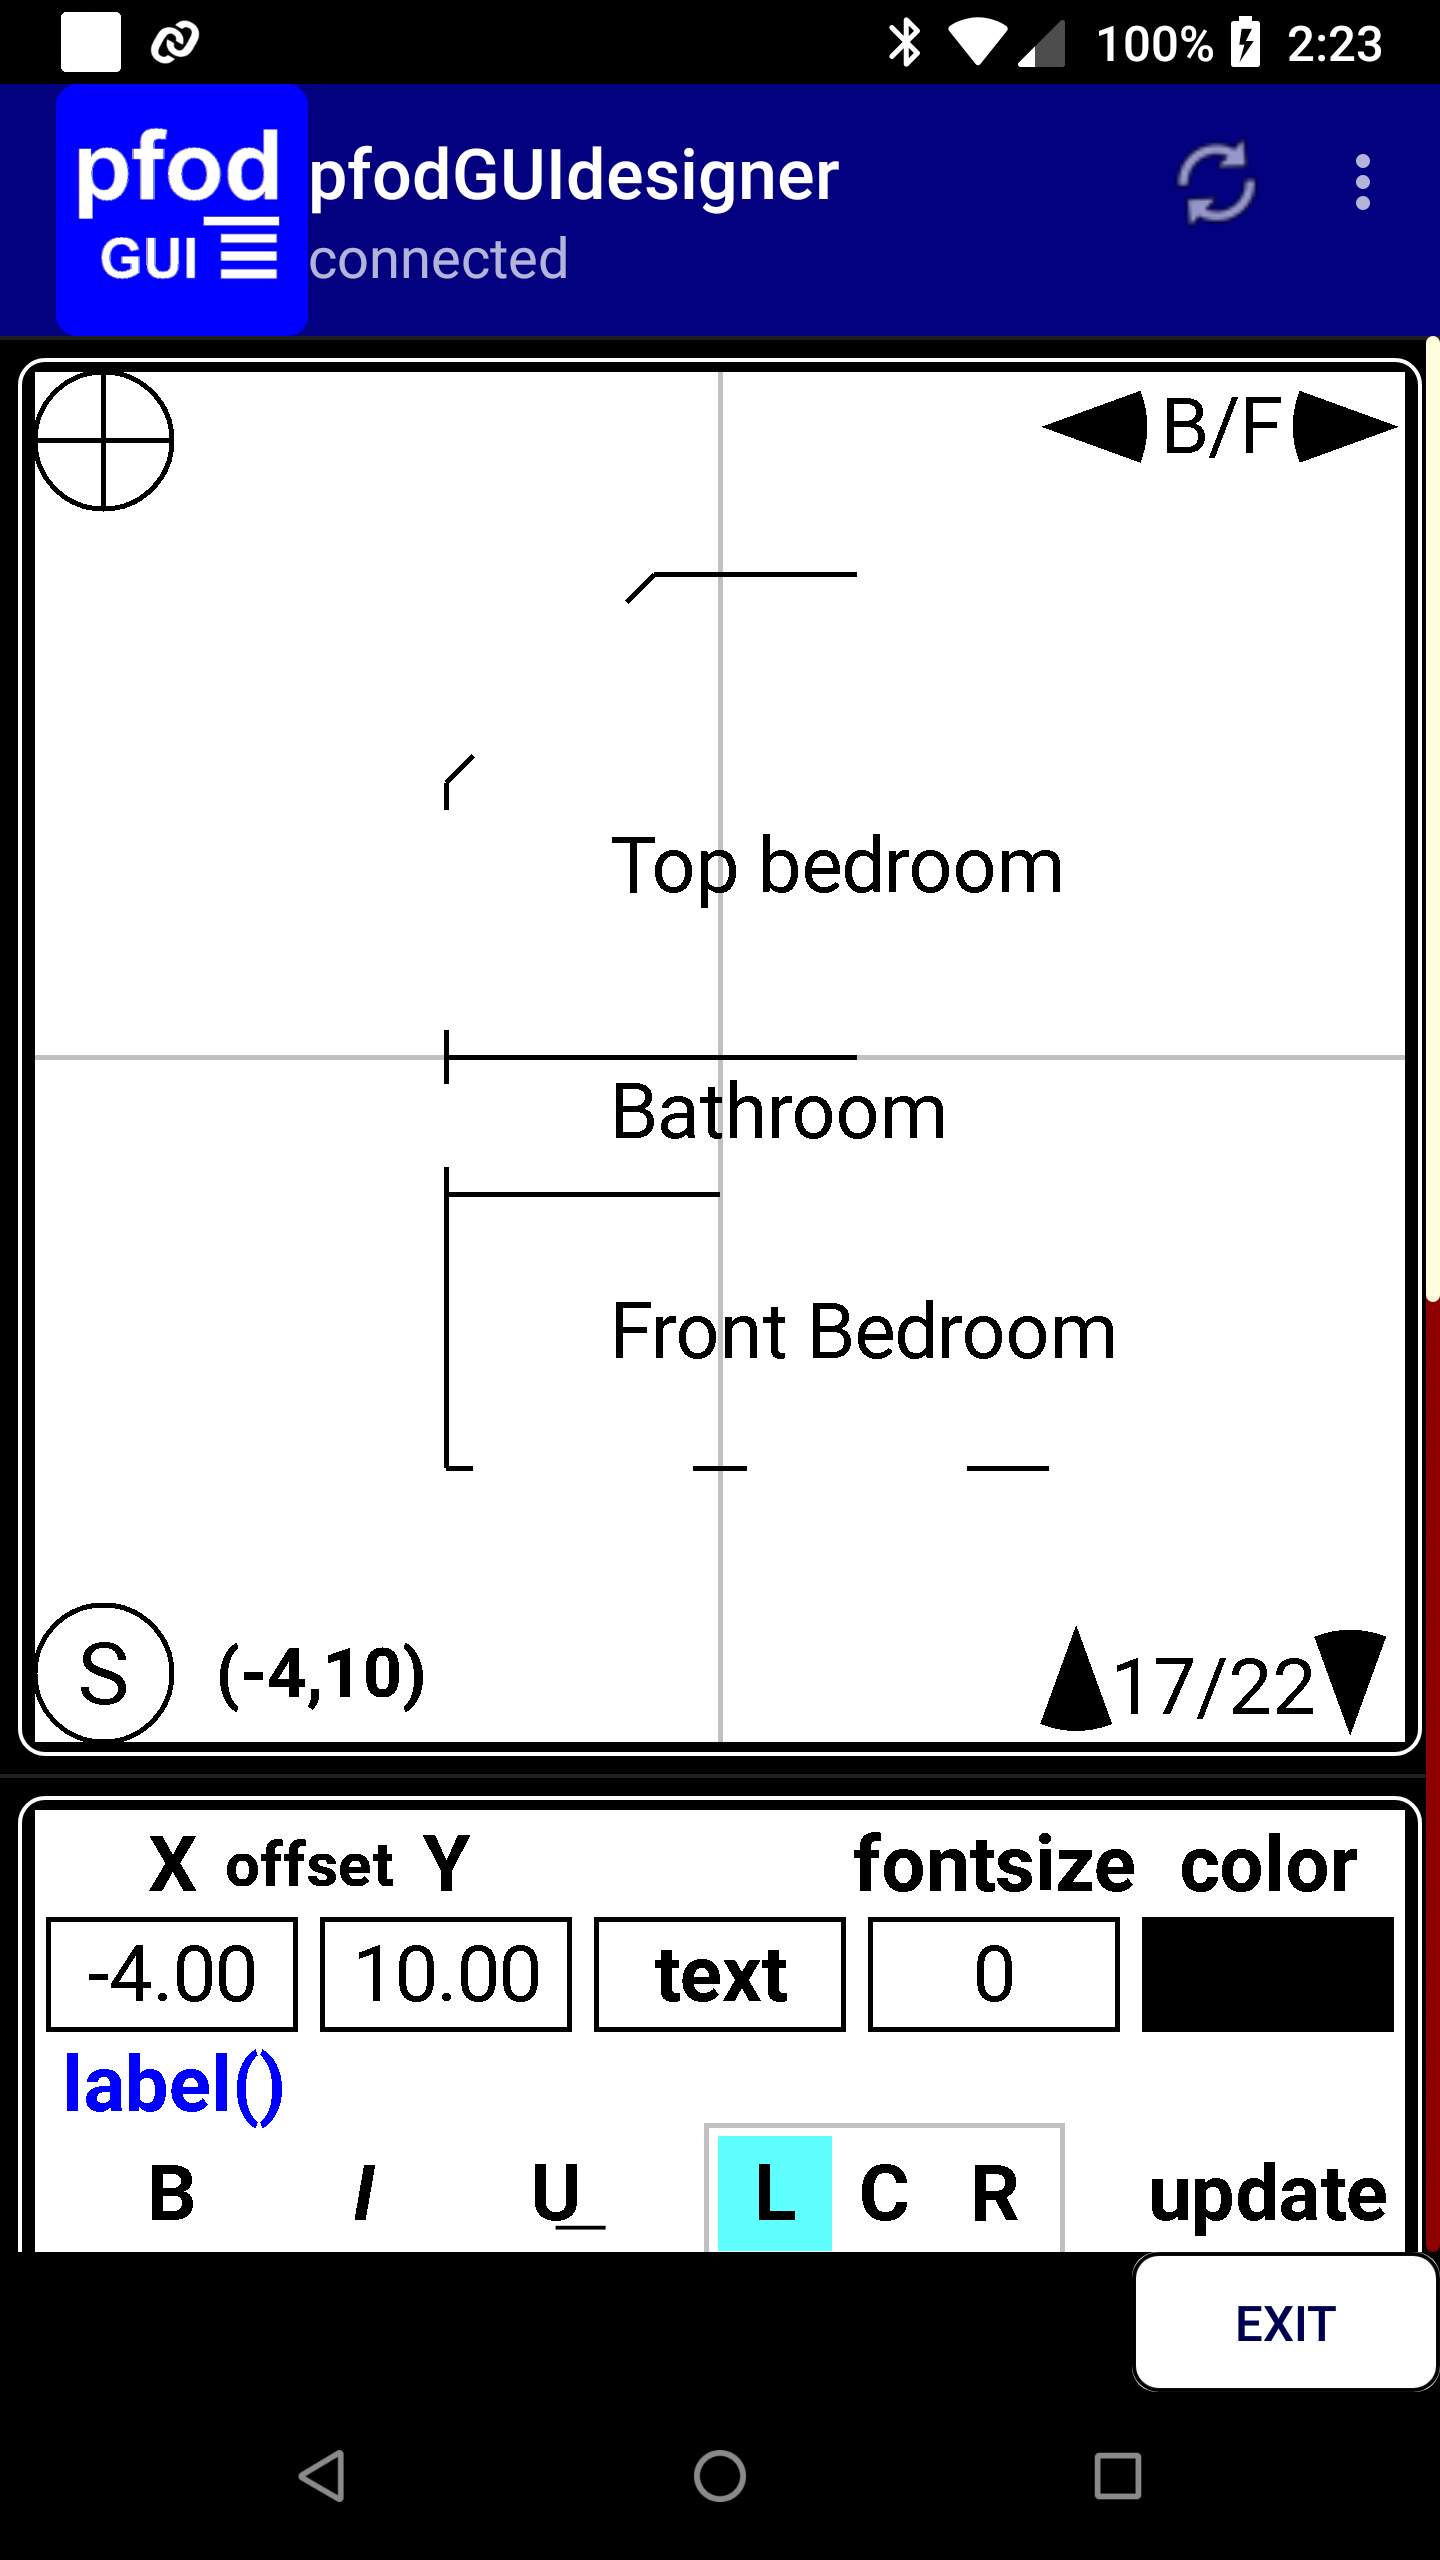
Once you have your room outline, go back and add the closed windows/doors and mark each as an update.

Then generate the code, save and download the pfodGUIDesigner.txt file and extract the Windows.h and Window.cpp sections and replace the corresponding files in the Arduino RD_ESP32C3_BLE_Scanner_Server directory.
Now if you upload the sketch to the ESP32C3 and connect with pfodApp you will see your own layout. If you don't see your layout, open then connection screen and clear the menu cache using the top right … menu.
Next edit you layout to change the position and colour of the windows to indicate that they are open.
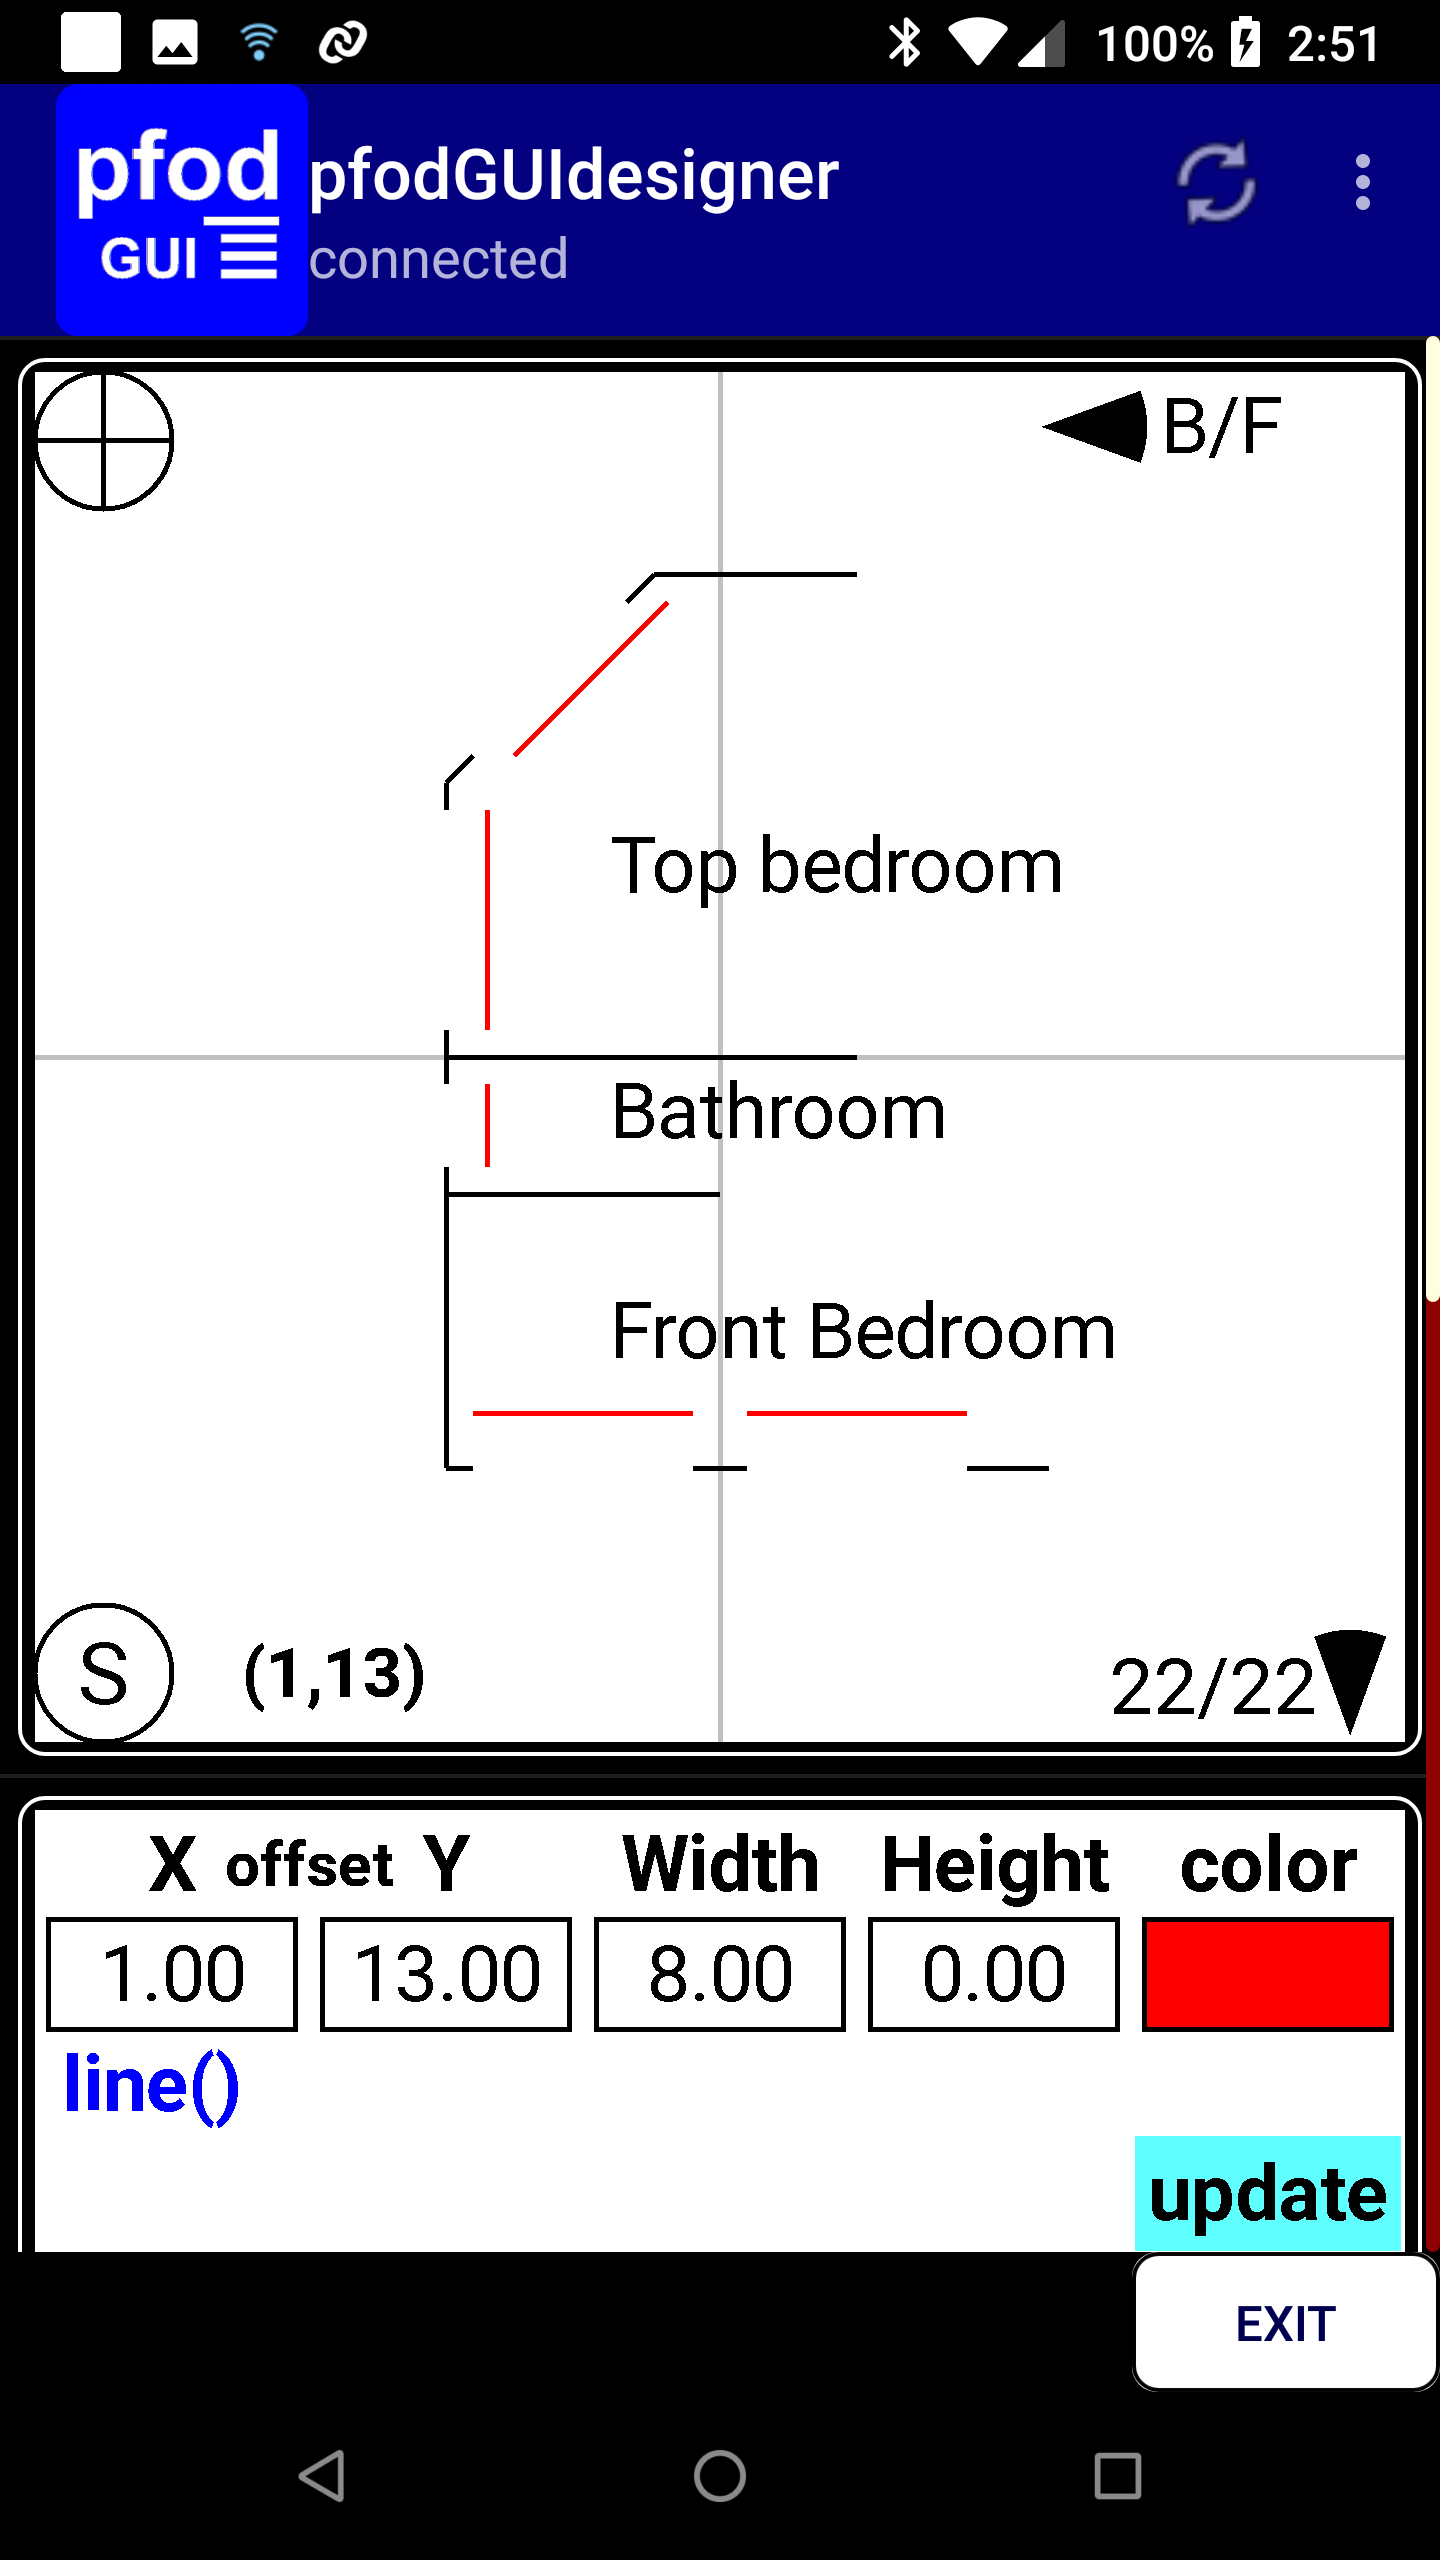
Generate the code again, but this time only copy the void Windows::updateDwg() method and place it below the existing one in your Window.cpp file.
// from Windows Closed dwg
void Windows::updateDwg() {
    dwgsPtr->line().idx(_update_idx_15).color(10).offset(-9.00, 15.00).size(8.00, 0.00).send();
    dwgsPtr->line().idx(_update_idx_13).color(10).offset(1.00, 15.00).size(8.00, 0.00).send();
    dwgsPtr->line().idx(_update_idx_17).color(10).offset(-10.00, 1.00).size(0.00, 3.00).send();
    dwgsPtr->line().idx(_update_idx_19).color(10).offset(-10.00, -9.00).size(0.00, 8.00).send();
    dwgsPtr->line().idx(_update_idx_21).color(10).offset(-9.00, -11.00).size(5.60, -5.60).send();
}

// from Windows Open dwg
void Windows::updateDwg() {
    dwgsPtr->line().idx(_update_idx_15).color(9).offset(-9.00, 13.50).size(8.00, 0.00).send();
    dwgsPtr->line().idx(_update_idx_13).color(9).offset(1.00, 13.50).size(8.00, 0.00).send();
    dwgsPtr->line().idx(_update_idx_17).color(9).offset(-8.5, 1.00).size(0.00, 3.00).send();
    dwgsPtr->line().idx(_update_idx_19).color(9).offset(-8.5, -9.00).size(0.00, 8.00).send();
    dwgsPtr->line().idx(_update_idx_21).color(9).offset(-7.50, -11.00).size(5.60, -5.20).send();
}
Do the same again for BAD sensors
with a different colour and or position. Again only copy the void
Windows::updateDwg() to your
Window.cpp file.
Now you have three updateDwg() methods which you
need to merge together so that the appropriate line position and
colour is sent to pfodApp depending of the BLE sensor state.
First identify the update_idx associated with each of your sensors by looking at the offset( ) values and then merge the three updateDwg() methods into one as shown below. For each update_idx, lookup the window start and then send() the appropriate line position and colour
//{ "Front_Bedroom_Win_Rhs", "Front_Bedroom_Win_Lhs", "Front_Bathroom_Win", "Back_Bedroom_Win_Lhs", "Back_Bedroom_Win_Rhs" };
//   _update_idx_15,         _update_idx_13,          _update_idx_17,       _update_idx_19,           _update_idx_21
void Windows::updateDwg() {

  windowStateEnum state = getWindowState("Front_Bedroom_Win_Rhs");  // idx 15
  if (state == CLOSED) {
    dwgsPtr->line().idx(_update_idx_15).color(10).offset(-9.00, 15.00).size(8.00, 0.00).send();
  } else if (state == OPEN) {
    dwgsPtr->line().idx(_update_idx_15).color(9).offset(-9.00, 13.50).size(8.00, 0.00).send();
  } else { // bad
    dwgsPtr->line().idx(_update_idx_15).color(0).offset(-9.00, 13.50).size(8.00, 0.00).send();
  }

  state = getWindowState("Front_Bedroom_Win_Lhs");  // idx 13
  if (state == CLOSED) {
    dwgsPtr->line().idx(_update_idx_13).color(10).offset(1.00, 15.00).size(8.00, 0.00).send();
  } else if (state == OPEN) {
    dwgsPtr->line().idx(_update_idx_13).color(9).offset(1.00, 13.50).size(8.00, 0.00).send();
  } else { // bad
    dwgsPtr->line().idx(_update_idx_13).color(0).offset(1.00, 13.50).size(8.00, 0.00).send();
  }

  state = getWindowState("Front_Bathroom_Win");  // idx 17
  if (state == CLOSED) {
    dwgsPtr->line().idx(_update_idx_17).color(10).offset(-10.00, 1.00).size(0.00, 3.00).send();
  } else if (state == OPEN) {
    dwgsPtr->line().idx(_update_idx_17).color(9).offset(-8.5, 1.00).size(0.00, 3.00).send();
  } else { // bad
    dwgsPtr->line().idx(_update_idx_17).color(0).offset(-8.5, 1.00).size(0.00, 3.00).send();
  }

  state = getWindowState("Back_Bedroom_Win_Lhs");  // idx 19
  if (state == CLOSED) {
    dwgsPtr->line().idx(_update_idx_19).color(10).offset(-10.00, -9.00).size(0.00, 8.00).send();
  } else if (state == OPEN) {
    dwgsPtr->line().idx(_update_idx_19).color(9).offset(-8.5, -9.00).size(0.00, 8.00).send();
  } else { // bad
    dwgsPtr->line().idx(_update_idx_19).color(0).offset(-8.5, -9.00).size(0.00, 8.00).send();
  }

  state = getWindowState("Back_Bedroom_Win_Rhs");  // idx 21
  if (state == CLOSED) {
    dwgsPtr->line().idx(_update_idx_21).color(10).offset(-9.00, -11.00).size(5.60, -5.60).send();
  } else if (state == OPEN) {
    dwgsPtr->line().idx(_update_idx_21).color(9).offset(-7.50, -11.00).size(5.60, -5.20).send();
  } else { // bad
    dwgsPtr->line().idx(_update_idx_21).color(0).offset(-7.50, -11.00).size(5.60, -5.20).send();
  }
}
That completes your layout design. pfodApp will now update its display as the windows are opened and closed.
This project detects when windows/doors are open using very simple, very low power BLE modules the run for 5 years on a coin cell. The reciever/rain detector monitors the BLE modules and the rains sensor and sounds an alarm if it starts raining and there is an open window/door.
A simple web page output was included as well as customizable mobile display for your Android phone using pfodApp. No Andriod programming was required all the code is in you Arduino sketch and your custome the layout is designed and the code generated by the free pfodGUIdesigner app.
Android TM is a trademark of Google Inc. For use of the Arduino name see http://arduino.cc/en/Main/FAQ
The General Purpose Android/Arduino Control App.
pfodDevice™ and pfodApp™ are trade marks of Forward Computing and Control Pty. Ltd.
Contact Forward Computing and Control by
©Copyright 1996-2024 Forward Computing and Control Pty. Ltd.
ACN 003 669 994