
|
Home
| pfodApps/pfodDevices
| WebStringTemplates
| Java/J2EE
| Unix
| Torches
| Superannuation
| CRPS Treatment
|
| About
Us
|
|
|
BLE Rain Gauge
|
by Matthew Ford 31st January 2025 (original 31st January 2025)
©
Forward Computing and Control Pty. Ltd. NSW Australia
All rights
reserved.

This project is a simple BLE Rain Gauge for beginners that reports
directly to your Android mobile. This BLE Rain Gauge has a number of
advantages over other Rain Gauges:-
* Connects via BLE. No signal
or power wiring is needed, which makes installation trivial.
*
Runs for years on two AA batteries.
* Simple construction, just
three (3) components and a BLE module
* Reports directly to your
Android mobile using pfodApp.
* The Android display is completely
controlled by the Arduino sketch. No Android programming necessary to
change what data is displayed.
* Has analog filtering to prevent
counting noise pulses and digital blanking to prevent counting extra,
contact bounce, pulses.
* Beginners with some soldering experience
can readily complete this project.
As an addition to the Audio
Rain Sensor project, a 'tipping bucket' rain gauge was added to
record the mm of rain over various periods, 24hrs, 7days and
30days.
To avoid having to run long wires out to the rain gauge
and providing a power supply for the processing circuit, a simple BLE
circuit powered by two AA batteries was used, based on
pfod_lp_nrf52_2024
very low power board support for nRF52832 processors.
Prices as at January 2025 excluding shipping.
1 x WH-SP-RG Rain Gauge ~US$18 (Aliexpress)
1 x nRF52832 module
such as Jessinie XL52832-D01 nRF52832 module (with pins) ~US5.10 and
Jessinie Test Board Adaptor Plate for NRF52832 ~US$1.10 – Total
~US$6.20 (e.g. Aliexpress
)
1 x 0.1uF ceramic capacitor Jaycar
RC5360 (pack of 2) ~US$0.35
2 x 100K resistors Jaycar
RR0620 (pack of 8) ~US$0.55
1 x AA battery holder Jaycar
HP9202 ~US$1.10
2 x AA Alkaline batteries ~ US$1.00 OR Lithium
for low temperature use.
1 x packet 3mm x 25mm nylon bolts Jaycar
HP0142 ~US$2.20
1 x packet 3mm nylon nuts and washer Jaycar
HP0150 ~US$4.00
1 x Waterproof plastic box 80mm x 65mm x 55mm
or similar ~US$8.50 (Aliexpress)
1 x Plain Veroboard (no copper
tracks) Jaycar
HP9562 ~US$4.50 OR a piece of stiff plastic.
1 x pfodApp
Android App ~AUD$12
1 x MuseLab DapLink
~US$6 to program the nRF52832 via the Arduino
IDE V1.8.19 or later
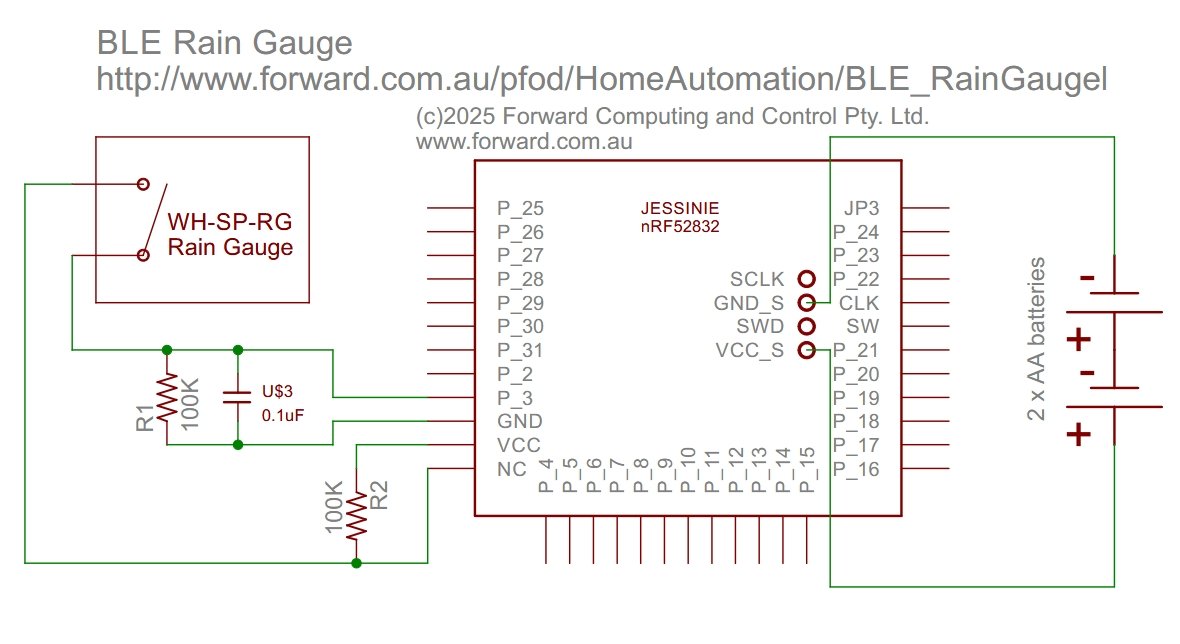
The circuit for the BLE Rain Gauge is trivial.
The circuit below is for a recommended Jessinie module (pdf
version) The rain gauge input filter components are
mounted directly on the Jassinie Adaptor board.
Note: When
fitting the Jassinie nRF52832 module to the adaptor board, the pins
are very tight. Line them up carefully before pressing forcefully.
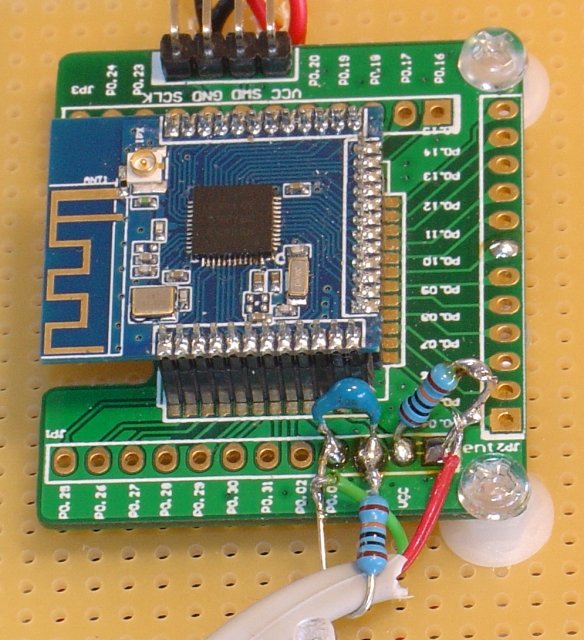
The first photo below shows the mounting of the rain gauge input filtering. Allow sufficient rain gauge lead length, between the rain gauge and the BLE circuit, to enable the rain gauge top cover to removed for cleaning.
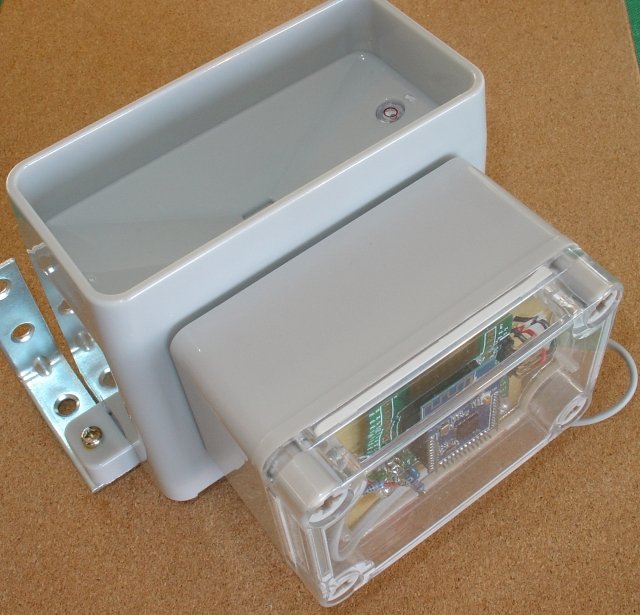
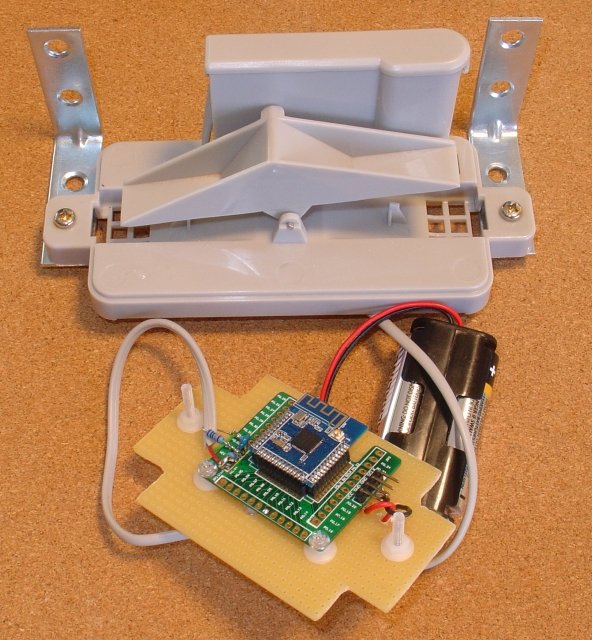
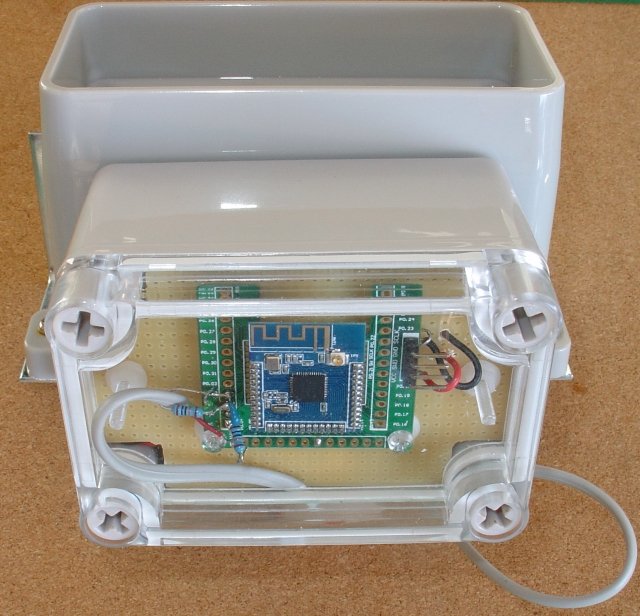
The completed circuit is mounted on a small piece of plain (no
tracks) veroboard (or other piece of plastic) and placed in the
waterproof box with the battery under the board. A few nylon 3mm
bolts were used as spacers.
The waterproof box was attached to the
rain gauge removal cover with nylon bolts. The waterproof box was
fitted so the blots, cut off, to cleared the tipping buckets.
The complete sketch is lp_BLE_RainGauge.ino
Install the
pfod_lp_nrf52_2024
Arduino board support as described in Easy
Very Low Power BLE in Arduino
Install the pfodParser library
V3.63.1+ from the Arduino library manager or from
https://www.forward.com.au/pfod/pfodParserLibraries/index.html
Note: As
installed the lp_timers have us accuracy, but can only be set to time
delay of about 8.5mins.
This project records the accumulated rain
fall on hourly intervals so the lp_timer needs to be set for longer
ms timing.
In the …/Arduino15 directory where the
pfod_lp_nrf52_2024
board support was installed, open (e.g. on
Windows)
C:\Users\yourUserName\AppData\Local\Arduino15\packages\sandeepmistry\hardware\nRF5\0.6.0\cores\nRF5\utility\lp_timer_speed.h
and comment out
//#define
LP_TIMER_US
to enable ms timings.
If you forget to do this you will get a compile #error reminder.
When programming, choose “Generic nRF52832 (LFC crystal) bare modules..” as the board type. The Jassinie Adaptor board has headers for VCC,SWO,GND and SCK to connect the programmer to. A MuseLab DapLink is the preferred programmer. It sometimes (often) takes a couple of attempts to get the OpenOCD to recognise the DapLink programmer. Unplug and re-plug the USB DapLink if it is not found. If you continue to have programming failures, check the wiring from the programmer to the board. Jumper cables are convenient but become unreliable after repeated use. In which case you should replace them with soldered wires.
Because there is no signal or power wiring, installation is just a matter of mounting the rain gauge level using the builtin bubble. After you mount the rain gauge and with its BLE sender attached, remove and replace one of the batteries to re-zero the reading to remove any “tipping” that occurred while mounting the rain gauge.
Install the pfodApp on your mobile phone and create a connection for the Rain Gauge. See pfodAppForAndroidGettingStarted.pdf for the details. When you connect to the rain gauge, pfodApp will display a screen like showing the mm of rain in the last 24hrs, 7 days and 30 days.
When first powered up all the previous readings are zero and (partial) will be displayed until there is a full set of 24hr or 7day or 30 day readings. The above photo was taken 24hrs after installation so the 24hr rain fall is available, but not the 7 and 30 day readings.
The rain gauge is just a reed relay that is operated, briefly for a few 10's ms, as the bucket tips from one side to the other. The 0.1uf and the two 100K resistors forms two RC filters that have rise time to the input switching point of ~3.5ms and a fall time of ~7ms. This suppresses electrical noise. Within the code a low power comparator monitors for input voltage rising above 0.85V. When the reed relay closes the charges up the 0.1uF capacitor via the 100K connected to +3V3. At 0.85V the compatator fires incrementing the accumulated rain gauge pulses. It also starts a 1sec blanking time to ignore multiple pulses due to any reed relay contact bounce or bounce of the tipping bucket itself. This limits the maximum measured rain rate to 16.8mm per min (~1m / hr). COMPARITOR_DELAY_ms near the top of the file sets this blanking delay if you need to handle heavier rain rates.
Each pulse from the rain gauge is accumulated in the uint32_t currentRainGaugePulses variable. This variable is held in memory and zeros if the batteries are removed which will not be necessary for many years. Once an hour, the currentRainGaugePulses is saved to the array24hr array (configured as a circular buffer) and once each 24hrs, currentRainGaugePulses is saved to the array7day and array30day arrays. When the pfodApp requests the results, the pulses 24hrs ago are subtracted from the currentRainGaugePulses and multiplied by the tipping bucket volume mmPerPulse = 0.2794 If you calibrate your buckets edit that number to suit. The result is that the 24hr mm displays the total rain in the previous 24hrs plus the rain in the current, yet to be completed, hr. Similarly for the 7 and 30 day results, the current yet to be completed, day's rain in added to the previous 7 or 30 day's rain for display.
As noted above for the first 24hrs / 7 days / 30 days after power up, the results will be marked as (partial) to indicate incomplete totals are being displayed.
The pfodApp display is completely determined by the code in the sketch. You can edit the colours and font sizes, text, etc by editing the sketch. See the pfodSpecification.pdf for the text colours, sizes and format options.
A very simple BLE rain gauge was presented which runs for years on two AA batteries. It connects directly to your Android mobile and displays the total mm of rain in the last 24hrs and 7days and 30days. It only has 3 components plus a nRF52832 BLE module making is very simple to construct. Because this project does not need any signal or power wiring, it is trivial to install, just level it using the built-in bubble.
Android TM is a trademark of Google Inc. For use of the Arduino name see http://arduino.cc/en/Main/FAQ
The General Purpose Android/Arduino Control App.
pfodDevice™ and pfodApp™ are trade marks of Forward Computing and Control Pty. Ltd.

Contact Forward Computing and Control by
©Copyright 1996-2024 Forward Computing and Control Pty. Ltd.
ACN 003 669 994