
|
Home
| pfodApps/pfodDevices
| WebStringTemplates
| Java/J2EE
| Unix
| Torches
| Superannuation
|
| About
Us
|

|
BLE LED Light Switch, 2023 -- Retrofit
|
by Matthew Ford 21st Sept 2023 (original 25th
February 2023)
© Forward Computing and Control Pty. Ltd. NSW
Australia
All rights reserved.
Update
21st
Sept
2023 – Minor
revisions to PCB. Use EagleCAD_BLELedControl_R4.zip
Update
1st June 2023 –
Revised
to have less off-current and to be flickerless when on. Now used for
Low Wattage Lights (Leds) up to 100W, in preference to BLE
High Power Light Switch, 2023 -- Retrofit, which handles higher
wattage lamps.
Update
16th May 2023 --
This has been superseded by BLE
High Power Light Switch, 2023 -- Retrofit, which handles more
watts than this BLE LED Light Switch and works with Hallway switches.
This page covers retro-fittng an existing light
switch with a BLE Remote Control for LED/Incandescent Lights
controlled from your Android Mobile.
No
extra wiring is required and the existing wall switch continues to
work.
The particular example
here is for an Australia 240V light switch but the circuit works just
a well for 110VAC with a slight change to component values.
– Costs about the same as a remote
controlled light and much less expensive for multiple lights on the
same switch.
– Remote still works when the light is switched
off at the wall switch. Existing light switch continues as a manual
on/off override.
– Simple to
install behind an existing light switch.
– No separate power
supply required.
– No additional wiring required. No need to
add a Neutral wire, just connect the controller in place of the light
switch.
– 98.5% efficiency for 240W/240VAC, 99.3% for
10W/240VAC light when on and less than 22mW (90uA) when light is
off.
– 110VAC / 240VAC versions can control about 200W of
lamps, depending of the Fet chosen.
– The top half of the
PCB can be trimmed off to allow for easier mounting behind slim line
light switches.
– Very low off current, <90uA, means Led
lamps do not flash when switched Off, except some very low wattage
LEDs, less than 5W/240VAC
– Optional additional functions
such as light off after set time or control from remote sensor. See
below for auto-turn off sketch.
Why this Project?
How
is the BLE Remote Switch Powered when there is no Neutral wire at the
Light Switch?
The BLE Remote Light Switch
Circuit.
The Completed Board.
Programming
the nRF52823 module
Safely Testing the BLE
Remote Light Switch PCB
Design
Considerations for the BLE Remote Light Switch Circuit.
Code
Description
For all the hype about Home Automation, current remote control lighting solutions require either:- rewiring to provide a supply power for the control or need continual battery replacement or they stop working when the existing light switch is turned off. This project avoids all those limitations.
This project is made possible by two
factors:-
i) The very
low power Arduino board support for the nRF52823
ii) The
availability of High
Voltage Normally ON N-Fets. That is high voltage N-Fets that have
low resistance with zero Gate volts and turn off with negative gate
volts.
This project supersedes these two previous projects Remote Controlled Light Switch – Retrofit – 2017 and Retrofit BLE Control to an Existing Load of 10W to >1000W – 2017 and uses currently available BLE modules and programmers and has a revised circuit that improves efficiency when the light is On and reduces the quiescent current when the light is Off.
This solution is Mains Powered but DOES NOT require any extra wiring to be installed. Just install the remote inside the existing light switch using the existing two wires (the Active and the wire back to the light bulb). This solution is Mains Powered and does not to use batteries. A battery powered remote would need an accessible battery case for user replacement, so you could not just add the remote behind the existing light switch. Having a Mains Powered remote avoids these problems.
The existing light switch is retained and continues to work. That is you can continue to turn the light on and off from the wall switch as well as being able to turn it on and off from your Android mobile. In particular you can remotely turn the light ON after you used the wall switch to turn it OFF.
Commercial remote controlled light bulbs plug into the existing light socket BUT the wall switch needs to be ON in order to use the remote. If the wall switch if OFF you cannot use the remote to switch the light ON. The circuit used here continues to work when the light is switched OFF at the wall.
Once you have a microprocessor controlling your light, you can readily add additional functions. Such as turning the light off after a given time or controlling the light via a remove sensor.
Here is the standard light switch wiring.
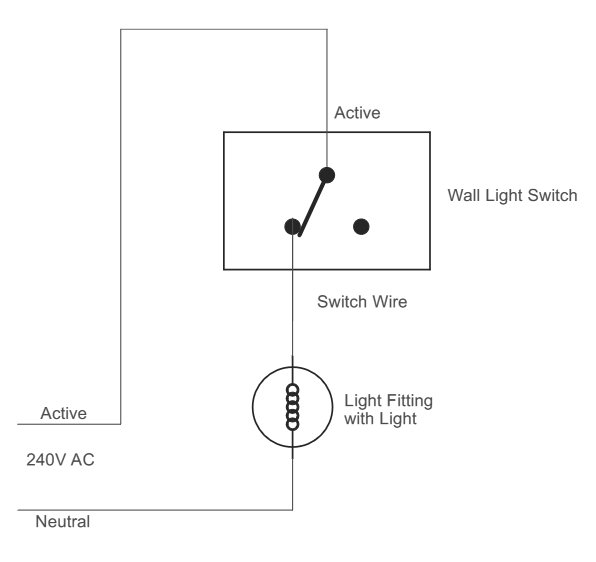
The wall switch disconnects the mains (110VAC
/ 240VAC) active wire from the light.
Here is the basic power circuit for the BLE Remote Light Switch (larger pdf version)
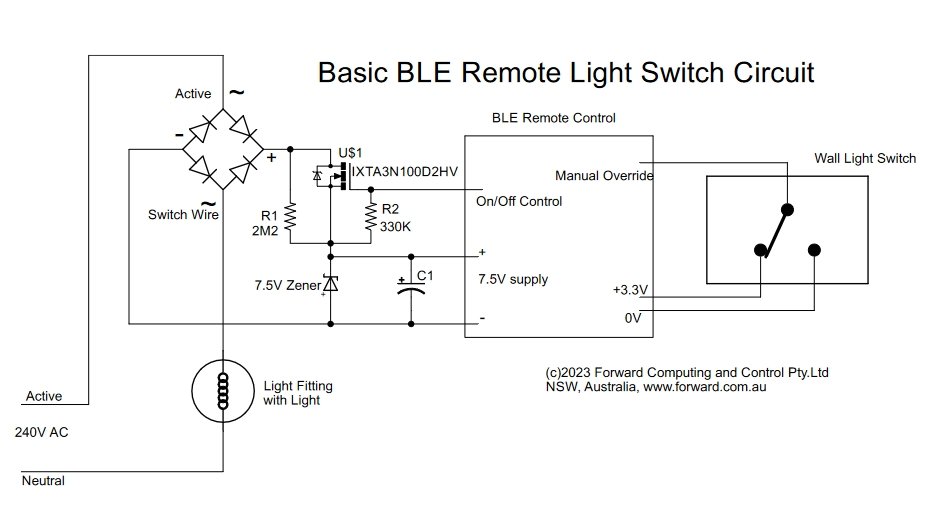
In the BLE circuit, the wall switch has been
replaced with a high voltage FET inside a full wave rectifier. The
FET controls the light On/Off.
When the FET is Off, the resistor
R1 supplies <110uA to flow through the Zener and is used to power
the BLE control. In this simplified circuit, when the FET is on the
full light current flows through the Zener.
The Gate bias
resistor, R3, ensures the FET Gate voltage is 0V when mains power is
first applied. For these special
FETs a 0V gate voltage turns the FET on.
The wall switch now
connects to the BLE module, but is still floating at mains voltage.
The complete BLE Remote Light Switch is shown below (pdf). Parts List (csv) with 240VAC and 110VAC alternatives. EagleCAD was used to layout the PCB (EagleCAD_BLELedControl_R4.zip). The two .cam files included are used to generate the Geber output and drill file. gerbv was used to view and check the Gerber files before submitting for manufacture. Here are the Gerber files (BLELedControl_R4.zip) that were sent to www.pcbcart.com for the manufacture. The board size is 70mm x 49.5mm, copper thickness copper thickness 70um (for power use) and board thickness 1.6mm.

Note in this circuit U$5, the DMG2307LQ P-FET, is used to short out the 7.5V Zener most of the time when the light is on. This results in significant improvements in efficiency and allows high wattage lamps to be controlled.
The MAX6457 holds the 3V3 regulator (TPS709) off until the input capacitor (C3 100uF) has charged up to between 6.15V and 6.46V. The nRF52832 draws relative high current (mA's) for the first 320ms when starting up. The dual N-FETs BSS138DWQ are driven by the nRF52832's 3.3V outputs but drive the gates of U$6 and U$5 to approximately -7.0V (7.5V +/-5% Zener less the drop across the BAT54 <0.3V). This is sufficient to turn U$6 hard Off (<10uA) and turns U$5 hard On (<0.1ohm)
R3, the 330K resistor, turns off the main control FET (U$6) as soon as the 3V3 supply is powered up. This protects the Zener from carrying the lamp's load current for the 320ms while the nRF52832 goes through its start up sequence before the nRF52832 takes control of the Zener bypass FET (U$5).
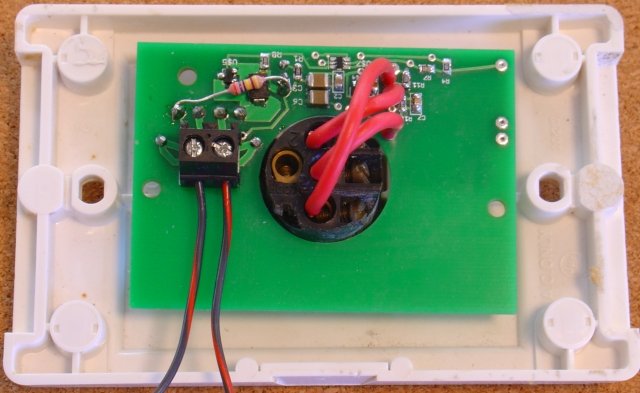
The completed board (back side), with the BLE module mounted, is shown here.
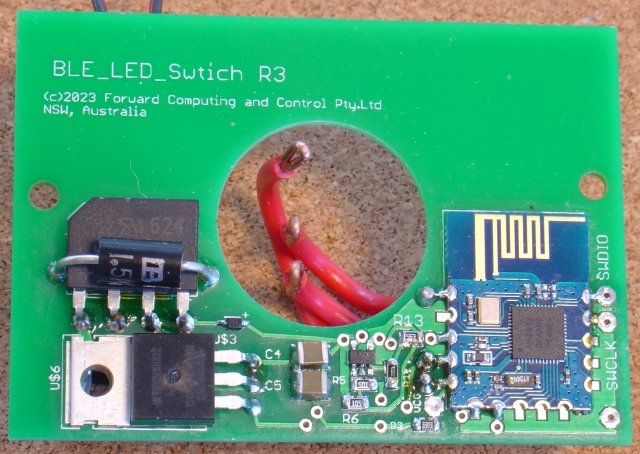
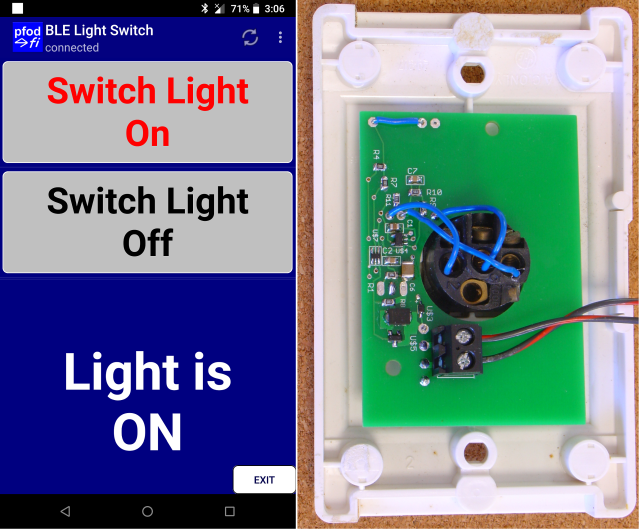
Here is the board (front side) attached to the light switch
For convenience, program the nRF52832 module before mounting it on the PCB.
The circuit board is laid out for a GT823E-01 nRF52832 module, but the PCB can be modified to accommodate other small modules. See Easy Very Low Power BLE in Arduino – 2022 for some alternative modules. Easy Very Low Power BLE in Arduino – 2022 also covers how to program the nRF52832 module. This sketch needs the latest pfod_lp_nrf52_2023 Rev 11 board support to be installed.
The nRF52832 was programmed with the BLE_LED_TimerOff.ino sketch. That sketch will serve up a control menu for pfodApp, but you can also use Nordic nRF Toolbox to send the commands to turn the light on, {A} or off {B} or toggle on/off {T} . See Very Simple BLE Power Switch for more an example of using the Nordic nRF Toolbox.
Once the board is programmed you can connect to is using pfodApp. Set up a connection to the BLE Light Switch as described in pfodAppForAndroidGettingStarted.pdf, then when pfodApp connects, your Android mobile will display the following button menu and the current state of the light.

There is also an option for auto-turn off in the sketch which can will turn the light off after up to 8mins (or less, adjustable in code). The sketch also has the option to disable BLE remote control if you just want the auto-turn off feature. Disabling the BLE when not in use removes unused connections showing up on your mobile.
See below for how to test the construction using a safe low voltage.


To safely test the BLE Remote Light Switch, use a 24VAC supply instead of the mains and replace the light with a 12V 100mA bulb and an 82ohm 5W resistor. You will also need to temporarily add a 120K resistor across the R1, 2M7 (or 1M2 for 110VAC) so that the Off current is still >90uA. With this low voltage set up you can use a grounded oscilloscope to check the circuits operation. Once you have tested the circuit, remove the 120K resistor and wire the PCB in behind the light switch.
While this two wire circuit is very convenient for
providing a DC supply for the BLE control module, it does have some
notable characteristics.
1) The full wave bridge rectifier and
FET and Zener must be able to handle the Lamp current. The power
dissipation of these components determines the maximum Lamp wattage
that can be controlled.
2) The full wave bridge rectifier and the
FET must be able to withstand the mains voltage and any transient
voltage spikes.
3) A small current is flowing through the light
bulb when the wall switch if OFF.
Considering these in reverse order:-
When the FET OFF, the 2M7 (for 240VAC) resistor allows <90uA to flow through the light bulb. The real power consumed is <22mW. In the previous project Remote Controlled Light Switch – Retrofit – 2017 this OFF current was a few mA which caused non-dimmable LED light bulbs to flash on and off and dimmable LED light bulbs to glow. Reducing the Off current to <90uA in this circuit avoids these problems, except for very low wattage Led lamps, less than 5W. For 110VAC a 1M2 resistor is used to give <92uA.
For a nominal 240VAC mains supply the peak voltage is 339V. However transient voltage spikes hundreds of volts higher are not uncommon. To protect the FET from Vds breakdown a transient voltage suppression (TVS) diode was added across the input to the bridge rectifier. The TVS diode chosen was 1.5KE530CA, which has a 450V working voltage with <1uA leakage and a 503.50V to 556.50V breakdown voltage (1mA) and a clamping voltage of 725V (2.1A). To match this, the full wave bridge rectifier and the N-FET where chosen with 1000V breakdown voltage.
For a nominal 110VAC mains supply, a 1.5KE300CA can be used, which has a 256V working voltage and a clamping voltage of 414V (3.7). In that case an N-FET with a 500V Vds breakdown voltage can be used. The 1000V bridge rectifier is only US$0.66 so it would be used in this case as well.
When the light(s) are on all the lamps current flows through the bridge rectifier and the N-FET and, in the simplified circuit above, through the Zener. For, say, a 1A rms lamp current (i.e. 240W at 240V or 110W at 110V) the peak current is 1.414A peak and the average rectified current is 0.9A. Then bridge rectifier dissipates ~1.2W (assuming 0.65V avg diode drop), the N-FET (IXTP6N100D2 Ron 2.2ohm) dissipates 2W, while the 7.5V Zener (SMBJ5342B-TP) dissipates 6.75W.
The RMS value of the main sine wave is used to
calculate the rms current for a given Wattage in a resistor (e.g. an
incandescent lamp). A 60W lamp will draw 0.25A rms from a 240V rms
main supply.
The Peak value is the maximum value of the sine wave.
For 240Vrms the peak voltage is sqrt(2) * 240 = 1.414*240 = 339V. For
0.25A rms the peak current is 0.35A.
The
Average value is used in DC and rectified circuits (like this one).
It is the average over the rectified sine wave. For 1A rms the
average rectified current = Peak Current * 2 / pi = 1.414*1*2/3.142 =
0.9Aavg
Of these three components the 7.5V Zener has the highest dissipation. Not only does it exceed its 0.78W at 80C (1.5W at 15C) ambient rating, but has a significant impact on the efficiency of the over all circuit. In a 240VAC system the loss of 7.5V across the zener represents 3.5% rms voltage loss. To overcome this a P-FET is added to bypass the Zener most of the time and only turn it on for a fractions of a ms every 4ms to recharge the BLE's supply capacitor.
One of the nRF52832's ADC inputs is used to monitor the voltage on the supply capacitor to control the Zener bypass. The P-FET is a DMG2307LQ. Its Ron is <0.1ohm for a dissipation of <0.1W at 1Arms. Using the standard PCB pads, DMG2307LQ's thermal resistance is 159C/W junction to ambient. Allowing for 80C ambient and a maximum junction temperature of 150C gives 0.45W maximum allowable dissipation, so that P-FET is suitable.
The on time for the Zener varies with the load
current. For load currents >0.3A rms, i.e. 75W/240VAC or
35W/110VAC, the on pulse is 156us every 3ms => 0.052 duty
cycle.
For an 80C ambient, the allowable zener wattage is 0.778W
(Fig 1 on the data
sheet). 0.778W at 7.5V +5% tolerance = 0.0988A avg. With duty cycle
of 0.052 => 1.9A avg => 2.1A rms allowable load current. This
sets the approximate upper limit on the lamp current due to the
Zener.
The other point to consider for the Zener is that there is ~320ms delay in starting up the nRF52832 BLE module. That is the time between applying power and running the setup() code. To prevent the Zener carrying the full lamp current for that time, R3 (330K) turns the FET off as soon as the 3V3 volt regulator is enabled and starts the BLE board power up sequence. So the Zener needs to only carry the current long enough to charge up the supply capacitors, i.e. about 0.1sec. The maximum surge current (Fig 5) shows the SMBJ5342B-TP 7.5V Zener can handle about 6A for 0.1sec. That is 6A average == 6.7A rms. This sets the approximate upper limit on the lamp turn on surge current.
Finally any Zener above 5.6V would be sufficient to drive the U$6 and U$5 gates. A 7.5V Zener was choose to store more charge on the 100uF supply capacitor to be used by the nRF52832 BLE module when transmitting BLE responses. The 7.5V Zener also maintains it voltage at very low currents, <10uA. A 5.6V Zener do not perform as well at very low currents and Zeners below 5.6V do not maintain their voltage at low currents.
As a design decision, no heat sinks were added to any of the components. From the Average Rectified Current graph for KBP210G, at 80C ambient, the allowable average current is ~1.6A = 1.78A rms. This sets the approximate upper limit on the lamp current due to the bridge rectifier.
The final component is the N-FET. Here you have a choice to pay for a lower Ron to handle higher currents. For 1000V Vds the choices are 10ohms for US$3.20, 6ohm for U$3.60, 2.2ohm for US$9.75 and 1.5ohm for US$18.40.
Assuming ~50C/W for Rth junction to ambient for TO-220 cases styles and max Tj of 150, gives a maximum allowable dissipation at 80C ambient of 1.4W.
For a 240VAC mains supply FETs with 1000V Vds are used. They are a 6ohm device that is 0.26Arms (62W lamps at 240VAC), for 2.2ohm it is 0.707Arms (170W lamps at 240VAC) and for 1.5ohm it is 1.04Arms (250W lamps at 240VAC)
All of these current limits are less then the bridge rectifier limit so the chosen N-FET sets the maximum lamp wattage for a 240VAC system.
For 240VAC, the preferred N-FET is the 2.2ohm IXTP6N100D2 which would handle up to about 170W / 240VAC
For a 110VAC mains supply a 500V N-FET can be used and the choices are 4.6ohm => 0.34Arms (37W / 110VAC) for US$2.60, 2.3ohm => 0.67Arms (74W / 110VAC) for US$3.20, 1.5ohm => 1.04Arms (114W / 110VAC) for US$4.07 and 0.55ohm => 2.8Arms (310W / 110VAC) for US$9.80.
The current limit for the 0.55ohm N-FET exceeds
the current limit for the bridge rectifier. So the limit is 1.78Arms
set by the bridge rectifier.
110VAC –
For the IXTP6N50D2
500V 0.55ohm N-FET in a 110VAC system, the
controlled lamp load should be less than 195W (limited by the bridge
rectifier)
There is a free pfodDesigner app which allows you to design multi-level menus for pfodApp and then generates the code for the nRF52832 modules. See Generating the BLE nRF52832 Low Power Code in Very Simple BLE Power Switch for the basic sketch with on/off buttons.
The BLE_LED_TimerOff.ino sketch includes an optional turn off timer. Setting OFF_TIME_MS to non-zero will enable to auto-turn off feature. You can also disable the BLE connection by commenting out the #define BLE at the top of the file. Do this if you just want the auto-off timer function and don't need BLE control. This will get rid of the un-used BLE connection showing up on your mobile.
The Zener on pulses (i.e. when it is not bypassed by the DMG2307LQ P-FET) are calculated each ADC cycle which measures the voltage on the capacitors. The ADC cycle is 3ms which is not an exact sub-interval of either 50Hz or 60Hz and so the ADC sampling point moves through the AC waveform, turning the Zener on at different points in the AC cycle. This suppresses the flicker that would otherwise occur if the Zener reduced the AC voltage by 7.5V at regular intervals.
Note the Lamp will always flash once when the mains power is re-connected. The Zener is initially on for ~0.1sec until the capacitors charge up and R3 turns it off while the nRF52832 initializes itself. Then the setup() code turns the Zener back on.
The Zener on time is adjusted to is adjusted to maintain the capacitor voltage between about 6.6V and 6.1V.
When the lamp is turned on, the Zener on time starts at 156us then every 30ms the on time is doubled if the capacitor voltage is still falling. Once the capacitor voltage reaches the upper voltage level, the Zener on time is adjusted in quarter steps (i.e. current pulse length times (1+ ¼) or times (1 – ¼)) with the aim of keeping the capacitor voltage above the upper value. Because the BLE chip draws power in uneven lumps, a number of delays have been added prevent the zener on time responding to these dips in voltage due to the spikes in BLE current. See MAX_LOW_CYCLE_COUNT etc settings in the code.
As well as optimizing the efficiency of the circuit, the Zener on pules adjusts for change in resistance in incandescent lamps as they heat up.
In this latest code, the Zener turn on pulses are not controlled by spinning delays in the Arduino code, which block other code from executing and increase the nRF52832's supply current. Instead the Very Low Power BLE support has been modified to support very short non-blocking timers down to 30.5us. Using these timers the nRF52832 sleeps while the timer is running, reducing the supply current.
The BLE name can be set at the top of the sketch
const char bleName[] = "BLE Light Switch"; This sets the name the BLE module will advertise itself as and also sets the name shown below the button on the pfodApp screen.
This project allows existing homes to be easily retrofitted with remote controlled lights. No addition wiring needs to be run. The existing wall switches continue to provide a manual On/Off override and the remote still works when the wall switch has been switched off.
The cost of the remote is about the same as one Phillips smart bulb, but the BLE Remote light switch can control multiple bulbs from the one remote making much cheaper then the Phillips alternative. Also unlike the Phillips alternative, turning off the lights from the wall switch does not disable the remote turn on.
AndroidTM is a trademark of Google Inc. For use of the Arduino name see http://arduino.cc/en/Main/FAQ
The General Purpose Android/Arduino Control App.
pfodDevice™ and pfodApp™ are trade marks of Forward Computing and Control Pty. Ltd.
Contact Forward Computing and Control by
©Copyright 1996-2020 Forward Computing and Control Pty. Ltd.
ACN 003 669 994