
|
Home
| pfodApps/pfodDevices
| WebStringTemplates
| Java/J2EE
| Unix
| Torches
| Superannuation
|
| About
Us
|
|
|
Android control of Non-Arduino based micros
|
by Matthew Ford 31th July 2016 (originally
posted 28th January 2016)
© Forward Computing and
Control Pty. Ltd. NSW Australia
All rights reserved.
This page describes how to use the free pfodDesignerV2 to create menus and charts for your non-Arduino based micro project. These menus and charts are then displayed by pfodApp on your Android mobile. No Android programming required. Half-Duplex operation is supported if your hardware/software does not support Full-Duplex.
First some background, then a detailed discussion of what you need to do in general to modify the pfodParserC library for your microprocessor so that you can use pfodDesignerV2 to generate your own menus. Finally two detailed examples are presented using a bare PIC18F14K22 processor and an Adafruit BLE communication module, although you can easily replace the BLE module with a Bluetooth Classic module or an inexpensive WiFi module. The examples are turning a Led on and off from your Android mobile, and sending data back to your mobile for logging and plotting.


pfod (Protocol For Operation Discovery) was developed in 2010 on a J2ME phone (Samsung C3110) to control an LED flash light. The first implementation of a pfodParser was in ASM on an Atmel Atiny84 8bit microprocessor. As the conclusion says
Under the pfod protocol, the pfodDevice™ advertises its capabilities to the pfodApp™ so the same pfodApp can be used to control any pfodDevice. The pfod protocol is very simple with minimal message structures and is readily implemented by small micro-processors ...
While pfodApp has moved on to Android and the pfod protocol has expanded to include addition features like menu caching and sliders and charts and additional formatting of fonts sizes and colours, the parser needed on the microprocessor is still very simple.
The latest version of pfodDesignerV2 (V2.0.2180+), which lets you design menus and charts on your Android mobile in a WYSIWYG fashion, now generates C code (C++ compatible) that can be readily used in any small microprocessor to render that menu on pfodApp and handle the user's inputs to control your micro. Check out the detailed pfodDesignerV2 tutorials on this page for how to design pfodApp menus and generate the code. Select the C Code target from the Generate Code screen.
pfodDesignerV2 also supports Unicode characters so you can design non-english menus and include special symbols such as ℃ To enter Unicode into pfodDesignerV2, type in \uxxxx, e.g. \u2103 which will be immediately replaced with the actual symbol i.e. ℃ , provided your Android mobile has the appropriate font installed. When pfodDesignerV2 generates the C code it outputs the Octal representation for the bytes that make up this Unicode character. e.g. \342\204\203. This page, Using Non-ASCII chars in Arduino and other micro-processors, has a Java program that also does this conversion.
The pfodDesignerV2 does not cover all the pfod messages or all the options. For the complete pfod message specification see the pfodSpecification.pdf.
The pfodParserC Library consists of three (3) C code files and their associated header files, pfodParser.c, pfodParserStream.c and pfodMenu.c. pfodParser.c parses the incoming messages from pfodApp and does not change. The pfodParserStream.c files needs to be customized for your microprocessors UART implementation. The third file, pfodMenu.c is generated for you by pfodDesignerV2 and contains the menus and sub-menus definitions and the main command switch statement to handle the parsed messages from pfodApp.
The pfodParserC Library page contains a zip file and installation instructions for these files. Those files are based on a PIC18F14K22 using the MPLAB IDE. The necessary customization of the library for your particular microprocessor is covered below. If your microprocessor is programmed by the Arduino IDE then an Arduino version of the library is also available.
The pfodParseC Library uses about 84 bytes of RAM and a few kilo-bytes of Program. As you can see the RAM usage is very modest. The program space depends on the compiler and optimization settings.
i) Modify the pfodParserStream.c file to work with our micro's I/O so you can send and receive bytes.
ii) Don't touch pfodParser.c at all. It does not change
iii) Use the free pfodDesignerV2 to design the menu you want and then generate a pfodMenu.h and pfodMenu.c files. Replace any existing files with these new ones
iv) Only use the variables and methods exposed in pfodMenu.h in your code (main.c)
v) Connect a communication module, Bluetooth, Bluetooth LE or WiFi, and use the pfodApp to control your board and log and plot data from it.
Once you are familiar with pfodSpecification.pdf you can make manual changes to the pfodMenu files outside the pfodDesignerV2
As mentioned above the pfodMenu.c and its header are generated for you by the pfodDesignerV2 by using the C Code target when generating the code for the menu you have designed. The pfodParser.c and its header are constant across the microprocessors. It is only the pfodParserStream.c file that you need to customize to your particular microprocessor and compiler.
The pfodParserStream file handles the I/O for the parser and menu. It only has four (4) methods:-
size_t pfodParser_TXfree(void);
int pfodParser_write(uint8_t c);
size_t pfodParser_RXavailable(void);
int pfodParser_read(void);
The pfodParser uses the pfodParser_read() and pfodParser_RXavailable() to get the bytes to parse from the communication channel module (Bluetooth, BLE, WiFi), usually via the microprocessor's UART. The pfodParser_printXX() methods use the pfodParser_write(uint8_t) and pfodParser_TXfree() methods to write data back to the pfodApp.
Because each microprocessor and each circuit has different ports/UARTs/ISP connections to the communication module, you need to first customization the implementation of these four methods to suit your particular set-up.
Here is a typical implementation. (MPLAB / PIC18F14K22 / UART with STDIO redirect)
/**
 * This is the interface to the i/o
 * Modify this file to suit your serial/uart connection code
 *
 */
#include "pfodParserStream.h"
#include "mcc_generated_files/mcc.h"

extern uint8_t pfodParser_connected; // set true (1) when {.} parsed, set false (0) when {!} parsed.

/**
 * return space available for write();
 * @return bytes free, if space is available any non-zero return will do
 */
size_t pfodParser_TXfree(void) {
    return eusartTxBufferRemaining;
}

int pfodParser_write(uint8_t c) {
    if (!pfodParser_connected) {
        return 1;
    }
    while (pfodParser_TXfree() == 0) {
        // spin
    }
    putch((char)c); // spins if no space available
    return 1;
}

/**
 * return bytes available to read(void)
 * @return bytes available, if bytes are available any non-zero return will do
 */
size_t pfodParser_RXavailable() {
    return eusartRxCount;
}

int pfodParser_read(void) {
    while (pfodParser_RXavailable() == 0) {
        // spin
    }
    return (int)getch(); // spins if not data available
}
In the above example code, MPLAB IDE provides two variables to use for pfodParser_TXfree() and pfodParser_RXavailable() and setting STDIO redirect in the UART configuration, links putch(uint8_t) and getch() to send and receive bytes to the UART.
You need to provide similar support in your microprocessor. You don't need to have a hardware UART, although that is desirable. You can use a half-duplex software UART implementation or an ISP interface. (See below on how to reliably use a half-duplex software UART)
In general, the code avoids the newer C99 features.
The exception is uint8_t. If your compiler does not recognize
this type add the following typedef to the top of each file
typedef
unsigned char uint8_t;
That's all the customization necessary to use pfodParser in your code. See below for how to debug your customization.
Once you have customized the pfodParserStream.c file for your set-up, you will want to action the user's commands in your program and perhaps send back some data for logging or plotting.
Your main.c file will typically look something like this.
// other header includes
#include “pfodMenu.h”

void main() {
  // initialize your microprocessor, clock settings, interrupts, I/O
   . . .

  pfodParser_setup();  initialize pfodParser

  while (1) {  // loop here doing your stuff
    pfodParser_parse();   // call this each loop the parse incoming messages and set the pfodParser global vars with user data and send back menus and data (if any)

    //  you other loop code here which uses the variables set by pfodParser to control your hardware.
  }
}Looking at a simple menu design that just turns a led on and off. (There is also a full MPLAB example to turn a Led on and off)

pfodDesignerV2
generates the following pfodMenu.h
file (as well as the pfodMenu.c file). As you can see this file is
C++ compatible in case your micro development system is C++ based.
/* ===== pfod Command for PIC ====
pfodApp msg {.} --> {,<bg n><b><+3>~PIC Led Control`0~V29|A`0~Led is ~~Off\On~}
 */
/*
 * File:   pfodMenu.h
 */
/* Code generated by pfodDesignerV2 V2.0.2182
 * (c)2014-2016 Forward Computing and Control Pty. Ltd.
 * NSW Australia, www.forward.com.au
 * This generated code may be freely used for both private and commercial use
 */

#ifndef PFODMENU_H
#define PFODMENU_H
#include <stdint.h>

#ifdef  __cplusplus
extern "C" {
#endif

  // global vars set by parser, access and update these in your main program
  extern uint8_t pfodParser_connected; // set true (1) when {.} parsed, set false (0) when {!} parsed.

  extern int cmd_A_var; // name the variable for 'Led is'  0=Off 1=On

  extern volatile uint8_t pfodParser_sendDataFlag; // set this to true (1) to send data, it is reset to false (0) by pfodParser_sendData()
  extern volatile unsigned long plot_X_var; // X axis defaults to an incrementing counter unless your code assigns a value to plot_X_var before each pfodParser_sendData() call.

  void pfodParser_setup(void);   // call this just once
  void pfodParser_parse(void);   // call this very processing loop

  // print support
  int pfodParser_println(void); // skips print if not connected. Blocks if underlying TX buffer full.
  int pfodParser_printCh(char c); // skips print if not connected. Blocks if underlying TX buffer full.
  int pfodParser_printStr(const char *str); // skips print if not connected. Blocks if underlying TX buffer full.
  int pfodParser_printLong(const long l); // skips print if not connected. Blocks if underlying TX buffer full.

  #define PFOD_PARSER_BUFFER_SIZE 18
  //  PFOD_PARSER_BUFFER_SIZE sets the max size msg the parser will store { vers : cmd ` args.. } e.g. {v7:A`1024}
  //  Longer msgs upto 255 can be received and will be parsed but only the first PFOD_PARSER_BUFFER_SIZE bytes will be stored in the parser

#ifdef  __cplusplus
}
#endif
#endif  /* PFODMENU_H */
The first comment shows the menu message that will be returned to the pfodApp when pfodApp connects and asks for the main menu by sending the command {.} The pfodDesignerV2 generates this response for you to match the menu, colours, font size and text you have designed. See the pfodSpecification.pdf for the details. All pfod messages are enclosed by { }
The cmd_A_var holds the user's requested led state, 0 for Off, 1 for On.
So in the while (1) loop of your main code you use this variable to control the led. The LED_RC0.. methods set the micro's output RC0 high or low. The complete code for this MPLAB example is included below.
        if (cmd_A_var) {
            LED_RC0_SetHigh(); //sets RC0 output pin high
        } else {
            LED_RC0_SetLow();  //set pin low
        }
No plots have been defined in pfodDesignerV2, so just the default pfodParser_sendDataFlag and plot_X_var are defined. These will be discussed in the next section and in this example.
The pfodParser_connected variable can be used to control parts of the code that should only run while there is a connection. This is the variable the is used to ignore pfodParser_printXX() calls when there is no connection to pfodApp.
Finally the PFOD_PARSER_BUFFER_SIZE define sets the size of the pfodParser storage buffer. The pfodSpecification.pdf limits the maximum command from the pfodApp to 255 bytes, but the pfod messages your micro sends to the pfodApp are designed so that you always know exactly the maximum size the pfodApp commands can be. Using this information the pfodDesignerV2 can calculate the maximum length of an incoming message for your designed menu and reduce the allocated RAM accordingly. If you manually add other pfod screens, for example a text input screen, you may need to increase this buffer size.
As mentioned above, all pfod messages are enclosed in { }. Any byte sent by your micro (the pfodDevice) outside of { } is raw data and is automatically logged to a file on your mobile. The pfodApp displays the name of this file when you exit. While you can send any raw data you want, including debugging output, if you want to plot your data you need to send it as CSV (comma separated values).
In the pfodMenu.c file there is the pfodParser_sendData() method. If you did not add a chart to your pfodDesignerV2 design then a minimal method is generated for you to fill in manually.
void pfodParser_sendData() {
  // assign values to the global plot variables to be sent here
  if (!pfodParser_sendDataFlag) {
      return;
  }
  pfodParser_sendDataFlag = 0;
  // send plot data in CSV format
  pfodParser_printLong(plot_X_var);
  //  pfodParser_printCh(','); pfodParser_printLong(plot_n_var); // Add extra lines here to send more data
  pfodParser_println(); // end of CSV data record
  plot_X_var++;
}
This method is called at the end of the pfodParser_parse()
method. If pfodParser_sendDataFlag is false (0) then it just
return. Also if the pfodParser_connected is false (0) the
pfodParser_printXX()
methods just return without sending any data.
To send data you need to be connected and you need to set pfodParser_sendDataFlag to true (non-0). When you are connected, each time you set pfodParser_sendDataFlag to true, the next call to pfodParser_parse() will send the data and clear the pfodParser_sendDataFlag to false. Typically you would use a timer in your microprocessor to set pfodParser_sendDataFlag to true at regular intervals.
See the pfodSpecification.pdf for more details on sending data for plotting.
If you add a Chart to your menu in pfodDesignerV2, you automatically get upto 3 plots. You can add more manually if you need. pfodDesignerV2 lets you set labels and hide unused plots and preview the chart. For example if you define a chart with two plots showing.
pfodDesignerV2
generates the following pfodParser_sendData()
method,
as well as a button to show the chart.
void pfodParser_sendData() {
  // assigned values to the global plot variables are sent here
  if (!pfodParser_sendDataFlag) {
      return;
  }
  pfodParser_sendDataFlag = 0;
  // send plot data in CSV format
  pfodParser_printLong(plot_X_var);
  pfodParser_printCh(','); pfodParser_printLong(plot_1_var);
  pfodParser_printCh(','); pfodParser_printLong(plot_2_var);
  pfodParser_printCh(','); // Plot 3 is hidden in pfodDesignerV2. No data sent.
  pfodParser_println(); // end of CSV data record
  plot_X_var++;
}
The pfodMenu.h file is also updated to include the global
plot variables plot_1_var and plot_2_var.
These variable are defined as volatile so they can be updated from a
timer interrupt routine.
// plotting data variables
  extern volatile uint8_t pfodParser_sendDataFlag; // set this to true (1) to send data, it is reset to false (0) by pfodParser_sendData()
  extern volatile unsigned long plot_X_var; // X axis for plot. Defaults to incrementing counter unless your code assigns a value before each sendData
  extern volatile int plot_1_var;
  extern volatile int plot_2_var;
  // plot 3 is hidden
To actually send the data, in your main.c you need to assign some values to plot_1_var and plot_2_var and set pfodParser_sendDataFlag to true (non-0). In this example, timer TMR0 is set up to call the TMR0_CallBack() method once a second. See the MPLAB pfod plotting example for details on configuring a PIC timer. In that interrupt call back values are assigned to the plot vars and the pfodParser_sendDataFlag to true so then next call to pfodParser_parse() will send this data as a CSV record.
unsigned long timeSec = 0;
void TMR0_CallBack(void)
{
    timeSec++;
    plot_X_var = timeSec;
    plot_1_var = 450+600+(rand()%100);
    plot_2_var = cmd_A_var;
    pfodParser_sendDataFlag = 1; // send data once per sec
}
Since TMR0_CallBack() is called from an interrupt, it should be keep as short as possible. Just assign the plot values here, collect and calculate them somewhere else.
Here we are plotting a random value and the current state of the LED.
Your pfodDevice (your micro) cannot force a menu update in pfodApp on your Android mobile. In order to get the menu updated you need to set a menu re-request interval for that menu in pfodDesignerV2. pfodApp will then re-request the menu regularly and display the latest values. For example if some other part of your code turned the Led off, then update cmd_A_var to reflect this and when pfodApp re-requests the menu it will display the updated Led state on your mobile.
pfodApp caches each menu with a revision string. Then when it re-requests that menu, either at the next connection or re-request interval, pfodApp sends its current menu version as part of the request. pfodParser parses this menu version and compares it to its current version and if they match, pfodParser_parse() only send back a short menu update message instead of the full menu.
For example the full menu may be
{,<bg
n><b><+3>~PIC Led Control`0~V26|A`0~Led is
~~Off\On~|B~Plot of Random Data}
but the refresh message is
only
{;|A`1}
V26 is the menu version and the refresh message only sends the current value of the Led, its Off/On setting. This means that while the initial menu may be very long, up to 1024 bytes of text and menu items, it is only sent once and thereafter the much shorter update messages are sent. Because pfodApp saves the cached menu across connection attempts, the full menu is only sent on the very first connection.
The pfodDesignerV2 automatically updates the menu version each time you generate a new set of code. However if you manually update the pfodParser_sendMainMenu() method in the generated pfodMenu.c, you should also change the pfodParser_pfodParser(ver) in the pfodParser_setup() method.
The pfodParser_printXX() are blocking. If there is no space available in the TX buffer, they block until there is. The method pfodParser_TXfree() is used to check if there is any free space. This ensures that no response bytes are lost. Since almost all menu updates are short messages, you only need a small TX buffer to hold the response.
Ignoring sending raw data, i.e. pfodParser_sendData(), the pfodParserC library is Half-Duplex safe. The pfodDevice, your micro, waits for pfodApp to send a command and then sends just one response. pfodApp does not send any other commands while waiting for the response to the pending one.
If your micro has a half-duplex UART, the simplest approach is to not send any raw data or plot data. If you need to send some raw data or plot data then the only safe time to send it on a half-duplex connection is after the pfodParser has finished parsing a command and before it send the response.
For example, in pfodMenu.c, the beginning of pfodParser_parse() is
void pfodParser_parse() {
  uint8_t cmd = pfodParser_parse_RX(); // parse incoming data from connection
  // parser returns non-zero when a pfod command is fully parsed
  if (cmd != 0) { // have parsed a complete msg { to }
    uint8_t* pfodFirstArg = pfodParser_getFirstArg(); // may point to \0 if no arguments in this msg.
    long pfodLongRtn; // used for parsing long return arguments, if any
    if ('.' == cmd) {
      // pfodApp has connected and sent {.} , it is asking for the main menu
      pfodParser_connected = 1; // set this true first to enable parser prints
      if (!pfodParser_isRefresh()) {
        pfodParser_sendMainMenu(); // send back the menu designed
      } else {
        pfodParser_sendMainMenuUpdate(); // menu is cached just send update
      }
Once cmd != 0,
the parser has finished parsing the pfodApp's command and the UART
can start sending without missing any incoming data. Once
pfodParser_sendMainMenu() or
pfodParser_sendMainMenuUpdate() is
called (or any other response is sent), the UART has to stop sending
data and listen for a new command from pfodApp. So if your hardware
only has a Half-Duplex UART, you can safely send raw data or CSV
records immediately after the statement cmd != 0
statement. i.e. insert a call to
pfodParser_sendData() there
and remove it from the bottom of the pfodParser_parse()
method
  if (cmd != 0) { // have parsed a complete msg { to }
    pfodParser_sendData(); // safe to send data here if half-duplex UART
Of course this means that you can only send raw data when the pfodApp sends a command, so set a re-request interval for this menu so that pfodApp regularly re-requests the menu and allows you to send raw data.
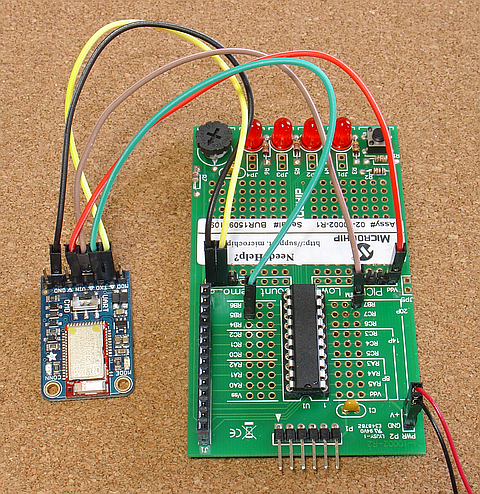
Here are two examples using MPLAB to program a PIC18F14K22 via PICkit3. The first one turns a Led on and off. The second one sends data back to the pfodApp for logging and plotting. They use an Adafruit Bluefruit LE UART Friend to connect to the Android mobile running pfodApp via BLE. However you can use any Bluetooth Classic, Bluetooth LE or WiFi connection. For example a SparkFun Bluetooth Mate Silver for Bluetooth Classic or a ESP8266 WiFi base board like Adafruit HUZZAH ESP8266 Breakout when loaded with UART to WiFi server bridge code from this project.
This tutorial showed how to implement the pfod parser on a bare (non-Arduino) microprocessor. The pfodDesignerV2 makes the menu design and datalogging and plotting easy and generates the necessary microprocessor C code. Using pfodApp means that no Android programming is required. Once you have customized the pfodParserStream.c file for your hardware's communication I/O, you only need to cut and paste the pfodDesignerV2 generated code into the pfodMenu.h and pfodMenu.c files. The pfodMenu.h header provides a simple access to the variables being set from the user's mobile.
AndroidTM is a trademark of Google Inc, For use of the Arduino name see http://arduino.cc/en/Main/FAQ
The General Purpose Android/Arduino Control App.
pfodDevice™ and pfodApp™ are trade marks of Forward Computing and Control Pty. Ltd.

Contact Forward Computing and Control by
©Copyright 1996-2020 Forward Computing and Control Pty. Ltd.
ACN 003 669 994