
|
Home
| pfodApps/pfodDevices
| WebStringTemplates
| Java/J2EE
| Unix
| Torches
| Superannuation
|
| About
Us
|
|
|
Offline Compiler Setup for BBC micro:bit
|
by Matthew Ford 8th June 2017 (original
5th July 2016)
© Forward Computing and Control
Pty. Ltd. NSW Australia
All rights reserved.
Update: 21st
December 2106 – Fixing paring
with Pixel
If you are having
problems paring with Pixel or other Android 7.1 mobiles, implement
the 500mS delay shown in this
GitHub pull request #225
There are a number of ways to write and compile programs for the BBC micro:bit. This page covers setting up an offline compiler and docs that will be used to compile the code generated by pfodDesignerV2 ,when its micro:bit update is available, but this setup can also be used for any C++ micro:bit programming. This offline setup does not require any accounts to created and does not require an internet connection once the setup is complete.
This tutorial is based on the Offline C/C++ Development With The Micro:bit Using NetBeans article, (also see Getting Started with Offline C++ on the BBC Micro:Bit and BBC micro:bit Yotta for the setting up Yotta part), but it is modified to work with Netbeans 8.1
It also saves and reuses the downloaded micro:bit
support files from project to project. This has two advantages:-
i)
you avoid downloading ~90Meg of files for each new project
ii) you
get a consistent set of support files from project to project (with a
consistent set of bugs and limitations)
Here I will be setting up the offline compiler for Windows using Netbeans as the IDE, refer to that article for setting up on Mac and Linux, which are a little easier. It is also possible to use Eclipse as the IDE, but that is not covered here.
Also see Getting Started with micro:bit C++ which covers debugging, fibers and monitors and semaphores.
To download Netbeans IDE for C++ develoment, which is all that is needed here, goto the Netbeans download page and click the download button at the bottom of the C/C++ column, choose either x86 for an 8bit windows version or x64 for a 64bit version depending on your computer. (Try right clicking Computer in the windows explorer and select Properties to see what type of Windows you have).
When the Netbeans download finishes, run the netbeans-8.1-cpp-windows-x64.exe to install it. It will install a Java JRE if needed. The first time I tried to install Netbeans I got an “incompatible JVM” error message, so I uninstalled the previously install JRE's and re-ran the Netbeans exe which worked.
On opening Netbeans for the first time I was prompted to update a number of plugins. Restarting Netbeans installed the updates.
Yotta is the build system used to micro:bit C++ programs. Download the Yotta Installer (yotta_install_v023.exe in my case). Run the exe after it downloads. It installs to C:\yotta
When you get to the Choose Components screen, check the mbed serial drive as well as the ones already ticked. Windows needs a serial driver, Mac OS and Linux do not.
You need to have a micro:bit board plugged in in order to install the mbed serial driver. If you don't have a board yet, just cancel the install you can do it later by running C:\yotta\mbedWinSerial_...exe The latest serial driver is also available from here. See Serial connection via USB below.

There
was a note about a pip upgrade, which I ignored. Lots of packages get
download during the install, so it may take some time.
micro:bit also need a utility called srecord You can down load the zip file (srecord-1.63-win32.zip) from https://sourceforge.net/projects/srecord/files/srecord-win32/ Then unzip to the yotta directory. Windows explorer will open the zip file and then you can copy and paste all the files to the c:\yotta directory.
There will be a Run Yotta short cut on the desktop (or you can open a command prompt and change directories to the yotta installation directory, c:\yotta (i.e. cd c:\yotta ) and run the batch file run_yotta.bat ) This batch file sets the paths correctly to find all of the programs involved in using yotta.
Following the instructions the Offline C/C++ Development With The Micro:bit Using NetBeans article, run yotta and do the following steps to install the micro:bit support needed.
mkdir
emptyproject
cd emptyproject
yotta init
Accept the defaults for init except to the question Is this an executable answer yes
Then set the
micro:bit target
yotta
target bbc-microbit-classic-gcc
Yotta responds
with
info: get versions for
bbc-microbit-classic-gcc
info: download
bbc-microbit-classic-gcc@0.2.3 from the public module registry
info:
get versions for mbed-gcc
info: download mbed-gcc@0.1.3 from the
public module registry
Then install the microbit support using the cmd
yotta
install lancaster-university/microbit
This can take a while to download the support code. Note: You may be prompted to sign up/login to the MBed website to download the code. Just ignore that.
info: microbit,
lancaster-university/microbit
info: get versions for
microbit
info: download microbit@v2.0.0-rc4 from GitHub
lancaster-university/microbit
info: dependency microbit:
^2.0.0-rc4 written to module.json
info: get versions for
microbit-dal
info: download microbit-dal@v2.0.0-rc4 from GitHub
lancaster-university/microbit
-dal
info: get versions for
mbed-classic
info: download mbed-classic@microbit_hfclk+mb5 from
GitHub lancaster-university/
mbed-classic
info: get versions
for ble
info: download ble@v2.5.0+mb3 from GitHub
lancaster-university/BLE_API
info: get versions for
ble-nrf51822
info: download ble-nrf51822@v2.5.0+mb6 from GitHub
lancaster-university/nRF51822
info: get versions for
nrf51-sdk
info: download nrf51-sdk@v2.2.0+mb4 from GitHub
lancaster-university/nrf51-sdk
Stop at this point
Using the standard install instructions you would be downloading the lancaster-university/microbit files every time you started a new project. This would require you to be on-line and use up downloads each time. You can avoid this by copying from your emptyproject. (Of course you may want to downloaded the support files every now and again in order to get the latest updates.)
To create a new project,
create a new directory, say pfodtest in the same directory as the emptyproject directory. NOTE: The new directory name MUST start with a lowercase letter followed by lowercase letters or numbers.
copy all the contents of the emptyproject to the new pfodtest directory.
In the pfodtest directory, open the module.json file and edit the name: entry to “pfodtest”
{
  "name": "pfodtest",
  "version": "0.0.0",
  "bin": "./source",
  "private": true,
  "author": "",
  "license": "Apache-2.0",
  "dependencies": {
    "microbit": "^2.0.0-rc4"
  }
}
To complete the new project setup, create a
file, say main.cpp,
in the pfodtest/source
directory. Note: There in nothing special about the name of main.cpp,
you can call this file anything you like. The sample main.cpp
file just displays “HELLO
WORLD!” once on your
micro:bit
Finally go back to the yotta cmd window and change directory to your new pfodtest directory and do an initial build
rem
move out of emptyproject dir
cd ..
rem then change dir into the
new project dir
cd pfodtest
yotta build
-- Build files have been written to: C:/
../pfodtest/build/bbc-microbit-classic-gcc
[159/159] Linking CXX
executable source/pulse
Under the C:/
../pfodtest/build/bbc-microbit-classic-gcc/source directory you will
find the pfodtest-combined.hex file
which is the one you want to download to your micro:bit
Note
the ...-combined.hex file is in the /source sub-directory of
…./build/bbc-microbit-classic-gcc
You need only do this step once. Once you have performed this IDE setup, next time you start a new project you can go to Creating a New Project in Netbeans
Now that you have your new project built for the first time using yotta build you can integrate it with Netbeans.
First you need to add the yotta install directory, C:\yotta, to the system path. (Edit system environmental variables) use ; to separate it from the existing paths.
You also need to install nmake for windows from http://gnuwin32.sourceforge.net/packages/make.htm Download the complete package, except sources. Run the downloaded exe, make-3.81.exe to install it.
Note: These steps in Netbean 8.1 are a little different from the article.
Open Netbeans and open Tools->Options. Click on the C/C++ tab. Click on the Build Tools tab. Then click the Add.. button
Fill in the base directory as shown. Then select Family as GNW Cygwin, then re-select it back to Unknown. Then enter the tool name ARM microbit

Click
OK and then enter the compiler paths as shown below.

Then
click Apply to save these settings and OK to close.
Use File-> New Project and select a C++ project with existing sources. Then browse to pfodtest\build\bbc-microbit-classic-gcc directory as the folder containing the sources.
NOTE this NOT where you created the main.cpp file, it is the \build\bbc-microbit-classic-gcc directory created by the yotto build command.
Set the Tool Collection to ARM_microbit and click Finish

Netbeans
will automatically start a build. You can then open the source
main.cpp file and edit it in Netbeans and use netbeans Build (hammer)
or Clean and build buttons (hammer and broom) to rebuild the project.
Netbeans code highlighting will/may show some include files as referencing missing includes. This is a bug in Netbeans. If the project builds and links without errors then all is OK and you can ignore these highlighted includes.
By
default, the Netbeans build shows warnings for unused parameters in
methods. Event handlers often do not use their MicroBitEvent
parameter and this raises a number of warnings. To suppress these
warnings, and document that the parameter was not meant to be used,
add the UNUSED macro. i.e. at the top of your code file add the
define
#define
UNUSED(x) (void)(x)
then in the method add
void
onConnected(MicroBitEvent e) {
UNUSED(e);
Often you only need one .cpp file, the main.cpp, but if you need add another file you will need to re-run the yotto build (once) to update the Netbeans build process.
When adding new files DO NOT just use the Netbeans File New-> command because, by default Netbeans will NOT put your new file in the pfodtest/source directory.
Instead you need to first initialize the Netbeans' New File source folders to include your pfodtest/source.
Navigate to your source folder.

The right click and click on Add Existing Items from Folders..

Navigate
up the folder tree to the pfodtest directory.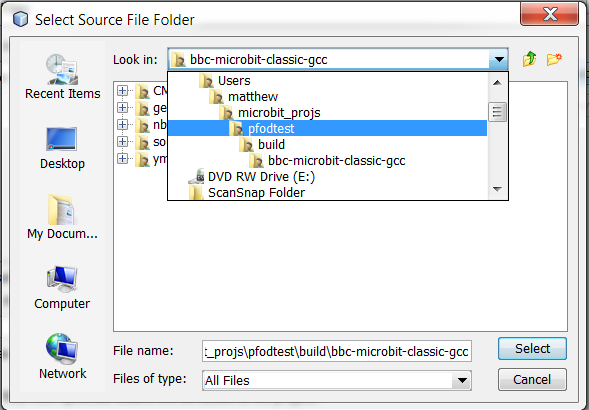
Then click Add to add that folder. That initializes Netbeans with this directory as a 'source' directory for adding new files.

Now
you can use Netbeans File->New File (or right click on the
pfodtest/source directory)

To
add a new file.
Note: At the Name and Location step, hit the drop down list under Folder: and choose the pfodtest\source dir.

Finally you need to open the yotta cmd window again
and run
yotta build
to update the build process to
include the new files you have added in the pfodtest\source dir. You
only need to do this once for each new file you add, there after you
can use Netbeans build ('hammer') to rebuild the project until such
time as you add another source file.
Unfortunately ALL Netbeans micro:bit projects are call bbc-microbit-classic-gcc, to you have to look at the source directory to see which one you are actually using. This is a problem when you go to re-open an existing project among many. You can avoid this problem by defining a new Project Group for each project.
Once you have imported your project into Netbeans, use File → Project Groups... to open the Manage Groups window.

Click
New
Group.. to
create a new group and give it the name of your project. The ticked
Use
Currently Open Projects will
ensure your current project is added to this new group

Click
Create
Group to
complete the process.
Then
to switch between projects, use File → Project Groups... and in
the Manage Groups window select/double click the project you want to
work on.
Then use File → Open Recent Project to open one and
only the bbc-microbit-classic-gcc project in this group.
If
you don't use Project Groups you will need to open the particular
project manually. Navigate down to the code's
build/bbc-microbit-classic-gcc subdirectory and open the netbeans
project stored there.
The source code and examples and doc for micro:bit C/C++ programming is available from lancaster-university github. The latest version of the microbit C/C++ docs is available from the Lancaster University microbit site.
Netbeans lets you navigate to the source code of the class by pressing the Ctrl key and clicking on the name. Tip: If this does not seem to work do a full clean rebuild (hammer with the broom) to rebuild Netbeans code links.
You can download a zip file of the C++ docs from https://github.com/lancaster-university/microbit-docs and unzip this folder, microbis-docs-master. These docs are in .md files and so should be processed into webpages. For this you need to install (another) package, mkdocs (http://www.mkdocs.org/)
To install mkdocs, open a command
prompt and run
pip
install mkdocs
When that is finished, change
directory to the microbis-docs-master directory (where the mkdocs.yml
file is) and build the 'site' html files by running mkdocs
build
That will create a site sub-directory with the html doc files. Open the docs via the index.html file.
See Step 3 on https://www.microbit.co.uk/device/usb but note the file name below.
The file you need to flash onto the micro:bit is pfodtest-combined.hex Note: You need to manually rebuild each time you edit the code. Use the “Hammer” icon in Netbeans. Netbeans will automatically save the file you have edited.
Connect the board to your computer using a micro-USB cable.
The board is shown as removable storage. Drive D: for example
From your file explorer, drag and drop the file
onto the board. I.e Find the pfodtest-combined.hex file
under the C:/ ../pfodtest/build/bbc-microbit-classic-gcc/source
directory and copy and paste or drag to the micro:bit drive.
Note
the ...-combined.hex file is in the /source sub-directory of
…./build/bbc-microbit-classic-gcc
The application is now on your board and should start working immediately. Note that some boards need a reset.
Dragging and dropping the ...-combined.hex file replaces any existing code on your micro:bit. If you want to restore your micro:bit to its original condition you can load it with the hex file given on this page.
The mbed serial port works by default on Mac and Linux, but Windows needs a driver. You can download the drive from here.
With your micro:bit usb plugged in, and no explorer drive windows open, run the installer. That is close your window's file explorer, open the driver page in your browser, click Download latest driver, then double click the downloaded file to run it. In Chrome the downloaded file is shown at the bottom of the browser window, just double click it to run it.
It will take some time (especially
on Vista), and pop up a few 'unsigned driver' warnings, but after a
while you should have a Serial port. If the Serial port does not
appear check out the 'Troubleshooting'
section on this page.
Make
sure you run the installer for every micro:bit board. Windows loads
the driver based on the serial number, so it needs to be run for each
micro:bit you use.
Serial Communication with a PC provides information on setting up a terminal, TeraTerm for example, and some example serial programs. Note: the default USB Serial baud rate 115200, 8N1 (8 bits, No parity, 1 stop bit).

Note:
The default buffer size is only 20 bytes (one bluetooth LE packet)
Various aspects of the micro:bit C++ code can be changed via a config.json file in the project directory. This page as a sample config.json file will all the configuration options listed.
Here is a smaller config.json file that removes the bluetooth paring code, i.e. open paring and disables OTA programming and the device info service. Open pairing is useful at home for development as you don't need to use the special Samsung BBC micro:bit app to pair your micro:bit with your Android phone. Open pairing is not so good in a classroom situation because it allows every one to see and pair with your micro:bit. Disabling OTA programming and the device info serivce frees up space for the bluetooth UART service that pfodApp. Since you are loading the code via the USB cable you don't need the OTA service.
Place this file in the top level project directory
e.g. …/pfodtest dir. (Your main.cpp is in
…/prodtest/source subdirectory of pfodtest.) The open the
yotta cmd window again and run
yotta build
You
will know if you have the config.json file in the correct directory
because yotta build will
rebuild lots of support .cpp files with the new config.
Note: If using the Samsung BBC micro:bit app to pair, you need to un-pair and re-pair after each program change. The pair pin is 6 digits and you need to press the reset button after pairing to restart the program and install what ever BLE services you have coded.
You can’t drag and drop more than one hex file at once onto your micro:bit. If you try to drag and drop a second hex file onto your micro:bit before the first file has finished downloading, then the second file may fail in different ways. When the first program has been written to the micro:bit, the drive will disengage. If you drag and drop a second file at this point it may not find the drive and the second write will fail. It may appear that there are two hex files on your BBC micro:bit so the micro:bit won’t be able to run multiple files.
To rectify this, unplug your micro:bit and plug it in again. Make sure that your micro:bit appears as MICROBIT and not MAINTENANCE.
If your micro:bit will not leave maintenance mode, then you may need to update or replace the firmware on the board, as described below.
You normally won't need to do this.
To update your firmware you need to be in MAINTENANCE mode. You can enter MAINTENANCE mode by:-
Unplug the USB cable from the micro:bit
Hold down the micro:bit reset button
While still holding down the reset button, plug the USB cable back in.
Your micro:bit will now show as a drive called MAINTENANCE instead. You can find the version in the 'version.txt' on the micro:bit.
If your micro:bit will not leave maintenance mode, then you may need to update or replace the firmware on the board by following these steps:
1. Download the newest firmware from this page (currently version 0234 as of 7th July 2016)
2. Unplug the micro:bit.
3. Press and hold down the reset button next to the USB connector.
4. The micro:bit will power on. Your computer's file browser will list it as a mass storage device called "MAINTENANCE".
5. Copy the firmware hex file you downloaded in step 1 to the "MAINTENANCE" device.
6. Wait until the drive dismounts and the system (orange) LED is flashing continuously.
7. Unplug the micro:bit and plug in again, and the board should enumerate as a MICROBIT.
The General Purpose Android/Arduino Control App.
pfodDevice™ and pfodApp™ are trade marks of Forward Computing and Control Pty. Ltd.

Contact Forward Computing and Control by
©Copyright 1996-2020 Forward Computing and Control Pty. Ltd.
ACN 003 669 994